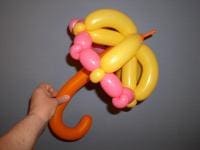
April Showers
Patricia Bunnell
 |
 |
 |
| Step 1 | Step 2 | Step 3 |
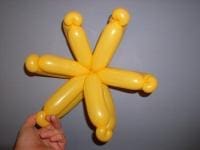
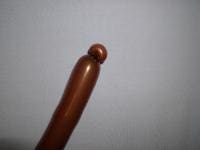
Step 1: Inflate a Goldenrod 260q balloon leaving about a 6″ tip. Make a 3 bubble cluster starting with a 6″ bubble followed by a 1″ pinch twist and then a 4″ bubble.
Step 2: Lock twist at knot. Roll the knot to prevent it from un-twisting.
Step 3: REPEAT two more times.
 |
 |
 |
| Step 4 | View from underside | Step 5 |
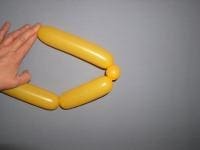
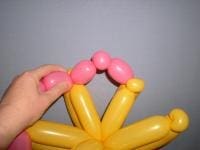
Step 4: Take one more Goldenrod 260q balloon and repeat steps 1-3. Twist the two balloons together in the center.
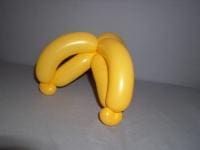
Step 5: Inflate a Rose 260 leaving an 8″ tip. Twist the knot of the balloon around one of the pinch twists. Make a cluster of 3 bubbles starting with a 1-1/2″ bubble, followed by a small pinch twist and finish with another 1-1/2″ bubble. Twist the last bubble around the pinch twist.
 |
 |
 |
| Step 6 | View from underside | Step 7 |
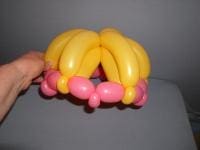
Step 6: Repeat the 3 bubble cluster around the remaining pinch twists.
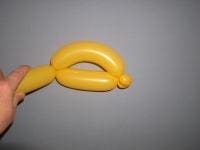
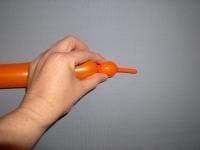
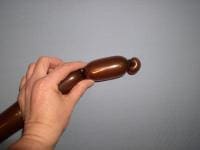
Step 7: Inflate an Orange 260q leaving a 1-1/2″ tip. Make a small bubble at the tip end of the balloon.
 |
 |
| Step 8 | Step 9 (Optional) |
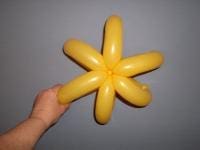
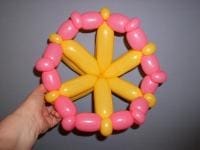
Step 8: Wedge the small bubble in the center of the umbrella. Adjust all the pinch twists.
Step 9: For the Awwwwwe factor add raindrops using Diamond clear 160q by making teeny bubbles at the end of the balloon. Wrap around the pinch twists.
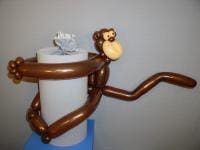
BONUS CREATION
MONKEY HAT
 |
 |
 |
| Step 1 | Step 2 | Step 3 |
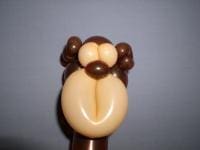
Step 1: Inflate a brown or mocha 260 balloon leaving a 3″ tip. Make a small pinch twist on the end. This is the nose.
Step 2: Make a soft 2″ bubble. This becomes the back of the head.
Step 3: Make a teddy bear head. Make the first bubble 1-1/2″ followed by a 1/2″ bubble, a 1″ bubble, another 1/2″ bubble and finish up with a 1-1/2″ bubble. Lock twist at the base of the soft 2″ bubble.
 |
 |
 |
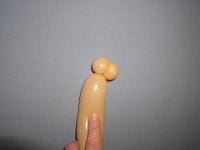
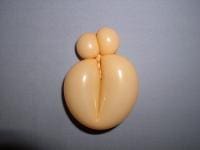
| Step 4 | Step 5 | Step 6 |
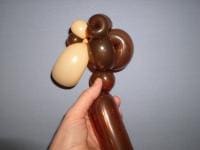
Step 4: Inflate a blush 260 balloon leaving a 10″ tip. Make two small bubbles and lock twist them. Roll the knot through to prevent it from un-twisting.
Step 5: Make a 4″ loop. Tie the knot end of the balloon to the loop twist and discard the rest. This becomes the monkeys face.
Step 6: Twist the small pinch twist from the first balloon around the eyes.
 |
 |
 |
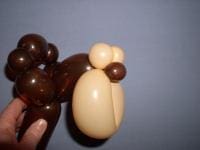
| Step 7 | Step 8 | Step 9 |
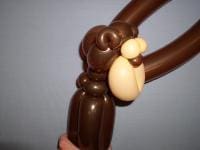
Step 7: Wedge the soft 2″ balloon between the “teddy bear head.” Pinch – twist the ears. Center the face.
At this point we will be making my version of Ken Stillmans Hitch Hiker hat.
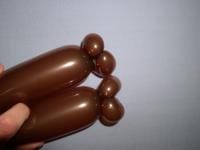
Step 8: Inflate 2 brown 260s leaving a 3″ tip on each. Make two small pinch twists on the ends. Twist them together. This makes the “hands” of the monkey. These 4 pinch twists look like his fingers are locked together.
Step 9: Wrap the arms around the child’s head and twist the arms together. Make 2 small pinch twists to form the shoulders.
 |
 |
 |
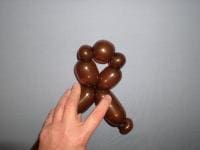
| Step 10 | Step 11 | Step 12 |
Step 10: Make a 1″ bubble for the neck.
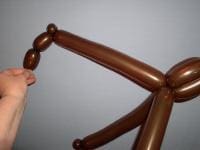
Step 11: Twist it around the double pinch twist we made for the shoulders. To make his body make about a 4″ bubble on all three balloons and twist them together. Now to keep the 3 bubbles from un-twisting, braid them together a few times at the joint.
Step 12: Choose 2 of the balloons to make his legs. The other one becomes his tail. For the legs, make them about 12-14″ long and make a small pinch twist on each leg. On one of the legs, make two 2″ bubbles for the feet.
 |
 |
 |
| Step 13 | Step 14 | Step 15 |
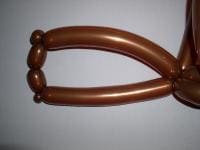
Step 13: Wrap the last 1″ bubble around the pinch twist on the other leg. Discard the remaining ends on both balloons.
Step 14: Bend the legs in half and squeeze at the fold to form the knees of the Monkey.
Step 15: Kink the tail.or make it curl. Add artwork. The legs slip over the child’s head and the arms wrap around his or hear head. I like the legs and feet joined together this way, it keeps the Monkey.s legs on the child’s shoulders better.
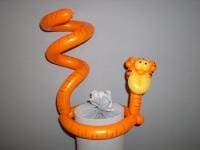
EXTRA BONUS!!!
I was messing around with various colors while making the Monkey and I discovered that if I used an orange and a goldenrod 260 it looked like Tigger.
ENJOY!!!