Easter Egg Bunny
by Ralph Dewey
This last Easter, I was presenting a program to some children at my church.
I first showed them how many people celebrate Easter by hunting for eggs.
I made a typical balloon rabbit in the sitting position. Then by popping a
bubble, it laid an egg. They were surprised when the blue Easter bunny
produced a yellow egg. Then I explained the true meaning of Easter by
explaining how Jesus rose from the grave on Easter morning. The kids
really enjoyed the gospel lesson. I’ll explain how you can make a
balloon rabbit lay an egg. It does require some advance preparation. Here
is how to do it.
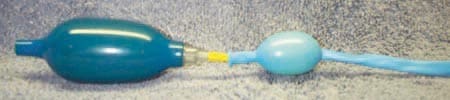 |
| Above photo shows how the yellow egg (from a piece of #160 spaghetti balloon) is inflated inside the #260 pencil balloon. |
Cut a 1-1/2” length off of the nipple end of a yellow #160 balloon.
This will be the egg. I use a pale blue #260 balloon for the bunny. If
you prefer a different color, choose one that is opaque so that the kids
can’t see the egg inside. Inflate the nipple end of the #160 balloon
to about 1” and hold it. Decorate it like an Easter egg by using a
Sanford brand Expo dry marker. Give it a few seconds to dry and then
deflate it. Next, insert it into the nozzle end of the pencil balloon.
Using a squeeze bulb pump, inflate the #160 again to the 1” size. Now
you can tie off the balloon. Make sure that the #160 bubble gets inflates
at the nipple end. Snip the excess balloon from its knot. That must all
be done through the nozzle opening of the #260. Now inflate the #260 fully
except for about 2-1/2” and tie off its nozzle. The white #160 bubble
(the egg) should be floating inside the #260 balloon. Tip the #260 balloon
so that the egg falls downward to the nipple end.
 |
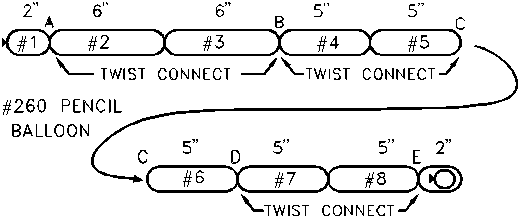
This is how to make the bunny. Twist off a 2” bubble (the head) on
the nozzle end, then two 6” bubbles (the ears). Twist-connect at
points A & B. To make a better bunny face, I often pull the knot to
point A and twist it there. Twist off three 5” bubbles and twist
connect at points B & C. Twist off two 5” bubbles (the rear legs)
and twist connect at points D & E. Remaining should be a 2”
bubble (bubble #9) with the egg in it. To tighten and secure the twist at
bubble #9 better, push it through bubbles #7 & #8. Later when you pop
bubble #9, the rear legs won’t deflate. To make the bunny sit, push
bubbles #4 & #5 down into bubbles #7 & #8. Mark the face. To make
the bunny lay an egg, pinch bubble #9 (the tail) with your fingernails (or
cut it with a pair of scissors) to burst it.
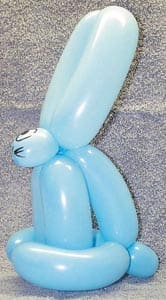
Photo left: shows the completed Easter bunny ready to have the tail
popped to release the yellow Easter egg.