Railroad Track Hat
Michael Philo
Magical Balloon Michael
This month I will finally show you the hat that I promised you for the last two months, which goes really well with the Tom Train I showed two months ago.
Railroad Track Hat
You will need:
4 to 6 Grey 160s
2 Black 260s
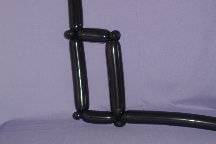
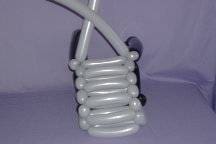
Start by inflating both of the Black 260s leaving about 3″ and burp them. To make the base of this hat is a little tricky but not too bad. Make a 1″ ear twist at the knot end of both 260s. Make a 5″ bubble in both balloons followed by another 1″ ear twist. Make a bubble about 10″ in one of the black 260s and lock it to the first ear twist that you made in the second black 260. Repeat with the other balloon to form a rectangle with a ear twist at each corner that should fit a lot of heads. If you prefer you can measure the hat on the wearer and make that size bubble instead of the 10″ bubble.
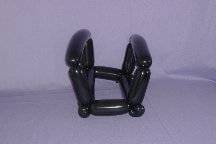
 Make a 4″ bubble, another 10″ bubble and another 4″ bubble. Lock this last bubble to the other side. Repeat on the other side. If you have a tail pop and tie it off. Sometimes it works out perfectly.
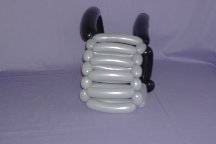
 Inflate two of the Grey 160s leaving about 5″ and tie. Tie each 160 to the front pair of each ear twist. Now make two 5″ bubbles in each 160 and start a flat weave. Now unlike most flat weaves you want to leave 1″ between each set of rungs. You need to go 1″ bubble, 5″ bubble and roll the 5″ bubbles around each other to lock them in place. You should be able to make about 5 rungs with a 1 to 2″ bubble left over and a we bit of tail. Make a 1″ bubble in the leftover and twist it into the ear twist on the top of the hat base. If you have enough balloon leftover in one of the 160s make another 5″ bubble an lock it to the other side to help hold the hat together.
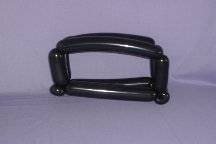
 Inflate two more Grey 160s leaving a 5 to 6″ tail but this time time tie them together and make an ear twist and connect it on the top of your hat base. Make a 5″ bubble in the longer one of the 160s and another 1″ ear twist, lock it on the other side of the hat. (A few changes here and you could have a great semi truck).
 Now continue the flat weave. 1″, 5″ roll together. This time you should be able to make 5 to 6 rungs and lock it to the back set of ear twist. You may have to add more 160s to finish this process.
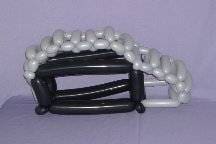
 Now you can leave it this or you can repeat what you did at the begining of the hat to complete the back.
Play with this base as there are a lot of things that can be done with it.
Hope you were able to learn something new.
Michael Philo
Magical Balloon Michael
Instructions online at LaRocksMagic.