International Trade Newsletter Copyright © 2001
Balloons @ WorkTM
*********************************************************************************************************************************
Balloons@Work is produced by Business of Balloons Pty Ltd (ABN 16-076-582-119) in Sydney Australia and published at approved web sites.
Hard copies are not mailed outside of Australia. Readers may print content to use only as trade reference material.
Email:[email protected] Web Site http://www.bizballoons.com.au Phone: 61- 02 – 98981544 Fax: 61 – 02 – 98981580
Post; Balloons@Work PO Box 6868 Parramatta Business Centre NSW 2150 – AUSTRALIA.
*********************************************************************************************************************************
IN THE APRIL ISSUE
* From The Editor’s Desk – Work That Convention! * Pro Tips #72 and #2
* Did You Know? (products, people, trends and trivia) * Hot Air (letting off steam)
* IBAC’s Next Generation. (Will IBAC move?) * Letters To The Editor * Classified Ads
Click Here to Download Newsletter (Windows/Zip)
 G’Day! from THE EDITOR’S DESK G’Day! from THE EDITOR’S DESK
Work That Convention!
So much has happened in the last month! I’m now back in the chair, after a whirlwind trip to IBAC and the Halloween & Party Show in Chicago, and I am “buzzing”. All the hard work in months of planning such a business trip, seems to be coming together nicely. That’s the topic I want to share with you this month. With the huge balloon convention/party show soon in Birmingham (UK), The National Stationery Show in New York City, The Halloween & Party Show in Las Vegas and the ABC in Australia ….. all these upcoming business opportunities to network, do a deal, learn, share, investigate, buy, sell, ….. it’s critically important that every delegate should make the most of every minute at these conventions or trade shows.
Did you notice in my opening paragraph that I didn’t mention the words “fun”, “party” or “socialise”. Why? Because I believe those benefits of making such a business trip (investment), should NOT be included in your commercial decision making process to attend. The fun, parties, sightseeing and social benefits should be considered a BONUS for attending. I refer to the opportunity to take time out during the show to go see the Empire State Building, the Tower of London or play the tables at the Mirage Casino. Conventions and trade shows are about doing business and should be carefully planned as an opportunity to invest in your small business. What exactly do I mean? I’ll give you some examples.
Those who may be planning to attend a convention should be writing an advance schedule for every waking minute during that convention. It’s a big expense to your annual budget so … milk every minute and dollar!
Example #1:- Have a business breakfast every day with someone who can help your business grow. Do the same for every lunch and dinner. If the convention program includes organised formal dinners, plan with whom you would like to be seated at your table , but don’t talk business details at the gala ball!
Example #2:- If you are going to a trade show; find out which companies will be exhibiting. Call the suppliers who interest you, weeks before the show and ask about their new product lines. Then, make an appointment to see them at a specific time at their booth. Most will accommodate your request and you won’t waste time at trade shows. Spend the first day on appointments with your “core” suppliers. The second day browsing unfamiliar (new) product booths.
Example #3:- Prioritise the people and companies you hope to see at the convention. If you are running out of time to stop off at specific trade booths or talk to important individuals, leave your card and a note for them to call you after the show. Leave it at their booth or at the reception desk of the hotel where they are staying. The important thing is to MAKE PERSONAL CONTACT! Somehow, make them familiar with your name, before you meet. They’ll be more receptive if they know your name before the face-to-face meeting.
Example #4:- Attend only the classes that are relevant to your business plan. If you don’t twist balloons and have no inclination to do so, rather than do a twister class to “kill time”, volunteer to help with hands-on or even help at a vendor’s booth. Take the time to have a coffee with one of the instructors, take photos or video …. Whatever! Just make sure you aren’t wasting or “killing” time during those hours of opportunity.
I’m not suggesting that your next balloon convention should be “all work and no play”. No sir! What I am suggesting is that just as your normal day-to-day balloon business can be work combined with pleasure ….. (I love going to work every day) …. so too the balloon convention must be treated the same. It’s not an annual vacation with some trade classes thrown in so you can claim a tax benefit. You deserve better than that! Even if the convention location is Honolulu, you owe it to your business to treat the convention as business time. Plus:- maybe take advantage of the location to have a vacation from business – separately?
Don Dixon CBA – Editor email:-[email protected]
PRO TIP #72
Rouse Matrix framing is actually designed to hold pairs of latex balloons. Inflate to the specified size and make multiple “duplets” before you begin inserting the balloons into the banner, heart, star, puffed heart or builder framework. The advantage:- time saving and strength/stability. During balloon installation and manoeuvring the finished product, if a balloon “pops out” of it’s hole …. the second balloon stops it from falling out completely. The new matrix material is designed with a “hook” that allows the tied necks of the duplets to be incorporated into the frame matrix structure.
DID YOU KNOW?
(We have some announcements from Pioneer Balloon Company in the USA, plus more product news)
The Very Best Balloons 2001 Catalog offers One-Stop Shopping!
Pioneer® Balloon Company makes life easier for balloon professionals with the release of The Very Best Balloons 2001 catalog! This comprehensive catalog features the complete line of Qualatex® latex and Microfoil® balloons and value-added coordinates to make ordering easy and creating designer-perfect ensembles even easier. Plus, the catalog features many new designs from the manufacturer many retailers rely on for The Very Best quality balloons in the widest range of colors, messages, and designs.
“The Very Best Balloons 2001 catalog has more than our complete line of products, it includes coordinated merchandising ideas and marketing materials to help customers sell more balloons and make more money,” said Betty Vlamis, Executive Vice President, Pioneer Balloon Company. “An entire library of books, magazines, videos, and instruction sheets support those customers who support us.”
Pioneer Balloon Company helps balloon professionals grow their businesses with creative, quality products; fresh, new designs; coordinating products; Balloon Images magazine; the Qualatex Balloon NetworkSM (QBN®) program; educational events; and more. Plus, Pioneer stands by its products with a SATISFACTION GUARANTEE!
New Qualatex® Neon 260Q Balloons are Hot, Hot, HOT! Pioneer® Balloon Company proudly announces the release of a hot, new 260Q Neon Assortment! The assortment features six sizzling colors: Neon Green, Neon Magenta, Neon Orange, Neon Pink, Neon Violet, and Neon Yellow. Many of the new colors are even black-light responsive!
“Balloon twisters requested the new color assortment, and Pioneer responded.” said Stephanie Bloyd, CBA, Editor, Balloon Magic® – The Magazine, Pioneer Balloon Company’s magazine for balloon entertainers. “The new colors are super intense and give balloon artists the Qualatex durability they count on.”
_________________________________________________
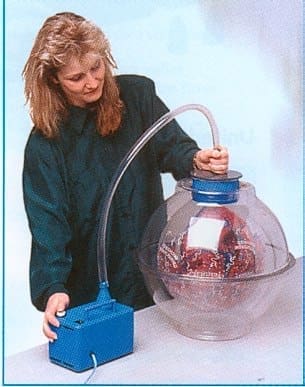
Pioneer® Master Bow, Inc., Introduces the Qualatex® Sand Balloon Weight Machine Model 300
The new, improved, Qualatex Sand Balloon Weight Machine Model 300 is the perfect solution for making sand balloon weights quickly and easily! Sand weights are used as inexpensive anchors for bouquets of balloons and can be dressed up with squares of tissue or foil and coordinating bows.
“The new Qualatex Sand Balloon Weight Machine can be very profitable for balloon retailers by saving them time and labor,? said Jim Fink, President, Pioneer Master Bow, Inc.
Benefits of the Qualatex Sand Balloon Weight Machine Model 300:
* Easy to use; no special training required.
* Fast; make up to three sand balloon weights per minute.
* Reliable; turns out perfect 1/4-lb., 1/2-lb., or any size weights every time.
* Saves time; the hopper holds up to 50 pounds of sand.
* Works efficiently with any good-quality, commercial-grade sand.
For more information or to order The Very Best Balloons 2001 catalog; The 260Q Neon Assortment or the Qualatex Sand Balloon Weight Machine model 300; in Australia:- contact “Business of Balloons” [email protected] Elsewhere:- contact your local Qualatex distributor. For the name of a distributor near you, call 1-800-356-0901 or 316-685-2266 in North America. Pioneer Balloon Company is the manufacturer of Qualatex brand latex and Microfoil balloons, the most recognized brand of balloons in the world. Retailers can visit Pioneer Balloon Company online at www.qualatex.com.
More new product lines that caught my eye in Chicago this month. ** Indicates will be available at Business of Balloons in Sydney.
Seen at the “IBAC Shop”
The 3 Wedding Books by Lanette Rajski CBA **
“Save a Tree – Buy a Balloon” pin and tee shirt.
A customised PVC pipe fitting – hand held (manual) balloon stuffing device.
Seen at the “Halloween & Party Show”
Conwin’s Archline Dispenser Pack.
Conwin’s Hi-Float Inflator (Revolutionary!)
Conwin’s Twin Pocket Pouch
Conwin’s Air Force 4
Conwin’s Big Balloon Inflator
Conwin’s Grip Guide Balloon Template. (very practical) **
L Daniels Inc. “Topiary Netting” roll. **
The Qualatex 646Q non round latex. (PBC evaluating feedback at this stage)
The Qualatex non round “knobby” latex. (PBC evaluating feedback at this stage)
The Qualatex non round “snake” latex. (PBC evaluating feedback at this stage)
The Qualatex “Glow Print” latex. **
The Qualatex “Glitter Print” latex. **
The Qualatex packaged bouquets. (Microfoils and latex) **
The Qualatex 11″ Round Neon colours – latex balloons. **
The hand held Pick Machine from ACP **
Holographic PVC Tube from ACP
Theatre Effects – “Le Flame” (simulated torch flame)
For latex balloons:- “Elegant Seal” ribbon and seal by Zibi **
The Zibi Balloon Stuffer.- (see it at the ABC in Bendigo) **
Walden Productions new Uplifter Banner messages ** (we hope)
A new (thinner) RMS material from Rouse International.
The Balloon HQ Mousepad. (a “must have” for all BHQ subscribers)
____________________________________________________
Anagram International (Australia) are holding an “Open House” on April 10th from 4:00 – 9:00pm at their new Blacktown premises. Get along to see all the new Amscan and Anagram designs at;19 Chicago Avenue. Ph: (02) 9621 0222
Marc P Summers of the Balloon Store in England reported a staggering 498 Balloon-In-A-Box orders for Valentines Day. Congratulations to Mark and his staff. Obviously, they know how to market their business and have a unique point of difference to their competitors.
Qualatex Balloon (Australia) are putting on a “Sausage Sizzle BBQ” all day open house at their Brookvale warehouse premises on Wednesday April 11th.Pick up some bargains on discontinued stock lines. Phone: (02) 9905 9333
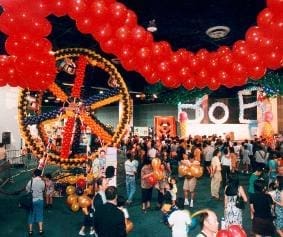
The Sydney NSW-QBN Chapter are holding their next meeting at 7:00pm Wed, 4th April. The hands-on educational will feature creative ideas and techniques when working with SDS framework. And …. thanks to the producers of IBAC, Don has some video tape of last month’s IBAC to show EXCLUSIVELY for those attending QBN Chapter meetings. It’s a $5 per head Pizza & Pepsi night at the Business of Balloons premises – 231 Victoria Rd, Rydalmere. RSVP Dolly on; (02) 98981544 (IBAC Image)
www.eballoons.com.au have added over 50 new members to their world wide online balloon delivery network in the month of March alone. The vast majority of new members are based in towns and cities across the USA with some in the UK as well. More and more balloon businesses like the idea of being able to join a global network and earn extra dollars every month by sending or accepting online balloon deliveries. Dean Johnson, Network Manager for Eballoons said, “Obviously our success with Valentines Day business has caused a lot of talk among people in the balloon industry in the USA. I assume word spread through QBN Chapter meetings, at IBAC and at the Chicago Party Show.” Email: [email protected]
_________________________________________________________
IBAC’s Next Generation. (Will IBAC move?)
I’ll start this topic with a few observations about this year’s IBAC 17 in Chicago.
* Numbers were down from the 1200+ who attended IBAC 16 in Las Vegas. Yet the spirit of those present was that IBAC had “come home”. The alumni felt it was a BETTER (more social) convention than last year!
* On stage industry celebrities at the Gala Dinner Awards night included the most highly respected names of longevity in the industry; Hardy, Iiams, Barrucci, Gruberman, Burchette, Mandoli, Toomey and Vlamis.
* The IBAC Crystal Award …. our industry “Oscar” …. was presented to Bruce Walden CBA. I personally felt it was long overdue for this Canadian who has competed, inspired, tutored and lead the industry with product innovation (all over the world) throughout the 90s and continues to do so today.
* The growing number of foreign delegates and competition entrants. A truly global mix in people, language and foreign cultures being expressed in the competition pieces. The Mediterranean tribute to the grape harvest by Alberto Falcone CBA ….. The English “Noddy” entry, “Tea Pot” and “Lady Di’s Tiara” were 3 of the Large Sculpture entrants….. The famous “Sorbetero” ice cream vendors in the streets of Manila ….. and “Ballerina in The Snow” a magnificent sculpture depicting the courtship dance of Cranes in Japan. America’s trademark for the new generation was evident in Bill McCormack’s “Space Shuttle” sculpture. There was even a unique creation of a polar bear ice fishing under stalagmites (with moving fish).
* The constant feeling throughout the day that “something was missing”. This IBAC was weird? Just couldn’t put my finger on it!?!? It turned out to be the absence of a crackling walkie talkie on the (always moving) Don Cheeseman’s hip. Yes, the absence of Don (IBAC) Cheeseman himself? But even with Don’s rigging skills and years of experience in production missing …. the show still went on!
* US media coverage of the convention was better than ever before. Huge! And shows like NBC’s “Today” program is televised live world wide. Fantastic exposure for our profession!
After making these observations, reading and hearing comments from others regarding IBAC 17, I got to thinking about where I invisage IBAC might be heading in this new millennium. IBAC under the patronage of younger Toomeys, Burchettes, Bells, Monks, Dixons, Airths and Mandolis. Now, I do not profess to know a great deal about the logistics and cost of producing such a world standard trade convention. But, I think my “vision” may have some merit or content worth considering. Think about this;
With the growing market and number of delegates attending from Asian and South American regions, plus the obvious reluctance of southern and west coast US balloonists to travel to (a frozen) Chicago in March …. (remember; they flocked to Vegas) …. could it be inevitable that to maintain the Mecca status, IBAC will have to search for a new home base city? Mind you, that new home base venue might not even be built yet! I’m not talking about next year’s IBAC 18. Maybe as early, though, as the IBAC 20th Anniversary?
IBAC is a commercial venture and now competes for delegate attendance with the Las Vegas Party Show, the Birmingham Party Show in the UK, the All Star Review in NJ and even the ABC in Australia. (three years ago there were nearly 20 Aussie delegates in Chicago. This year – 5) So what is it that will “really” draw balloon pros to attend a convention? My guess – not in any order of priority;
* They want celebrity high profile instructors and speakers.
* They want to be entertained by, and socialise with, people who talk their talk.
* They want a “memory” to take home. (class notes, books, tools, tea shirts, souvenirs)
* They want the convention and accommodation under one roof.
* They want a “convenient” time in their business calendar. March is good for the majority.
* They want it in a city with English as the dominant spoken language.
* They want “added value” by seeing what’s new. (a trade show incorporated or nearby)
* They want the convention at a “holiday” destination/resort/location.
* They want a rounded mixture of competitions and class topics. (round & non round balloons)
* They want to be able to claim a tax break for the majority of the cost.
* Finally, they need it to be a good value investment in their business.
So where might I guess we’ll be going to IBAC 20, 22 or 25 to attend the world’s premier balloon industry convention? The decision ultimately lies with the sponsors. Those who put up the money! They will decide, based on the world wide demand for balloons according to the global growth markets. That will determine where it’s most likely the premier convention must be positioned. Without a move, the producers and sponsors risk dwindling attendance and distancing themselves from the majority of their new customers.
I think it will move south (warmer climate) in search of a long term new home base. It could even move off the US mainland to accommodate the “shift” in world demand and growing balloon markets. Honolulu – a possibility and gets my tip – closer to the Asian growth markets. A popular international convention destination and likely to be patronised by mainland Americans as an affordable holiday destination – combined with business. Maybe, Los Angeles or Las Vegas – to attract the numbers in the US west, south and new decorators from Mexico and South American countries? Could it be coordinated with the Las Vegas Party Show? What about Orlando, Florida?? – certainly worth serious consideration as a candidate.
Another possible solution….. An Asian based annual balloon convention quite separate from an Anglo/American IBAC based in Bermuda or Florida. Food for thought? But again …. will the sponsors be able to support TWO annual conventions? (It has been tried in the past) Wherever it will be, I expect a much younger Dixon will be there to catch up with her generation of balloon heirs that she met and partied with in Chicago ….. way back in 2001.
________________________________________________________________
HOT AIR (A monthly column where readers can get it off their chest – anonymously)
Hi,
We don’t have at this moment Qualatex balloons distributor in Argentina. Then we can’t make most of the professional decorations. Qualatex forgot the 15th CBA in Argentina and the QBN members. How can we grow in the balloon business?
Thanks for this opportunity.
Thunder – South America
I just wanted to respond to “Legitimate” who can’t stand the “homies”. I’m one of those at home Mom’s, business’s etc. I feel some of us start a home business in balloons because we LOVE BALLOONS and it is fairly inexpensive to get started. I pay an annual fee for my license, and I pay TPT (privilege Sales Tax) to my state, and the cities I sale in each month. My Qualatex distributor would not think of selling wholesale to me unless I was licensed. My business is only a few months old, and at this time I am probably under pricing my goods. This is from both inexperience, and the need to get my feet in the door. I will eventually become a CBA and learn all there is to learn so as not to under price myself. However I will probably always be a threat to the store front locations because I don’t have the rent, electric, etc. overhead that they have. I will probably remain a home based business until my children are out of the house, because my children are my first priority.
If the store front owner is offended by the home based Moms maybe they should re-evaluate what they are in the business for. If you are losing that much business to Moms with a helium tank in the station wagon and a bag of balloons, and a roll of fishing line, maybe you ought to take a serious look at the quality of work you are putting out there. If the countries or states were to impose a $10,000 dollar business tax for the homebased business it would take out allot of homebased business’s including mine. It would also take out allot of people who truly care about the balloon industry, and the effect balloons have on other’s. It would also hurt the economy because what amount of profit the homebased business makes is usually put back into the economy whether spent on pantyhose, or ice cream cones.
“Home Based Homie” – Arizona
To “legitimate” Calif,
It might be an idea if you had a look at how the author of this balloon mag handles the situation. The key seems to be “education not vilification”. Do you offer excellent service, quality balloon arrangements and do you have integrity? If so, chances are your customers will stay loyal to you. The almighty dollar is not always a major concern. As for your suggestion of a $10,000 licence fee, are you nuts? Give the Government another idea how to squeeze more revenue, yeah, good suggestion..NOT.
Yes, I work from home and can assure you I plan to eventually expand my business to a full time thing. Thankfully with the support of the Q.B.N., and my peers I will reach my goal, but without education I would never have lasted as long as I have. I cannot compete with the prices the shops offer, for a start they get much better prices for their balloons than I do because of volume. So there you are mate.
I wish you well though, and please consider the positive rather than the negative.
“getting there” – Australia.
I feel the need to vent!
I’ve just come from a new mall in Suburbia where some “decorator” has installed the most disgusting, ugly balloon decor I’ve ever seen. I wanted to get up there above centre stage and “fix it”, but even that would have been impossible. Bad framing, bad spiral packing, low quality latex balloons, inconsistent size. YUK!
I wanted to wear a sign saying, “I didn’t do the mall decor!” just in case some locals recognised me.
Someone here has set our profession back 10-12 years! You probably aren’t on the list of balloon businesses who subscribe to “Balloons@Work”, but just in case you are, “PLEASE – get some lessons! Buy some videos! Attend a beginner’s seminar.” I don’t begrudge any of my competitors making a dollar, but in this case, it’s hurting the entire balloon industry. I’m tempted to make an appointment to see the manager of that mall to show them what classic balloon decor should look like.
CBA – East Coast, Australia
Hello,
We based in a large city with a retail shop premises for 4 years. I have got my CBA certificate and so has my wife. Six months ago a balloon competitor open just a couple of miles from us. We now have customers telling us they bad mouths us. They say they are CBA too, but I’m sure they aren’t. They don’t even use Qualatex balloons. Can I get Pioneer to check them out? Then what can I do without it costing me a fortune in legal cost? They are defaming us right? I’m so mad I want to punch his lights out.
Jose – Texas.
Hello,
Response to “homie’s” and home based business.
I am home based. I have a studio in my home. We have a walk out lower level in our tri-level and I have taken over the whole lower level along with my husbands Halloween prop business. I NEVER take clients up to my “living” level. I don’t have a station wagon, I have a mini van. Most Moms do :)…of course this van is decked out with my logo on the side, professionally done. I won’t go “bankrupt, move on or fade from the scene”. The reason for my home based studio is that we moved here from out of state recently, we didn’t know a soul in this new town. Hence, we didn’t have the money for a retail business or people to help out. I have the know how, working with balloons from my home state for 8 years.
I have a “legitimate” business. I pay and file taxes. I have a business phone line. I wear business clothing, including nylons (even at home). When I do a consultation, I have someone watch my son while I consult or do deliveries. I am a member of the Chamber of Commerce and am an active member of community associations. Many clients tell me I am more professional than the “store people” with my typed proposals, professional contracts, showing them where their money is going and not hiding any costs. Since it is just me also, I don’t give two different stories to a client like my competitors often do. And since my professionalism shows, I DO charge more. I have the time to do more “special touches” and go that extra mile for a client because I don’t have to worry about “the store”.
My view of my competition in town that have a store front?!? The only thing I can’t compete with is their store exposure. So, USE IT!! Don’t let Valentine’s Day balloons droop in the window a week after. DON’T let your windows be empty! Have a party for whatever reason to draw people in, offer
gift certificates for whatever reason. Have a radio remote with the local radio station! Don’t whine about what they are doing. Shout to the public what YOU can do!
Just a final note….I won’t be a “homie” for long. We do have plans for a balloon and Halloween shop combined. And we will kick butt. But I will miss the times between typing up a proposals and cutting ribbon, I could toss in a load of laundry and kiss my son on the head while he played with
play-doh at the kitchen table.
Signed…Professional at home.
CLASSIFIED ADS
FOR SALE: This is for all the Australian readers. Melbourne’s oldest balloon distributor, “Balloon Man” is closing down after nearly 20 years. All Qualatex stock is being cleared at 25% off and all Anagram stock at 10% off. Regulators and other equipment is being cleared. Call our new number; 03-8225596
Len, Felicia and Godfrey
Balloon Man – Melbourne, Australia
FOR SALE: Classy Wrap Balloon Stuffer. AU$1,200. Purple model with handle and wheels, stock carry bag, various hole size fittings, spare large clear latex balloons. In as new, perfect order. Contact Ray Mow “Balloons Are Right” Melbourne Ph:(03) 97525774.
LETTERS TO THE EDITOR Dear Don,
I can’t thank you enough for the words of encouragement and all the information you provide. It’s people like you that make us glad that we got in to this business.
Rosemarie Kleitz
A Balloon Affair – Binghamton, NY
Dear Don,
Please could you help me out. I have just started my own balloon business in England and I would be very grateful if you tell me if there are any videos out there that will help me with my balloon decorations, eg. arches, clouds etc. I have been on a course but I feel I need more help, please advise me on what to do. Yours truly
Carol
Lancashire. England.
Editor’s Reply: Videos ?????
1. Set of 5 videos. QBN Education program.
2. “Balloon School” Set of 8 videos by Bruce Walden CBA
3. “Masterpiece Series” Set of 8 videos by Conwin Carbonics.
4 “Wedding Decor Worksop” 2 video set by Christopher Horne CBA
“Themes & Dreams” 2 video set by Christopher Horne CBA
I’ve listed them in order of my recommendation. In fact, I wouldn’t be without any of them in our video library. You should be able to order any or all of these from “Pioneer Balloon” – Europe or from “Up Up & Away”. Good Luck.
Editor’s Note:- Business of Balloons have an extensive video library. Some for sale only – many available for weekly rental. [email protected]
PRO TIP #2 (Extract from Balloon HQ Deco List – 15th March, 01)
Just a tip, but it works for me – If you inflate the balloons in inches to the same size as the arch in feet, it seems to be in proportion. So, an 8 foot wide arch needs balloons inflated to 8 inches. A 10 foot wide arch needs 10 inch balloons, and a 6 foot wide arch needs balloons inflated to 6 inches.
Chris Horne CBA,
Northampton – England.
____________________________________
ABC TRADE SHOW
Come visit the Business of Balloons trade booths #10,11 and 12 on Tuesday 1st May from 3pm at the Australasian Balloon Convention – Bendigo. We’ll be featuring; * Lomey Products * Zibi inflation equipment and products * Eballoons online delivery network * ACP accessory and enhancement products . Look for John Warner, Christa Parsloe, Don or Dolly Dixon to assist you – or email us beforehand [email protected].
“Balloons@Work” is an independently owned publication distributed via the internet to subscription members in the balloons, floral and associated industries. Balloons@Work contains no paid advertising. The editor invites readers to contribute articles, images, letters and press releases for publication in future issues. The editor retains the sole right to include, omit or edit in part, all contributions submitted. The opinions expressed by others in this newsletter are not necessarily those of the editor or publishers of this newsletter. Balloons@Work™, Celebrating™, BalloonPro Depot, and Eballoons™ are divisions of, or associated with Business of Balloons Pty Limited – Sydney, AUSTRALIA
|
|
|
 Editor’s Reply: Videos ?????
 ABC TRADE SHOW

 ice in my opening paragraph that I didn’t mention the words “fun”, “party” or “socialise”. Why? Because I believe those benefits of making such a business trip (investment), should NOT be included in your commercial decision making process to attend. The fun, parties, sightseeing and social benefits should be considered a BONUS for attending. I refer to the opportunity to take time out during the show to go see the Empire State Building, the Tower of London or play the tables at the Mirage Casino. Conventions and trade shows are about doing business and should be carefully planned as an opportunity to invest in your small business. What exactly do I mean? I’ll give you some examples.
 Rouse Matrix framing is actually designed to hold pairs of latex balloons. Inflate to the specified size and make multiple “duplets” before you begin inserting the balloons into the banner, heart, star, puffed heart or builder framework. The advantage:- time saving and strength/stability. During balloon installation and manoeuvring the finished product, if a balloon “pops out” of it’s hole …. the second balloon stops it from falling out completely. The new matrix material is designed with a “hook” that allows the tied necks of the duplets to be incorporated into the frame matrix structure.
 The Very Best Balloons 2001 Catalog offers One-Stop Shopping!
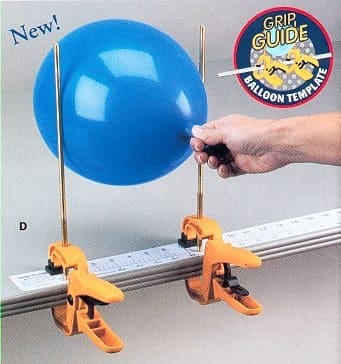
 Holographic PVC Tube from ACP
 Party Show in the UK, the All Star Review in NJ and even the ABC in Australia. (three years ago there were nearly 20 Aussie delegates in Chicago. This year – 5) So what is it that will “really” draw balloon pros to attend a convention? My guess – not in any order of priority;