

The Artist’s Corner
by Patrick Brown
Welcome again. I hope everyone has had a successful month. I have just
returned from the All Star Revue. I must say that Mark and Andrea put on a
first class event. Their enthusiasm for balloon art and the manner in which
they made me feel as if I were a guest in their home rather than a
conference attendee was truly remarkable. I only attended the classes for
“Twister Sunday” this year, but I intend to be signed up for the full
conference next year as they had so much to offer all balloon artists. I
wish to offer a big thank you to all the instructors and attendees at this
conference as they truly made it an incredible weekend.
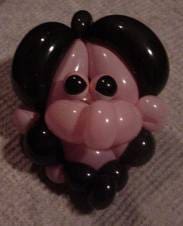
This month in honor of Larry Moss’s new CD-ROM on balloon faces I am going
to discuss facial hair. It is a detail that can really make your faces
resemble the characters you are creating.
[Click here for more
information on the CD-ROM Patrick is referring to.]
Look around you. There are many people that you meet every day that
have some type of facial hair. Do they all look the same? No. There is an
incredibly wide variety of beards, mustaches, goatees, and side burns. No
two mustaches are exactly alike, but there are several styles of mustaches
that are similar enough that they can be classified. The easiest to
recognize is the handlebar mustache. Then there is the Fu man chu, the
Chaplin or Hitler style, and many others. All of these can be created out
of balloons. A handlebar mustache does not have to be an exact match to be
sufficient enough to represent the one worn by the subject of a balloon
portrait. Lets look at some ways to create mustaches. A stand-alone hook
twist is a natural for creating curved shapes like the handlebar or down
turning fu man chu. One can use a double pinch twist for a Chaplin style
mustache. A simple bubble stretched from the nose to the ears (see Larry’s
poster) can create another shape for a mustache. A series of loop twists
could be used to create a caterpillar type mustache on a large sculpture.
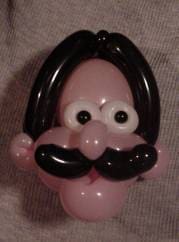
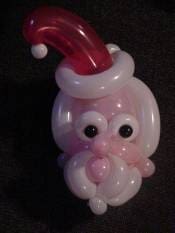
A beard is another form of facial hair that will make your character’s
features really stand out. There are three major considerations when
creating a beard. First is shape. Is the beard rounded? Squared? Pointed?
The shape will determine how the beard is attached to the face as well as
how it is formed. The second consideration is how much of the face is
covered by the beard. Does the chin show through? Are the lips or teeth
visible? Does it go from ear to ear or only cover the chin. The third
consideration is how full the beard is supposed to be. Will we create it
with a single 160Q or do we need to use multiple layers to give it the
fullness. If it is curly we can use a series of bubbles instead or a long
bubble to give it a curly texture. The beard could be woven and attached
only at a point or two (the ears are a good spot for this type of
attachment).
Lets look at how some of these forms of facial hair could be created.
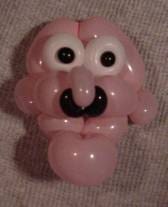
We will start with a basic head form as follows.
Inflate a 260Q about 10″. Make a _” pinch-twist followed by a _”
bubble, another _” pinch-twist, another _” bubble, and another _” pinch
twist. Make a 1-1/2″ bubble and lock-twist this around the first
pinch-twist. Make a very soft 2-1/2″ bubble and lock twist this around the
pinch-twist at the other end of the 1-1/2″ bubble. This gives us the nose,
ears and chin of a basic head. We could vary the bubble sizes and or
connection techniques to create more prominent cheeks, or a stronger chin,
or even a larger nose, but that’s a different subject. Make three or four
of these style heads so that we can experiment with different styles of
facial hair.
Attaching a single bubble of a 160Q from ear to ear so that it runs
along the bottom of the 2-1/2″ bubble that forms the chin can make a simple
beard. If we want to make a beard with a curly texture, we can make a
double row of bubbles along the same 2-1/2″ bubble and attach them to the
ears in a similar manner. We can change the shape of the first beard by
placing a pinch-twist at the mid point of the bubble creating a more
pointed beard. This beard could be made fuller by attaching another bubble
and fitting it below the one already there. Try all the combinations you
can think of and choose those that suit your needs.
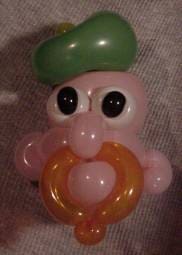
Adding a mustache can be as simple as making a bubble the length of the
mustache and twisting it around the pinch-twist nose. This bubble if made
soft can be shaped and positioned to make many different mustaches. Using a
stand-alone hook-twist can create another mustache. Varying the tension in
the inner band of this hook twist enables us to control the curve (or
curves) of the mustache.
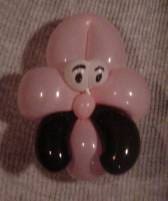
Variations in the lower jaw of the basic head described earlier can be
used to create some interesting attachment points for different beards.
Placing a fold twist in the soft bubble create a strong chin that can be
used as a center for a goatee. This goatee can be made from a 160Q and
attached to the nose and wrapped around the chin. You can make it more
pointed by creating a diamond from four bubbles with a pinch twist between
the two bubbles at the bottom. Making the lower jaw with two pinch twists
and three bubbles could be used to create long sideburns or a wrap around
beard without a mustache.

Facial hair is a wonderful detail that could be added to many balloon
faces. Try some out! Until next month I wish you the best of luck.