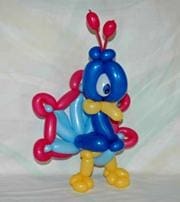
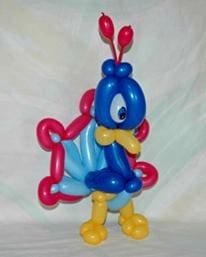
Pretty Peacock
Tonya McNeill
Supplies needed:
1-dark blue 260, 1-goldenrod 160, 2-pale blue 160s, 2-wildberry 160s, 1-scrap white 160
*you may use whatever colors you prefer, this is what I used.
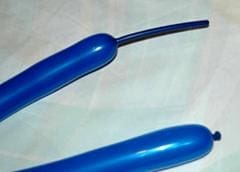
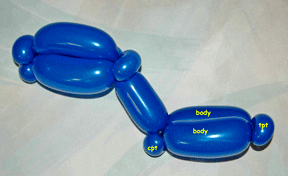
| Step 1: Inflate the dark blue 260 leaving a 5″ tail and tie off. |
 |
| Step 2 – The Head: From the nozzle end make a 4″ side of head (soh) bubble, 1″ back of head (boh) pinch twist, a 4″ side of head (soh) bubble, and 2-1″ top of head pinch twists. Connect the nozzle to the top of head pinch twists. |
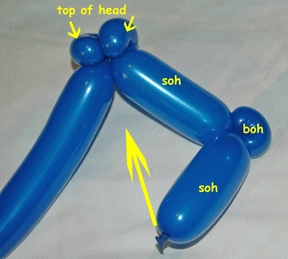 |
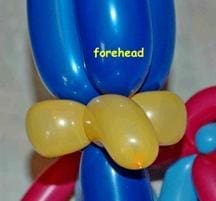
| Step 3: Make a 3rd 4″ bubble (for the forehead) and connect it to the back of head (boh) pinch twist. |
 |
| Step 4 – The Neck and Chest: Make a 3″ neck bubble and 1″ chest pinch twist. |
 |
| Step 5 – The Body: Make a 4″ body bubble, a 1″ tail pinch twist (tpt), and 4″ body bubble. Connect back to the chest pinch twist (cpt). |
 |
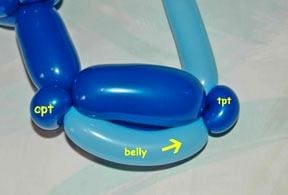
| Step 6 – The Belly: Inflate the 1st pale blue 160 leaving a 4″ tail and tie off. Connect the nozzle to the chest pinch twist (cpt). Make a little bit bigger than 4″ belly bubble and connect it to the tail pinch twist (tpt). |
 |
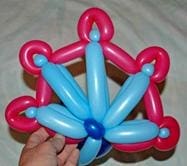
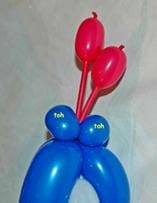
| Steps 6 & 7 – The Tail: Continuing with the pale blue 160 make a 5″ bubble, a 1″ bubble and a 5″ bubble. Connect it back to the tail pinch twist (tpt). This is the center tail feather. 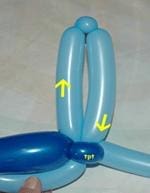 |
 For the 2nd tail feather, measure a 4″ bubble, a 1″ bubble, and 4″ bubble. Connect it to the tail pinch twist. |
| Steps 8 & 9: Make a 3rd tail feather (the same bubble sizes as the 2nd) on the other side of the center tail feather. 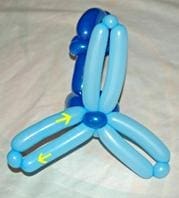 |
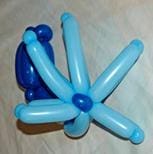 Inflate the 2nd pale blue 160 and connect the nozzle to the tail pinch twist. Make the 4th and 5th tail feathers by using these bubble sizes for each: 3″, 1″, and 3″. Connect them back to the tail pinch twist each time then tie and break off the remaining 160. Position them as in the above photo. |
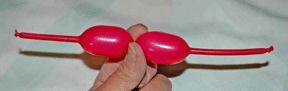
| Steps 10 & 11 – Outer Tail: Inflate the 1st wildberry 160 leaving a 5″ tail and tie off. Connect the nozzle to the tail pinch twist. On the smallest (3″) tail feather turn the 1″ bubble into a pinch twist. Make a little bit smaller than 3″ bubble and connect it to the pinch twist on the top of the feather. Make a soft 2.5″ loop around the pinch twist. (the 1st loop pictured on the right is 3″. I think a 2.5″ loop looks better). 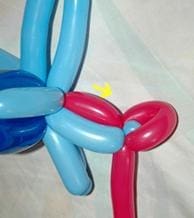 |
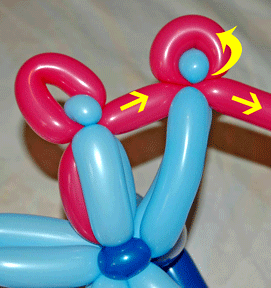 Turn the 1″ bubble on the 4″ tail feather into a pinch twist. Make a 3″ spacer bubble then a 2.5″ loop around the top of the 2nd feather pinch twist. **Turn the 1″ bubble on the center (5″) tail feather into a pinch twist. Continuing with the wildberry 160 make another 3″ spacer bubble and a 2.5″ loop around the pinch twist.** Break and tie off the remaining wildberry balloon. |
| Step 12: Inflate the 2nd wildberry 160 and tie off. Connect the nozzle to the center tail feather pinch twist. Continuing the pattern between the red asterisks (**) from step #11 connect the remaining feathers. Then make a little bit smaller than 3″ bubble down the outside of the 5th tail feather and connect it back to the tail pinch twist. |
 |
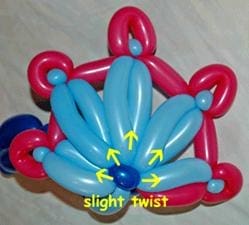
| Step 13: Slightly twist each of the tail feathers to fill in the empty space between feathers. |
 |
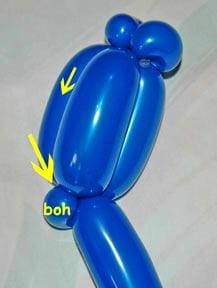
| Step 14 – The Cheeks & Beak: Inflate the goldenrod 160 leaving a 6″ tail and tie off. Make 2 – 3.5″ cheek bubbles and turn them into loop twists. |
 |
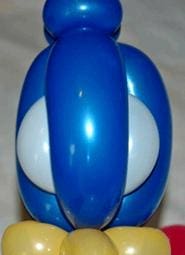
Steps 15 & 16: Connect the cheeks to the back of head (boh) pinch twist. Position the head so that the 2 side of head bubbles are centered above the back of head (boh) pinch twist.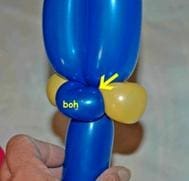 |
 Make a 2.5″ to 3″ beak bubble then break and tie off keeping the remaining goldenrod inflated for the next step. Position the beak in the center under the forehead bubble. |
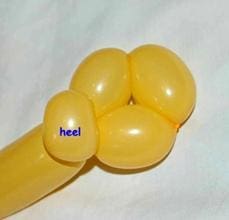
| Step 17 – The Feet and Legs: Make a 1″ to 1.5″ heel pinch twist, then a ring of 3 – 2″ foot bubbles. |
 |
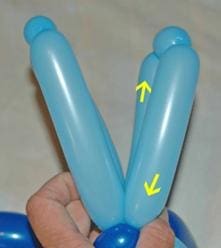
| Steps 18 & 19: Make a 3″ leg bubble and a 1″ thigh pinch twist. Pull the goldenrod balloon between the belly and back until it almost touches the thigh pinch twist. 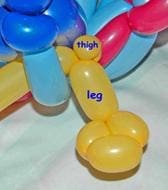 |
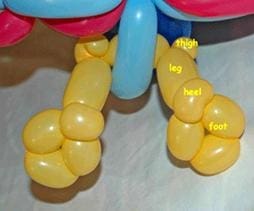 Make a 2″ bubble under the belly bubble, then a 2nd thigh, leg, foot, and heel. This is a view from the back. |
| *NOTE: You can make the legs an alternate way if you want. Just omit the thigh pinch twists and measure a loop the size you.d like the legs to be. Connect it to the heel pinch twist then make the second foot leaving off the 2nd heel. | 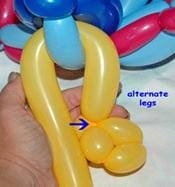 |
| Step 20 – The Eyes: Inflate the scrap white 160 to 6″ and tie off. Make 2 soft little bigger than 2.5″ eye bubbles. Tie and trim off the remaining balloon as close to the knot as possible for a clean look. |
 |
| Steps 21 & 22: Gently tuck the eyes under the forehead bubble and center them. 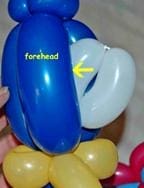 |
 |
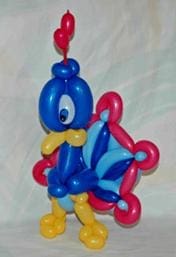
| Steps 23 & 24: Top of Head feathers: Using the remaining wildberry 160 from step 12 make a 4″ bubble and tie off. Center the bubble. 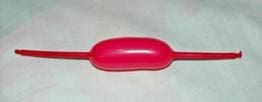 |
 Turn the 4″ bubble into 2 – 2″ bubbles. |
| Step 25: Attach them to the top of head (toh) pinch twists then force the air into the ends of the balloon. I like to leave one slightly taller than the other. |
 |
Add pupils to the eyes and here is your completed peacock.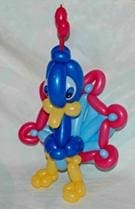 |
 |
If you want to make it a little more elaborate, add another 160 any color (I used dark blue) to the tail feathers. Inflate a 160 leaving a 5″ tail and stretch well.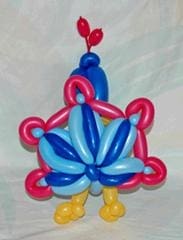 |
 Connect the nozzle to the tail pinch twist, and then make soft bubbles up the front and down the back of each tail feather. |