Twisting Balloons 101
Let’s twist again like we did last summer…
– Chubby Checker
- Basic pinch and twist
- Locking Twists And The Basic Four-legged Animal
- Bird Body Or 3 Bubble Roll Through
- Fold Twist Or Large (Elephant) Ear Twist
- Ear (Pinch) (Bean) Twist
- Apple Twist
- Hook twist
- Apple Twists and Deep Hook Twists: How NOT to Get Your Finger Stuck
- S-Twist
- Putting An Object Inside A Balloon
- Pop Twist
- Banana Twist
- Attaching balloons with adhesive
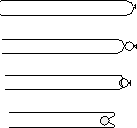
 |
basic pinch twist |
  |
Lock twists |
 |
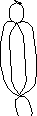
3 bubble body |
 |
Ear or pinch twist |
 |
apple twist |
 yo-yo or split apple twist” vspace=5> yo-yo or split apple twist” vspace=5> |
yo-yo or split apple twist |
 |
Hook twist |
 |
pop twist |
 |
Roll knot toward nozzle |
 |
Poodle tail |
Note: The symbols used in the above table are not part of any standardized system. They are simply a suggested set of clear pictures to be incorporated into drawings of balloons. Expect these symbols to change and become more abstracted as we work toward a standard set of symbols.
Also, some twists have multiple names and many of us use terms that are accurate only part of the time. This may be make it difficult for beginners and ESLers (English as a second language ers).
David Graves has provided a suite of drawings of basic twists. These are very well done, and he’s offering them for your use, free of charge, in any and all future publications. These images can be found in the Balloon HQ photograph database If you are thinking of writing a book, a web page, etc, that has basic instructions, you probably ought to have a look at these and send David feedback on them. They can be found in the photo area, under: Drawings of Balloons. Additionally, there are also animated balloon drawings for the following twists: Apple twist, Bird Twist, Ear Twist, Fold Twist, Meatball Twist, and Pop Twist. Check them out!
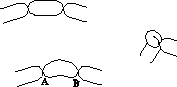
Basic pinch and twist
- Forming an animal amounts to making bubbles of various sizes and then twisting them together in different combinations. Forming a bubble is as simple as pinching the balloon and twisting so that the pinched area stays pinched without your fingers. Well, this is almost true. The balloon will untwist unless some kind of locking twist is used to secure it.

       ______________  ____
     -(______________)(____)
                     ^
                     |
              pinch and twist

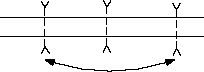
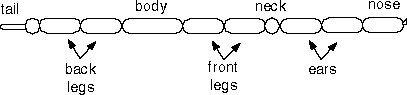
Locking twists and the basic four-legged animal
- If three bubbles are made using the method described above, the second two can be twisted and locked together. The hardest part of this is learning to use all of your fingers to hold bubbles that you’ve made until they get “locked”.
______________ ____ ____ ____ --(______________)(____)(____)(____)= 1 a 2 b 3 c - In the above picture, the numbers refer to the twists, the letters refer to the bubbles. To secure all of these bubbles, fold the balloon at twist 2 so that “a” and “b” sit alongside each other. Now form another twist combining 1 and 2. This is already the basic head of an animal. “a” and “b” are ears. “c” is a nose.
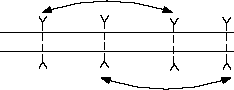
- This same process can be repeated two more times to complete a basic dog (or whatever you wish to call it). That is, immediately below the head make three more bubbles and twist the second two together. This forms a neck and two legs. Now, the same way, form a body and two more legs. If the balloon were held end to end with all of the twists in it, it would look like the figure below.
             ___  ___  ____  ___  ___    ___  ___  ___
        --()(___)(___)(____)(___)(___)()(___)(___)(___)=
        tail leg  leg  body  leg  leg ^  ear  ear  nose
                                      |
                                     neck
())__ \ ____ (__) ()(____)() ()) ())
Bird body or 3 bubble roll through
- Any figure that has wings or arms needs those wings and arms to sit alongside the body. To form this we will make three bubbles and do the locking twist above, but make the second two significantly longer than the first. This will be a head and wings. Make another bubble roughly the same size as one of the wings and push only that bubble completely through the wings.
________ ______ ______ ______ _ --(________)(______)(______)(______)(_)= 1 body 2 wing 3 wing 4 - The wings should be twisted together. When the body gets pushed through them, 1 and 4 will be locked together even though there is no twist between them.
_ _(_)_ / ^ \ | w|b|w | | i|o|i | | n|d|n | | g|y|g | \__V__/ ^ | | - When making bird bodies with unequal size bubbles (an un-equal size roll- through), it’s a lot easier to twist lock a short bubble with a long bubble and then roll a short bubble between them, than it is to *cram* a long bubble between two shorter ones.
- I start Lorna’s Rose with a 3-bubble roll-through.
Fold twist or large (elephant) large ear twist
- You simply make a long bubble, then bend it and twist the two ends of the bubble together so that it forms a circle, of sorts. This is good for making quick (but ugly) animal legs when the line gets long. It is also handy for making large elephant ears and the saucer on the Starship Enterprise. It’s the same principle as an ear twist, except an ear twist is usually done with a 1 inch bubble and an elephant ear is done with a much longer bubble.
Ear (Pinch) (Bean) twist
- This twist works well to make ears, a pig nose, hands, elbows, hips, eyes, lips, the center of a wheel, a cycle light, motorcycle engine, birds feet, rooster comb, snake rattles, an owls beak, and those little mechanical helpers that give us angles where we need them. To make one, take a bubble and twist the two ends of it together.
before: __ ____ __ after: ___ __)(____)(__ ( v ) <-- formed with single bubble / ^ \ Or, described another way, ( )( )( )( )------- ^ ^ a b - Form a bubble and then twist its own ends together. i.e.: points "a" and "b" are twisted together "folding" over the bubble inside. The size of the bubble determines what the use is for. Often, as when making a bear or cat, a one inch bubble is used, by having the edge that looks like the ear canal pointing forward on the head it looks like a cat, pointing to the sides of the head it looks more like a bear. At least that's what they say. I always make them point forward, it looks more charming to me that way.
- I killed a lot of balloons before I learned how to do that ear twist. The best way to avoid breakage is to make the bubble "soft". You do this by letting out just a little air just before you twist the ear the first time. A tight or hard bubble has a greater chance of breaking. Especialy if you are doing ear twist next to each other. This is hard to learn (making the bubble soft) but once you get it you will wonder why it was so hard to begin with. Practice practice practice. :-)
- You can make a specific bubble (any bubble, not just ear twists) take more abuse by giving it more rubber. Twist the bubble larger than you need then untwist just enough to squeeze some air out of the bubble. The idea is to get the same size bubble with more rubber.
- You might try softening the bubble before doing the pinch twist. If the balloon is fairly tight I squeeze it, just before doing the twist, then I have no problems with splitting the bubble. If the bubble is tight to begin with it is very hard to split, and quite often it pops. I have no idea how long mine lasts, but I have seen them in one of the restaurants the next day, still looking good. All it takes is practice.
- I do pretty good pinch twist but I can't seem to fold that twist into 2 smaller bubbles - like the claws on a T-rex or something - and I really don't know why. All the books say this will hold the pinch twist better - but mine last about 10 minutes and snap. Any help?
- Well, when I do a pinch twist. I take the ear twist and push it against it's pinch twisted point and THEN twist the little bubbles a couple quick times (in unison)... it makes my pinch twists VERY strong.
- When they "snap" do they come apart or pop? In other words, do they come loose and leak or does the bubble burst?
- How to split an ear twist... you have a 3 or 4" bubble then the ear twist and the rest of the balloon. I turn the balloon over so I can see the spot where the ear twist pulls the two pieces together (still with me) now push the ear twist up and pull the two longer pieces down and together forcing the ear twist into two equal parts. The ear twist now looks like a U, grab both sides of the U as you pull up and twist into two seperate pieces. Twist about 3 times and then it will stay much better. If you want even more insurance repeat the process by going back through the already split twist and giving it a few more twists.Now to give credit where credit is due, Michael Decker taught this to me and I have used it a lot.
- I used to have the same problem with my pinch twists coming undone on the bear. The trick I've found is to make the bubbles on either side of the pinch twist a bit tight, in other words don't squeeze any air out before you twist. You want them tighter and they'll hold the pinch twist.
- To begin with, you have a little ~1 inch bubble you plan on pinch twisting. Grab this bubble between a finger and a thumb. Fold down the bubbles/remainder of balloon on either side and pull a little bit. This stretches the not-yet-pinch-twisted bubble and gives you better access to the twists on either side for the next step. At that point, you want to slide the fingers holding the bubble to be pinch twisted down to the two twists on either side of the bubble and squeeze them together, then twist the pinch twist around a few times.Here's my description of a pinch twist.To practice, inflate a 260 q and leave some tail. Twist a bubble of any lenghth, then a small 1 inch bubble.
( )( )( )=====
Now take both larger bubbles in one hand , and hold one next to the other. The small bubble now sticks out in front.
()( ) ( )=====
Grab the small bubble and twist is so that both ends of that bubble are twisted together. You now have something that looks like an ear. This is the pinch twist. Well done. See, I knew you could do it !!!!!!
- When I first started twisting, I used to break a lot of pinch twists too. I found it was because the way I was doing it, the bubble of the pinch twist was rubbing too hard against the next section of balloon. What worked for me was to pull on the pinch twist ever-so-slightly as I was making it so that the bubble clears the rest of the balloon and you don't get that friction.
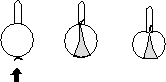
Apple twist
- This can be done with any type or size of balloon. But if use a small, round balloon you can actually form something that looks like an apple. (This can be great for a William Tell routine.) Blow up the small balloon part way and tie it off. Push the nozzle end into the balloon with one finger until it is inside the tail of the balloon. With the other hand grab the tail far enough in to grab the nozzle also and give it a few twists. This should stay on its own. You should now have something that basically forms the shape of an apple with a stem sticking up.
- The apple twist, often called a tulip twist, goes like this:
- It's helpful when tying the balloon to put the nozzle of the balloon through the knot twice to make it a bit large and easier to grab. Use your index finger to push the knot into the balloon and grab the knot, through the balloon, with the fingers of your other hand. Remove your index finger from the balloon without releasing your grip on the knot. If need be, push air back up above the knot, then twist at the knot several times. I like to push the knot up into the apple/tulip a little bit before releasing the twist. This avoids those occasional spontaneous untwisting apples.
- This twist has a lot of uses aside from just making apples. In any long thin balloon, you can push the nozzle in and form a bubble with the nozzle being further into the balloon than the twist. When you release this, it should stay in the balloon without any other locking twists.
- I put a worm in an apple by including about 3" of FBNI (full but not inflated) 160 in the apple twist, so the "worm" sticks out beside the stem. I put a little Sharpie smile and eyes. Great finishing touch! (Someone also once placed a black plastic spider on a my bunch of bananas.) EEEEWWWW!
- I still have trouble getting my tulip twists to stay, any words of wisdom? Try rolling the knot back up inside the bubble after you pull your finger out and twist it. You can even make it more stable by poking the knot out the top, (where your finger first went in,) and giving it a couple of twists there, then rolling the knot back into the middle of the bubble.

Advanced apple twists:
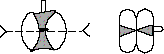
Yo-yo twist (split Apple twist)
- This idea is the fishing reel found in "Dewey's Zany Balloons." Dewey takes a bee body, inflates it half full, and does a basic apple. He then twists the apple in half horizontally. This gives the reel for the rod, and the "apple stem" sticks out to be the crank for the reel. I sure that the rod needs no explanation. I've used this often for fishermen with great response.
- It looks like two toruses (donuts) side by side, connected only at the centers. Like a yo-yo. If you pinch the donuts together on one side, it spreads open on the other side like a spring clothespin. You can then clip it on to a nose, ear, or whatever; it holds on by friction. For the earrings, add a few dangling 260's with 1-inch bubbles in the end (like poodle tails).
- I have done this with both 260's and 350's, but I like the effect better with the 350. It turned out to be rather simple:
Method
- Make a 3-inch bubble. The actual length is best determined by experimentation, and depends on what the final use will be. Tie a knot. At this point, I prefer to trim off the nozzle close to the knot so the knot is smaller.
- Make an apple. This is done by making an apple twist (see above) all the way down and about 1/4" - 1/2" into the uninflated part. Grab the knot through the uninflated part, extract your finger (or other apple-twist tool) and twist a few times.
- Trim off the uninflated balloon after the twists you just made, but keep hold of the twist itself -- it won't stay twisted by itself (yet). Push the twist you are holding back into the balloon, as if you were making an apple twist in the opposite direction as you just did. Once the twist is fully inside, it will stay twisted by itself. Push it back in far enough so the knot is more than halfway back toward the side where it started.
- You should now have an oblong bubble with a thread of uninflated balloon running through it from end to end. Give this bubble a simple twist in the center, making two back-to-back apple twists. The friction should hold the twists in place. You're done!
/--\ /--\ | | | | | | | | | |=| | | | | | | | | | \--/ \--/ (Side View, and Top View) - Pinch one side of this, and the other side opens up like a spring clothes-pin. Clip this on to whatever body part(s) you desire.
More instructions:
- Instructions were also printed in Balloon Magic the Magazine but here it is in simple form. Inflate a balloon to form a 1 or 1 1/2 inch bubble and tie it. Tie another knot about an inch beyond the end of the bubble. This forms a soft bubble. Now, do a simple apple twist or tulip twist - whichever you call it. Tuck the knots all the way inside the bubble. Next, twist the apple twist in half to form the "yo yo." Squeeze the bottom and the top opens. It will grip on most anything that is thin. It works best as an ear ring - if you wear a hoop or dangly earring and attach the balloon to that.
- After inflating the small 1.5 inch bubble and tying at both ends to create a soft bubble, reach all the way through to create the tulip twist. Cut off the remaining portion of tail and pull both knots to the center. Twist the balloon in half to create the "gripper." As you said, if you squeeze one side, the other opens and will attach itself on almost anything. Earrings, nose bobs, hair decorations etc.
Uses
- Clown Nose
- Animal Nose
- Earring (add baubles and dangly bits)
- Hair Bow (thanks to my wife for this one!)
- Game: get the "nose" off only be scrunching your face muscles
- Vehicle Wheels (makes a terrific Indy Race Car)
- Toys (see below)
- Inflate a 6-inch heart and wrap the nozzle between the two yo-yo bubbles. You know have a heart that will stick on a shoulder, on a Teddy Bear's ear, on a finger, a glass or a napkin holder (actually almost anything that is sized for the yo-yo.)
- If you put the feet of a balloon animal on one side of the yo-yo, you can use the other side to grip a glass or clothing or whatever. Now the twister creation can be conveniently placed almost anywhere. The balloon friction works to delightful advantage. Unlike glue, however, you can remove it whenever you wish. I've used this technique as a business card holder and as a card holder for magic. Works great!
- Once you've made one of these from a 350, you'll see that you have *two* suction cups right next to each other! Imagine the possibilities for attaching things! Take a yo-yo and suction cup it to a table. Now look at it. Looks like a light piece of fluff sitting on a table. Ask some poor sucker to pick it up. Or have them flick it off the table (maybe cover their desk with them, like mushrooms). Because of the suction, they act a lot heavier than they look. Rather startling, really.
Tips and variations
- Sometimes I leave the uninflated part on and "countersink" it into the opposite end of the tulip twisted knots (i.e. push the knots all the way through the tulip twist and grip the end of the tail. Pull the tail end and the knots to the center of the bubble and twist in half. -- like making a basket except the basket is twisted in half) Now you have an earring with a loop. Lots of possibilities to hanging, hooking and creating including "bull with a nose ring", ear chains, baskets with flowers and on and on and on.
- When you cut off the uninflated part, save it! I can get three "noses" from one balloon by re-inflating. It's also good for popped balloons that still have a few good inches in them.
- You can make easy, fast, long apple twists by using a smooth dowel instead of your finger. I started using a chopstick I have that is very smooth from many years of use, though this could be done with fine grit sandpaper.
- Put two "noses" together by springing them open and pushing the openings into each other, crosswise. Carefully push/roll the bubbles past each other. The bubbles will form a very interesting tetrahedron of apple twists.
- If you make the original bubble long enough, you can make more than two bubbles in the last step. Note that they don't seem to hold together as well, but they could be useful as parts in other sculptures.
- I put 2 superballs (T. Myers 3/4") into a 350 before inflating. (Tom's "Balls 'n Balloons" book gives good techniques for this.) When I did the final twist, I made sure there was one in each "chamber." This thing rattled and spun and bounced and did all sorts of crazy things! Putting two of these together into a tetrahedron was even crazier!
- Mark writes: I independently discovered this twisted apple-twist (yo-yo) this spring, after George Sands' book got me critically thinking about apple and hook twists. They're slick, aren't they? I had never seen them anywhere before twisting my first one, and remember proclaiming to several friends (and a professor) "I have just revolutionized balloon twisting!" 🙂 The biggest let-down of my twisting career came when I proudly showed Marvin Hardy one of them at IBAC. He said something like "Oh, that old thing" as he promptly made one and clipped it on my ear. 🙁
Suction Cups
- A tulip/apple twist forms a suction cup. As much as I would like to claim the balloon suction cup effect, I seem to recall reading about it years ago in one of the older balloon books (Chuck Leech?) where it was described as an effect, without (at that time) any apparent use.
- Put a tulip twist in both ends of a 350, bend the balloon around into a horizontal "U" shape and suction cup both ends to a window to create a "basket-ball hoop."
- I've used it for a table mount variation on the ray gun. ("keep 'em covered while I make the next balloon...").
- The interesting thing about using 350's for the suction cup effect, is that you get a stronger suction than with the 260's (due to wider cross section?) and the 350's are structurally stronger.
- Suction hint: If you are having trouble making the tulip twist stick, try this: After you make the tulip, work the twist (what would be the stem knot in an apple), back toward the end where you first stuck your finger in. As though you were trying to turn an "innie" into an "outie". When you get that end "flat", moisten it, press it against the glass and, while holding the tulip with one hand, gently pull on the body of the balloon with the other hand (pulling the twist partway back through the tulip.) Ta Da, Maximum suction cup effect.
- I've been suction-cupping balloons to things all over the place. A few days ago I made a person that definitely needed a hat. The head was made out of a couple heart balloons. I suction cupped an apple balloon to the top of the head to form the hat.
Marriage Twist
- A marriage twist is just an apple twist that joins two balloons. This twist is a way to attach one balloon to the next, as with a black balloon to a 3-inch white balloon so that the black bubble ends up laying in the tulip twist "funnel" area. The marriage knot is a second knot placed on the black balloon, in order to make a longer nozzle. The knots are approximately 3/4 inch apart. The first knot is what is tulip twisted (or apple twisted) into the white balloon, along with the white nozzle. The first knot helps anchor the tulip twist.
- To attach e.g. a 260, you can use a tulip twist (also called apple twist, and I believe, "marriage twist" by some). This however can untwist and come loose. Another possibility is to make two or three small pinch twists on the end of the 260, and attach a "raisin" twist to this.
- I recently bought "Dewey's Celebrity Balloons" and he has a GREAT way to make shoes on cartoon animals like Mickey Mouse, etc. - by apple twisting 6-inch hearts and connecting them to the legs! (Tie the knots together and push the knot into one lobe and apple twist) Even high heels by adding a short 260 bubble opposite the leg! So, what I want to know is: who out there has ever apple twisted a heart balloon? Be honest, now...
Rattlesnake Tails
- Stack 3 or 4 decreasing size apple twists together on the tail end of a 260 and you have a rattle-snake tail. If you pour a little uncooked rice or sugar in the 260 before you inflate the balloon, then divide it into each apple twist as you make the tail, it will really rattle. It's AWESOME!!! (and easy because sugar packets are available everywhere).
- Method 1:
- Push the knotted nozzle a few inches into the balloon (like a hook twist), but don't twist and close it off - just hold the knot through the balloon wall so that air can pass by. With your other hand, twist soft apples of increasing size. The last apple will hold the knot in place, and because the apples are soft, they will hold against each other pretty well and not unravel (unless you give it to a kid...) Make sure you push the knot up into the last apple. These are true stem-to-bottom-of-core apples, because they are really just one apple twist twisted into smaller apples. I just made a 4-apple (no end bubble possible with this method) tail as I wrote this, so it does work.
- The beauty of this method is that if you don't size all the apples perfectly the first time through, you can almost untwist one apple at a time until they just start to leak, and then pass air back and forth between neighboring apples to adjust the sizes. A way to cap off this tail and make it look finished is to add a single small bubble from the end of a second balloon, tied off, but with enough uninflated balloon (1-2") still attached after the knot. As you make the deep apple, stuff the uninflated part into it, and complete in the regular way.
- Note: In Texas Style Balloons, Bobby Cordell makes a rattlesnake tail by making a long, soft (squeeze some air out) hook twist (very long apple twist). Then, since it is soft, he twists it into 4 or so individual bubbles.
- Method 2:
- In George Sands' book Encyclopedic Balloon Modeling he presents the "Center Apple Twist" technique which enables you to put an apple in the center of a balloon, or literally anywhere you put a twist first. For the knotted nozzle, you substitute tiny bits of broken balloon held against the wall of the balloon and push them and the balloon wall into the balloon to make one apple twist after another. It takes a few trys to find out just where to place the balloon bit and how to push it in so that the result looks good, but it's a very useful trick. Sands recommends using an apple twist followed by a few Center Apple Twists stacked together for the rattlesnake tail. Here is Mark Balzer's better-looking version that explains the details of the Center Apple Twist technique:
- Twist a small bubble at the end of the balloon. That is the last rattle.
- Take a small piece of broken balloon and place it on the snake body bubble, about 1/2 inches away from the twist you just made. Poke it into the balloon with your finger and grab it through the balloon wall with your other hand. Complete as if making an apple twist. That is the second to last rattle.
- Repeat 2) as required.
- The trick is to make that 1/2" distance as absolutely small as you can... like 1/4" or less. If it is too big, you will get... an ugly mess. These "apple" twists are not really perfect apples connected stem-to-bottom-of-core; but rather like apples connected *near* their stems to the bottoms of the cores. Because of this, they want to form a little lop-sided. Keep that 1/2" number to a minimum and twist each apple enough times so that it snugs up tightly against its neighbors. That minimizes the lop-sidedness and allows them all to help hold each other in shape. If you have lop-sided apples, rotate them so that they cancel each other out and still form a straight rattle. You need good inter-bubble friction to hold it all together, so talc on the outsides of the balloons is a no-no. I just made a 4-apple + end bubble tail as I wrote this, so it does work, though it is harder and slower than Method 1.
- In George Sands' book Encyclopedic Balloon Modeling he presents the "Center Apple Twist" technique which enables you to put an apple in the center of a balloon, or literally anywhere you put a twist first. For the knotted nozzle, you substitute tiny bits of broken balloon held against the wall of the balloon and push them and the balloon wall into the balloon to make one apple twist after another. It takes a few trys to find out just where to place the balloon bit and how to push it in so that the result looks good, but it's a very useful trick. Sands recommends using an apple twist followed by a few Center Apple Twists stacked together for the rattlesnake tail. Here is Mark Balzer's better-looking version that explains the details of the Center Apple Twist technique:
- Method 3:
- Method 1 ends in an apple, unless you add a second balloon. Here's a method to add the bubble at the end with one balloon. Twist a small bubble at the end of the balloon. That is the last rattle. Twist all the air out of the next two inches of balloon by continuing to twist the balloon into a thread. Take a small piece of broken balloon and wrap it around the center of the thread you just made. Push the thread and balloon bit deep into the balloon (like a hook twist), but don't twist and close it off - just hold the knot through the balloon wall so that air can pass by.
- Now, with your other hand, twist soft apples of increasing size. The last apple will hold the knot in place, and because the apples are soft, they will hold against each other pretty well and not unravel (unless you give it to a kid...) Make sure you push the knot up into the last apple. These are true stem-to-bottom-of-core apples, because they are really just one apple twist twisted into smaller apples. I just made a 3-apple + end bubble tail as I wrote this, so it does work. Isn't topology wonderful?
- Method 4:
- A variation on the first part of method 3: leave an un-inflated tail at the end of your balloon. Then, take the ring of nipple (saved from a discarded balloon), roll it up the nozzle-end to where the inflated and uninflated sections meet. Then, make a poodle tail at the end of the balloon. Trap the thickened, added ring of latex with the end of your finger and use it to secure a hook twist. Please note: if you leave the uninflated section of the poodle tail too long, you will have an awkward space between the end apple and your rounded rattle. Not cool for tight looking tails, very cools for space-alien feelers/ antennae.
- I was doing some balloon torturing last night and figured out a fairly easy way to do linked apple twists. Start with a half inflated balloon, make an apple twist on the end. Next make two soft bubble (about 1/4" to 3/8" dia.). Take the second bubble and stuff it into the balloon and twist it in place ala apple twist. Repeat. You can go on forever with this twist. Larry has suggested a rattle snake tail or a beaded necklace. I make my unicorn horn with a short one of these - only about 5 bubbles. Is this different than what Bingo and Buster use for the butterfly body? David Graves makes the butterfly this way and I believe there is a photo of one...?
Hook Twist
- This is the "hook twist" that Dewey describes. He uses it for a lot of neat animals: dogs, snakes, squirrels, frogs, etc. This twist is basically a variation on the apple twist. Instead of pushing the nozzle into the balloon only about an inch, push it in as far as you can reach with one finger. If you bend the balloon a bit you can reach further along the wall of the balloon. Now grab the nozzle through the wall of the balloon and twist the way you would make an apple twist. Then carefully work your finger out of the balloon. I use the thumb and middle finger of the same hand that has the index finger inside the balloon. These two fingers kind of push the sides of the bubble back a bit while I retract my index finger. If you can do an apple twist you already know how to take your finger out. It's just a bit harder now since there's more finger inside the balloon. Practice making apple twists of increasing size. I suppose a bit of powder on your finger couldn't hurt to reduce friction, but I've never tried it. When you take your finger out of the balloon, the bit of balloon inside the bubble that goes from the nozzle to the end of the bubble will go straight from the twist to the end of the bubble. If the bubble is bent (or hooked) as described above, that inner piece of balloon will hold it in that position.
B __ __ ,' V \ -------------. ,----------'_,.-' | \ / _,.-'' ' A @)(,.--'~~ / / \ / -------------' `---------------' - The key to getting that shape is really to get the nozzle further into the balloon than your finger could reach if the balloon was kept straight. I scrunch up the bubble to really reach in there far. Note that no matter how far you reach in, the same length of balloon will be inside since you're only putting inside the balloon what covers your finger, so the further you can get the nozzle in, the greater the hook in the bubble.
- My technique is modified just a bit from that in "Dewey's Bubble Buddies" pp 12-14.
- Inflate and tie a 260 leaving a few inches uninflated.
- Put your index finger on the knot and press the knot into the balloon as for an apple twist. Rather than keeping your finger centered in the balloon, it should go in toward one side so that the palm side of the finger is along one edge and the inflated part of the balloon is on the back (dorsal) side of the finger.
- Insert the finger into the balloon as far as you can. Then use your other hand to push another 3 or 4 inches of the inflated balloon onto the finger so that the inflated balloon bunches up on the dorsal side.
- With the other (right) hand, pinch through the inflated part of the balloon to grasp the knot between your thumb and index finger. Twist the balloon to lock the knot in the twist as you would do for an apple twist.
- You now have a long apple twist that's curved and bunched up on the convex side of your curved index finger. I use my right forearm and elbow to hold the remainder of the inflated balloon against my side to prevent the apple twist from coming loose during the next maneuver.
- When all but an inch of your index finger has been freed from the twist, tip your finger up so that the back side of the finger is along the outside (convex side) of the twist. This will allow the other end of the twist to hook as you remove the tip of your finger.
- The twist should have a reasonable approximation of a tight "S" shape. You can move the main body of the twist toward or away from either end to accentuate or reduce the curvature at that end.
- Do you know a tulip twist ? A hook twist is an eccentric, deep tulip twist. There is a good explanation on it on the BHQ website, and if you happen to have access to the booklets written by Ralph Dewey, he has some extremely good instructions for it, although it does not compare to seeing him do it. He makes it look extremely easy, but it takes some practice.
- Inflate the balloon, and at the knot end, push in your index finger all the way until the balloon curls up a bit. Through the outer hull of the balloon, hold the knot end and start pulling out your finger by pushing on the lower end of the balloon with your thumb and middle finger.
- When your index finger is almost out, turn is upward and when it comes out, twist the balloon at the knot end, so the knot is held tightly. After practicing this for about 100 times, you should end up with an S-shaped tulip twist.
- The idea for the hippo is to twist the front of this S, and then twist this bubble in half. This results in two little bubbles on top of the larger bubble, being the nostrils on his snout. At the back of the head (the hook twist), you can either make a pinch twist or twist the back part of the hook twist itself. This will keep the head in the correct position.
Apple Twists and Deep Hook Twists: How NOT to Get Your Finger Stuck
- Peel the balloon down off your finger rather than pull the finger out.
- Don't try to pull your finger out of the twist! It won't work. Instead, use the thumb and first two fingers of the right hand to grasp along the curvature of the twist and gradually roll it off the entrapped left index finger. The knot end of the twist will bend into a hook as you do this.
- Use your other fingers to push the balloon off of your finger, rather than pulling your finger out of the twist with "brute force." This eliminates the friction which pops the balloon. It is hard and a little awkward at first, because your first instinct is to pull your finger out of the balloon.
- I push most of the air out of the twist before removing my finger. Then I just reach around to the uninflated end and squeeze the air back in before giving it the anchoring twists.
- I find that if you push the air up to the top of the balloon to create a lot of pressure, you'll have no problems getting your finger out of the balloon.
- The biggest problem I had with the hook was extraction of the finger while TRYING to hold the knot. My solution was to tie at least 2 knots & leave an extra inch or so of nozzle, so that when I inserted my finger there would something more substantial to grasp with my free hand. Also, I crook my insertion finger into the shape of a hook so that, for a shallow hook twist, I only allow the balloon to collect into the first joint of that finger. For a deeper hook twist, I may go to the second joint. Not going so deep makes it much easier to extract my finger.
- Wear gloves.
- Besides wearing gloves, you can cover your finger with a thin cloth - I used to use a juggling scarf - and it makes pulling out your finger very easy. I only use it on deep hook twists.
- Using baby powder or gloves works, but I find it hard to work in full gloves, because the cloth gets caught in the twists. I tried baby powder for a while, but it is messy.
- I saw Pat-in-the-Hat utilize a round, very smooth chopstick to make deep hook twists. I'm sure that anything thin, round, smooth and fairly sturdy can be used as a stuffing tool. If you go the chop-stick/thin wooden dowel route, don't use the cheap ones you get for free at restaurants. (too many splinters, pointy parts are bad for the balloon!) You can also use a balloon straw.
- Be sure your finger is very dry and possibly use a fine baby powder, that is what they use inside the balloons anyway.
- Any slight moisture will tend to make your finger stick, either very wet or very dry will do the trick. Try Cornstarch. It works. I tried it, and I don't think it will cake on your hands as much as baby powder has a tendency to do.
- A trick for making apple twists is to lick your finger before pushing the balloon in. This makes it MUCH easier to get your finger out.
- A trick for making bubbles inside a balloon and also for making apple twists is to: *lick your finger* before pushing the bubble in. This makes it MUCH easier to get your finger out without pulling the bubble out, losing a lot of air, or whatever. Of course, you can have as much fun hamming it up with this as you like.
- I was able to stop popping the balloons by wetting my finger before I did the twist. Then it pulled out without popping the balloon. Not too tasty, but it works. I find this most often happens to me when my finger nails are too long, or aren't trimmed cleanly.
- It's really hard to pull off a hook twist without popping a balloon after applying a relatively fresh coat of nail polish - some sort of weird friction thing goes on.
S-Twist
- The S-twist and a six-petal flower, twisting the whole kit 'n kaboodle in one move - it's been discussed here before, but I didn't understand the advantage of doing it that way until it was demonstrated by a pro.(The S-twist lets you create two bear-ears at the same time with a better chance of having them turn out the same size - and if they don't it's easy to adjust them. You just fold the balloon back and forth in a "S" pattern, then twist the S in the center. If one bubble is bigger than the other, you can un-twist them, pass the air back and forth between them until they match, then twist them together again. It works great for someone like me who doesn't twist enough to be able to do it blindfolded, like the stars on this list.)Additionally, he was making lots of red, white and blue jester hats, and did something I've never seen before... after creating a poodle tail, he secures a knot in the length of balloon below it... as a purist, I wouldn't do this for "competition pieces," but it's a new child-proofing trick on me, and really isn't super-noticable from a distance. Shawn Wake sure knows how to twist for kids!
Putting An Object Inside A Balloon
- Technique
- Things To Put Inside Balloons
- Things NOT To Put Inside Balloons
- Where To Get Stuff To Put In Balloons
- Tools for Putting an Object Inside a Balloon
Technique
- There are basically two ways to put something inside a balloon:
- Stretch the mouth/ nozzle open and shove the item inside.
- With an inflated balloon, push the item into the end, with the forced-in section of balloon forming a skin around the item. Keep pushing until the item is completely inside the outer balloon. Break off the connection to the inner section of balloon, trying not to lose too much air. The item is now inside the inflated balloon, and is coated with the broken off section of balloon.
- With regards to the little bit of loose rubber left in the balloon after you've inserted an object, and then stripped the rubber off the object: I usually make sure I trap that little bit in the first small bubble I make. It's a lot less obvious than leaving it in a long bubble, where you can watch it rattle around as you tilt the balloon. I've seen a twister manage to insert an object, manipulate the rubber off the object,(his finger still in the balloon) and then drag the little rubber bit out... all in one shot.
- METHOD for putting items inside a balloon without a skin.
- Blow up the balloon you want to put something into for a few inches... make it soft.. I normally keep an inch uninflated at the knot end, and make a small bubble...
- Then you fold up the nozzle, and put whatever item you want to put in the balloon in at the nozzle end... While you do that, untwist that small bubble to give the balloon some extra air... Carefully deflate the balloon and remove the "outer skin". The inner skin that is left you blow up again. And voila, the item is inside the balloon. Because you also put a large uninflated balloon in the nozzle you have enough balloon left to work with... if you inflate your balloon a bit, give the nozzle a bit of a pull, that will pop it out correctly after that you can blow it up as far as you want. That way you can put a balloon doggy inside a balloon doggy. Or make my smelly bomb... put on of your socks inside a 350, and blow it up for a friend 😉
- I posted some instructions a while back on how to put items inside a balloon without a skin and without using any special stuffing tools. I've got several reply's that my instructions were not clear enough...My thanks go to Ralph Dewey who was kind enough to finetune the instructions I rewrote to make it more clear to you.So here goes:
- Inflate about 10 inches of a #260 pencil balloon, let out some air to get it soft and tie off the balloon. At the nozzle end, push the air out a little, so that the first inch is unflated and then twist off a small bubble.
- Further soften the big bubble by squeezing it. Roll up the tail and push it inside the balloon. Now you can let go of the small bubble. This makes the balloon even softer.
- Following the rolled up tail, at the tail end, also push the desired object inside the balloon.
- Break the outer skin... and peal it off. What you have left is the inner skin with both the uninflated tail (that was rolled up) inside it as well as the object. Discard the broken outer skin.
- Because the balloon is now basicly inside out, and the tail has been rolled and placed inside the balloon, the tail will not want to come out "naturally" when the balloon is inflated. After you blow it up part way, give the tail end a bit of a pull. This will help it to fill it out and shape itself naturally again. Inflate it to the length that you need for your desired animal.
- NOTE: Because you also placed the rolled up and uninflated nipple end inside, you still have a long balloon to work with. You will lose a bit of length, maybe 10-15 inches. but still you have enough balloon remaining to create something.
- On http://www.mediaport.org/~hans/ballon1.gif there is a picture with above steps.
- The way I put a ball (opened pocket knife, cigarette and matches, etc.) in a balloon: use your index finger to insert the object you are working with into the knot area of the balloon and continue to push it in till you have gone PAST the second knuckle of that finger. With the thumb and index finger of the other hand, grasp the area in between the first and second knuckle of the finger in the balloon, holding tightly hook your insertion finger slightly as you pull it out. The balloon should pop on the inside just as the fingertip clears the circle of the grasping hand. Squeeze tightly to make sure no air gets out. Then adjust and tie as you normally would.Done with practice, you can go through the entire sequence without anyone noticing and hand them a "stuffed" balloon. Then you can amuse yourself listening to their ideas of how it was accomplished. Of course, it is also fun to allow them to watch you do it...but, personally, I get a much bigger kick out of surprising them.I once got a gig in a restaurant by inserting the owners VERY sharp little pocket knife into a balloon and then making a long-dog out of it. What made it so funny was, when I handed it to him (with LOTS of cautions and warnings about how dangerous it was) the knife popped the balloon almost as soon as he took it from me. No one was hurt due to the caution I displayed when handling it and the warning I gave when I handed it to him.
Things to put inside balloons
Anything
- Put a quarter into a clear 9" balloon and then rotate the 9" balloon to get the quarter racing around the inside of the balloon. You won't believe how fast you can get the quarter going.
- I like leaving tips inside of balloon figures when I'm in a restaurant.
- You can make a pinata out of a really huge balloon and fill it full of treats, confetti, toys, whatever.
- Sometimes at trendy "eclectic" type toy stores, you can find a variety of giveaway objects just about the right size to put into a balloon that cost in the neighborhood of 3-5 cents/each....stuff like plastic spiders, fuzzy worms, ants (maybe uncles), frogs, miniature piggies, and so forth. My favorite was a plastic newborn naked baby with his hands up and legs outstretched. It's about 3/4 to 1 inch long and I bought up all the ones they had for 5 cents each. They must be inserted head first; the little plastic feet (and the hands too, so you have to be careful) are hard plastic and so little they easily pop a balloon. I use them in anything.... such as in a dinosaur tummy, for older kids, especially precocious 10-12 yr old boys who are rowdy. I tell them it's the dino that ate Tucson... and if you don't behave you could end up just like this kid! Another thing I do with the infants is insert them in a clear balloon and then make an angel out of the balloon. I make the angel's hands as though I was going to pop twist, but instead of popping the middle bubble, the baby lays inside it on its back... Gives the illusion the angel is carrying the baby. I use it for mommies-to-be or on baby shower gifts. If you draw the angel's eyes closed, it makes it look almost even sweeter. Little girls like them cradled the same way in Teddy Bear hands.
- Here's a few Halloween ideas I had for putting things inside balloons. Now, not all of these would be perfect for small kids so I hope you can tell which is witch. 🙂 I got started with these ideas on a visit to U.S. Toy in nearby Kansas City. They had all their Halloween stock displayed and I was sucked in. Here are a few ideas:
- Spider rings (~ $1.00/gross). Looking back, I see this has been mentioned already. Here again: A black plastic spider ring looks pretty cool inside (say) a yellow dog. Be sure to push it in back first so the legs don't pop the balloon. Any ideas on how to make a spider web inside there? Without an actual spider, of course. (I have a way to get a live spider inside, but I'd be sure to get complaints from animal rights activists.)
- 1" Eyeballs (.28/each). If Cujo were a balloon animal... Also try placing two of them in a balloon dog. Put one in each "ear".
- With most multiple-bubble-head-type animals (lion/monkey/poodle/etc.) you can place one of these eyeballs in the "top of the head bubble" to make a Cyclops lion/monkey/poodle/etc. Ok, you _could_ just draw it on but what fun is that?
- Introducing the 1002nd thing you can do with a thumb tip. Insert a fake thumb (or finger). Be sure to draw teeth and add highlights with a red marker. Hold the balloon creature carefully in your right hand and point to it with your left, being sure to curl your left thumb in so that it appears missing. "You have to be careful of this one. He bites."
- I thought about trying to insert those plastic dracula teeth but I think they're a bit big for 260's. Maybe with a 350.
- A steak knife. It wasn't the sharpest knife I ever saw, but it was sharp enough to cut meat. I figured that if I placed it in point first I would just puncture the balloon. If I put it in handle first and I slipped, it would shoot out like an arrow. I chose the latter approach and pointed it at the floor. It was a success, and it got quite a few reactions. )
Put the knife in blade first. If you put the tip of the knife on the knot in the nozzle, it provides enough extra protection to prevent the tip from popping the balloon. And if the knife slips, the handle comes out first so you won't be cut. It works every time for me. - I was thinking of things to put into balloons. How about a watch into a dog producing . . . "a watch dog". I think you can buy plastic watch look-a-likes in a toy store fairly inexpensively, you know, the ones you get at carnivals at the duck races. Or hey, put a Rolex in one and send it to me. Takes and licking and keeps on ticking.
- A friend and I came up with a couple stuffing ideas today: One was an action figure twisted into the belly of a dinosaur. The other was an anteater with plastic ants rattling about its belly (these were wedged into the mouth of the balloon before inflating). Flies in the belly of a frog or lizard might work well also. Oh, almost forgot... push a computer chip into a balloon. "Intel Inside." I've been putting Halloween whistles inside balloons.."Look! Your dog/cat/whatever Just swallowed a whistle!"
- I have used a balloon doggy for the final of a magic routine using a spectators ring. At the end of the trick the ring vanishes and I offer to make it up to the spectator by making them a balloon. In the process of making the balloon I insert their ring. I twist up a basic dog making certain the ring ends up in the stomach portion. I give the balloon to the spectator and wait for the onslaught. I inform them their ring is in a very safe place it is being guarded by "mans best friend". They immediately dive for the balloon. Try to use wedding bands or small class rings stay away from anything with small stones as they tend to pop the balloon or worse come loose from their setting. Another use is to borrow a bill from a spectator. The higher the denomination the better. Vanish it and make it appear inside a animal balloon. Another neat trick I have played with is sticking a playing card inside a balloon and twisting the balloon into a sword. Then you can do a neat version of a card stab. Take a deck of cards force the duplicate on the spectator. Palm out the card, toss the deck into the air lunge at the deck with your balloon sword. You have told the audience you impale the card on your sword. Much to your surprise and theirs the card ends up inside the sword.
- Light stick jewelry. These things are plastic with an ampoule of a second chemical inside them. When you crack the ampoule, the chemicals mix and it begins glow a neon green or yellow etc. The necklaces are long skinny tubes that would wrap around your neck or wrist. I was able to feed one into a 260 then break it and twist it into a animal, heart, hat etc. It made sort of a electric neon balloon. They looked really neat in the dark nightclub. It may be something to consider for Halloween. I kept the bubbles with the light sticks large enough to handle the glow sticks. The sticks were maybe 10-12 inches in length. Hot dog dogs, Giraffes, Hearts all were big enough to hold a glow stick. The hats seemed to be the most popular item I made. Qualatex discusses this great trick in their book "Design", and they also show it in some flyers I got for their Halloween themed printed latex rounds. I'll bet they look awesome in a 260! We use them often in our decorating business to add excitement to dining tables. Place the necklace under a dinner plate and the bracelet around the napkin or under the coffee cup to add a glow.
- Look at the tiny, battery powered flashing LED ear-rings and pins that they make now - These would look great in balloons.
- How about stuffing one of those music-box-in-a greeting card circuits inside a balloon? You can buy them separately (i.e., without the card attached) at craft stores, and each one plays several different songs.
- I think it is the 260Q Decorator Book where it is suggested that you can braid Christmas tree lights in with 2, 3 and/or 4 balloon braids.
- Fortune balloons - like fortune cookies- put pieces of paper with jokes on in my balloons (they'd include my contact details as well of course).
- For Christmas Balloons, how about putting sleigh bells into balloons before twisting? They still jingle when they are put inside balloons. Put them in the antlers of an antler hat, inside reindeer, or snowmen or any creation.
- Per request of a young boy, I put a little sword (toothpick size, from an exotic drink) into a light, translucent 260 last September. I then made a ballooni brother, leaving the sword in his torso, and informed the family that it was a sword swallower that went too far.
- Fourth of July twists? Anyone ever tried firecrackers or smoke bombs inside of balloons? I think balloons pop enough on their own w/o help. Besides, would you light the fuse BEFORE or AFTER you put it in the balloon? Pop art now has a whole new meaning.
- I stuffed two wooden strike-anywhere matches into a clear 260, and lit them off of each other. I wouldn't call the experiment a success, as the flame instantly popped the balloon. A larger balloon or a smaller flame / spark would be more successful.
- Don't put live bugs (such as fireflies) in balloons because, aside from the whole idea of trapping a living creature inside a teensy space... when the balloon pops, the bug will get trapped in the now-deflated balloon, as well as get its eardrums messed-up.
- Tried putting a Hamster in a 350 once. She much prefers her cage - a lot more room.
- John Travolta - he portrayed "the boy in the plastic bubble" in the movie. They should have left John Travolta in a plastic bubble. While cruel, it would have spared millions a couple more seasons of "Baa-baa-baaaa, baa-baa-bareeno!"
- For an adult crowd...especially in a bar, How about "a Trojan horse" ?
- "How To Stuff A Full Drinking Glass Into A Balloon, Without Spilling A Drop" or "The Glass Wrap" Trick.
Needed:
- 1 drinking glass, smooth (especially the rim), stiff (not soft plastic, paper, etc. Diameter must be less than that of a inflated 350Q balloon. For a first try, 2" wide works well (I used one of those little glasses that come with cheese spread inside. Smooth, thick, free.) Caution: Wine glasses look cool, but don't use anything too thin, that could shatter and cause injury.
- Enough fluid to fill the glass, to 1/2" of the rim. Try water for practice (no stains), but have a carbonated soft drink available for later.
- 1 - 350Q balloon (clean), clear or yellow preferred.
- scissors (balloon removal later)
- towels (just in case)
- 1 - drinking straw. (trust me)
Method:
- Fill the glass, to within 1/2" of the top. For a wider glass, use slightly less liquid. Inflate the 350Q, leaving a 4" uninflated tail. Let the air out, and re-inflate (this will make the balloon slightly wider and easier to get over the glass). Squeeze the body of the balloon to soften it. You should now have a 2" tail left. With the glass resting on a solid surface, put the end of the balloon with the tail into the rim of the glass, with the "tail" hanging into the drink. The balloon will curve into the glass, to the fluid level. If there is too much liquid in the glass, the balloon will force some out, over the rim.
- Slowly press the balloon down onto the glass, working the balloon around the sides of the glass. When you get to the bottom, keep pushing, so the balloon wraps under the glass. Notice how the inner wrap has skinned around the glass, trapping the liquid inside. Notice also how the uninflated tail section is poking down into the glass. At this point, when the balloon has covered the bottom of the glass, you can very carefully turn/ rotate the glass inside the balloon, closing the bottom, kind of like a tulip twist. If you are brave, you can now set the balloon down (on end), and the weight of the glass will keep the twist from unwinding. Ta - Dah !!!
- You now have several options:
- Keep going and put the glass further into the balloon, break the "umbilical", re-knot the balloon and have a covered glass loose inside closed balloon.
- Put glass inside balloon, work skin off of glass, and have *open* glass inside balloon. Visually very impressive.
- Win bets by taking glass back out of balloon without breaking balloon Carefully unwind the twist, and slowly ease the balloon up, off the glass. Control of the balloon is critical for this move. It may have a tendency to spring upward, and then there can be a suction effect on the surface of the liquid. Move slowly.
- Do the "Glass Cover" trick. With the balloon down around the bottom of the glass, slowly let the air out of the rest of the balloon. Cut away what was the outer, inflated balloon, leaving just what was the inner wrap/ skin section.
- Here's the cool part: If you have used carbonated soda, holding the balloon, where it covers the sides of the glass, gently shake the glass. The resulting pressurization (fizz) should make the balloon tail pop up, out of the top! Use the scissors to cut the very tip off, insert the straw and hand the spill proof drink to a amazed audience member, or drink it yourself, to thunderous applause.
- My kids loved this one. Caution: It's tempting to use the "glass cover" like a baby bottle, and suck on the balloon, but again, we don't want kids to think it's okay to put balloons in your mouth. Use the straw.
- Hope you like the Glass Wrap. Have Fun!
- Have you seen those cool animal sponges that are all dehydrated and look like a vitamin pill? They could easily go into a 260.. add a little water.. do some quick twisting... before you know it you could have a dino inside a dino... dog in a dog or any other strange combination.. how about a dog inside a cat?? The beginnings of Cat/dog maybe? LOL It would be a real stumper as well as to how it got in there if you only showed the finished product.
- Now here's a variation. Do you think this would work? Add a little water first (I've often done it with one of those palm pumps), stick the capsule in, twist your animal and let the "baby" develop before their eyes. And would this not be a cool thing to do for a kid who's mom is pregnant!
- Most of you probably put balls in balloons but if you push the ball in just a little then twist (like doing a tulip - don't pop and re-tie the balloon) you will have a balloon capable of lanching a ball. All you need to do is untwist it . It is up to you to decide when it is appropriate to make ( "you'll shoot your eye out kid" ) but it sure is fun.
- Put his movie ticket in a doggy last week.
- My son has quite a few of the Matell(sp) small cars and trucks. I put these in a balloon and he has a great time playing with them.
- Put jingle bells inside the round balloons before you blow them up. just don't blow them up all the way, or you'll pop 'em.
- I keep small erasers (I got 500 for $3 in Oriental Trader) for these situations. I use them instead of a superball in balloon toys. Some are shaped like food. "Look, your dog must have just eaten an apple!"
- Candy canes were the favorite this year. I stuck jingle bells in them I got wholesale for pennies a piece in 2 different sizes. I used red/ white and green and spiraled 2 colors like the tmeyers spear, milked it to hook like a shepards staff, and tied a contrasting x-mas color 260 as ribbon. The kids loved the sound, but I also used red & white 360's for the jumbo effect and used larger bells.
- A balloon you can make is a Texas (or cowboy) mosquito which is a humming bird and I always do a bubble inside and say the skeeters in Texas are big enough to eat (butterball turkeys, baseballs, golf balls, tumbleweeds, etc.) you insert what you want.
Meatballs
- I call a bubble placed inside the balloon a meatball.
- Twist a small bubble.
----------------- \ -- most of balloon )(__) - small bubble _________________/ - Push the small bubble as deep as you can into the big one with your index finger.
----------------- -- __) ____________ (__)__<- (_________ \_______ _________________) (___ your hand (___ ________ (____/ pinch here | V ------------------ --xx __)__________ (__)x(___________ __________________) ^ | and here - Make the meatball kinda small - about half the diameter of the balloon. When you get into practice, you'll be able to make them as wide as the balloon, but I've found a smaller ball is easier to start with.
- When you twist the meatball, twist at least ten times. That will give you more uninflated balloon to tear, and a better chance for it to stay inflated inside the balloon.
- Lubricate your finger before sticking the meatball inside the balloon. This can be as crude as shoving your finger into your mouth or as dainty as dipping it into a finger bowl kept nearby for just such an emergency. Avoid petroleum jelly, which will corrode the balloon, but there are water-based lubricants that might work well if this is where the problem lies (I refuse to say any more on the subject).
- When you grasp the balloon with your holding hand, don't squeeze the meatball. Pressing the outside of the balloon against the twisted part you're tearing, keeping the meatball behind the two holding fingers. Hold it firmly, but don't pinch tightly until you've broken off the meatball - if you hold the twist tightly, you may end up with a scrap of balloon that connects the meatball to the broken end.
2 Fingers-> | | _________ |H H| ________________________________ ___/_________\|o e|/__ \ Insert finger \__\|l r|/ \@ \__ _____________/|d e|\__/ / \_________/|_ |\_________________________________/ |_|/ - Rip off the meatball with a firm jerk - if you find yourself tugging several times, you aren't angry enough. Use more force than you think you have to, so that you get a clean break. Sometimes you can help it tear by digging the nail of the inserting finger into the side of the balloon just above the twist.
- Be ready to pinch the balloon closed with your holding fingers just as soon as the meatball pops off. You want the meatball to fall inside the balloon and not be pressed against the torn end by the escaping air pressure (I usually tilt it away from the torn end to make sure).
- Don't worry about the air that escapes, especially when you're first learning. You need a certain amount of balloon to tie off, anyway. Once you've been successful at creating a few meatballs, you can adjust for maximum meatball size and air retention.
- Let enough air out of the balloon before tying so that you can push the bubble in. The balloon has to have some room available to do this, so don't fully inflate it. Draw a face on the ball and make a lion and you have a man eating lion.
- For those with a graphical browser:
- Now there is a bubble and your finger inside the large bubble. There is a second layer of latex around the small bubble. the outer layer is still connected to the big bubble. With your free hand, pinch the big bubble where the little one is inside of it and hold that bubble in place. With the finger nail inside the balloon, break that outer layer. (The outer layer to be broken is marked by x's in the above picture). Breaking it just takes a bit of practice. If you stretch the balloon that you want to break, by working the bubble further inside the long bubble with your other hand you should weaken it enough to help break it.
- While still pinching the large bubble, work the little one free. Your finger will still be inside of the balloon.
pinch here | V ----------\ __ ----__________ (__) (___________ __________/--------- ^ | and here - Since you're pinching the balloon, air shouldn't escape while you get your finger out. Now just tie the balloon from the end where your finger came out of.
- I make what I call the "puzzle toy," which is simply a meatball put into fully inflated balloon, which I then loop into a pretzel shape. The meatball can then float from one end to the other by turning the balloon. A bubble inside the balloon doesn't always roll very well, but a ball is heavy enough that it rolls through the whole pretzel shaped balloon very easily.
- For pregnant animals, I was taught to push the little ball into the balloon with your finger and then twist and twist and twist until you feel a good tightness on the end of that finger. Then angle your finger and pop with your fingernail. Works for me most everytime.
- A hint for tearing off a meatball inside a balloon, which I discovered by watching Richard Levine here in Eugene:
- Make the bubble
- Poke it deep into the balloon with one finger
- Pull that finger out fast - the balloon will often pop due to friction, and the "meatball" is free!
- If (3) fails, tear the end off with a *fast* motion, which is easier than slow.
- Failing (4)... use scissors. Latex makes crummy dental floss!
- When you twist off the bubble that is going to be inserted, make it fairly small and twist it 4 or 5 complete turns. The first hard part is pushing the bubble into the main body of the balloon. Make sure the bubble is smaller than the main body of the balloon. I hold the main body of the balloon in my right hand right up close to the twist. I then (slowly) push the bubble into the main body with the index finger of my left hand. When you get it in, push it as far into the main body as you can. With the thumb and index finger of your right hand pinch the main body down onto the twist of the bubble. Hold this tight in your right hand and start to pull your left index finger out of the main body. The idea is to break off the bubble at the twist with the fiction between the main body and your left index finger. Sometimes if you move your left index finger down a little at the first joint you can increase the friction and insure that the twist breaks. When the twist does break, clamp down with your right thumb and index finger to seal the hole. Then retie and the bubble is inside the main body.
- I push the bubble in almost all the length of my index finger, then I grasp the little bubble with the other hand from the outside and withdraw my pushing finger just enough so that I can pinch the bubble right where it meets the rest of the balloon. This pinch should be firm enough and should effectively cut-off any chance of air escaping once you pop off the bubble. Now, give a twist your finger that is still on the interior of the balloon; make sure you give your finger a hook shape and sort-of scoop twist. Usually the bubble will just pop free and you'll be left holding an unknotted balloon. And you'll probably have about enough space left where you're holding to simply knot it up, if you like. Try practicing with a superball, it is a lot easier to insert and break off.
- I could not manage to get a bubble inside a balloon -- until this last weekend! Yea! Two hints helped me get it to work:
- From the October Balloon Magic Magazine ("Magic" section): Push the bubble back into the balloon by holding it with your thumb and first two fingertips until it is back into the balloon, then use one finger to push it the rest of the way in. I had a lot of trouble pushing the bubble straight back with just my forefinger; it kept slipping out before I could get it secured into the balloon.
- Make the bubble smaller than the diameter of the balloon itself. I was definitely making the bubble too big before.
- I found T. Myers instructions on the balloon seed (bubble insertion) to be the easiest to do consistently. After inserting the bubble, twist another bubble on the end (it will look like a tulip twist) and pull it off. It separates easier. Later you can use other techniques to put one color inside another etc.
- When I'm breaking off a meatball, I twist the balloon tightly around my finger inside the balloon to ensure that I pull it all back. It makes it a little more difficult to break off the ball, but I find it ensures a successful insertion. I leave a little tucked inside, and the flash gets incorporated into the knot.

Peas In A Pod
- Make five or six meatballs, and then deflate the balloon around them, leaving something that looks like a pea-pod. The pea-pod can also be called a caterpillar. Then if you make wings out of another balloon you've got a butterfly. [Note: A chain of small bubbles, each pushed into the balloon body separately can be used to create the same effect... after the outer balloon shell is deflated.]
- When you are trying to do "peas in a pod" or a caterpillar body, do you do several separate meatballs inside one balloon? Or do you do a string of small bubbles and try to push them all inside the larger balloon? If so, how? Mine keep untwisting..
- Up till Saturday, I did use a series of separate meatballs. However, I got my hands on the insect edition of Balloon Magic, The Magazine, and it explained a technique using a series of tulip twists:Start with a tulip twist, and push it inside the balloon a few centimeters. Grasp the tulip twist inside the balloon, and twist at the point before it. You now have a second tulip twist outside the balloon. Push it in the same way, and repeat the process until you have a sufficiently long string inside the balloon. Now deflate the outer balloon. When I tried this, I couldn't believe how easy it was, and how fast. It went a lot quicker than pushing a meatball in, tearing off, reknotting, etc... plus you lose less balloon this way.
- When making a lot of little bubbles in one, make one bubble, push it in extra deep and make a small tulip twist. Then push the tulip twist in extra deep and repeat. Keep going untill you run out of balloon.
- Do one bubble at a time. Of course you have to hold on to the unit, but make it easy on yourself and only try to shove 1 in at a time. Make sure that the diameter of the bubble is smaller than the diameter of the balloon. The smaller the easier.
- Here is the method for making a butterfly or caterpillar body. Inflate a 260 (works with other sizes too) about halfway. Twist a one inch bubble, then push it into the inflated portion of the balloon, leaving enough balloon to twist another one inch bubble. Twist a one inch bubble, then push it into the inflated portion, and repeat until you have the required number of bubbles in the balloon. Pop the outer balloon, leaving bubbles with a membrane around them which keeps them from untwisting.
Glo-Sticks
- Glow sticks in balloons are awesome! My daughter and I couldn't sell yo-yo balloons with glow sticks in the them fast enough last 4th of July. Adults and kids were constantly stopping us and we couldn't restock quickly enough. Best of all, when all the lights were out in preparation for the fireworks, glowing balls were "bouncing" in the air all over the place! Loved it!
- There are a number of ways you can use "glow-sticks" in latex balloons for a cool nighttime effect. Here are a few:
- You can preload the small glow-sticks inside round balloons you plan to inflate with helium. On site, crack the lights to activate them and inflate the balloons with helium. Be sure to test ahead of time to make sure the:
- Balloons have enough lift to carry the lights for a significant amount of time
- Balloon colors chosen are transparent enough that the lights show up in the level of darkness you will have on site.
- which light colors show up best with which balloon colors
- You can do an "apple twist" with a glow-stick inside the inside-out portion of the balloon.
- This can work with apple balloons, even better with bee body balloons. For longer glow-sticks use #524 balloons. These specialty balloons are traditionally fairly opaque, however, so test before using them commercially.
- The apple twist concept can also work with the long, 22", lights by using #260, #340, #344, #350, or #360 balloons. Successful apple twist maneuvers can be made easier for such long balloons by inserting clear plastic tubes first and then simply and quickly sliding lights in when you have a crowd. It is still important to test light, color, and opaqueness combinations.
- Lite-Sculptures(TM) offer a third possibility. They are patented devices that allow glow-sticks to be inserted and removed from inflated balloons at will. They also allow for easily adding or removing gas from the balloons any time you like. Generally they are too heavy to float in the air with helium. I originally designed them for table decor, but they can be used like Japanese lanterns for room decor, or in other forms for individual play.These are not generally available, but we expect to revive their availability over the next six months. We plan to start showing these in the next couple of months on our web site: http://Rouseinternational.comDesigns incorporating the internal structuring techniques I developed for the Lite-Sculptures(TM) have won several international design awards (including IBAC and NABA) and have been among finalists for others. They have been published in Images, Balloons and Parties Today, Flowers, and Balloon World magazines. They were featured in what I believe is still the only one man, public art gallery exhibit devoted exclusively to balloon sculpture.
Check with distributors of the glow-sticks for related chemical light products that may not include balloons but which might go well with outdoor, night vending.
The discussion about glow sticks in helium balloons reminded me of the first Balloon Convention we attended. Unique Concepts Open House in June 1986. At one of the evening events Chuck Guberman entertained us with a magic act. Of course he was great. At the end of the act they did a balloon release in the Ballroom. This ballroom had a very high ceiling. I would guess somewhere over 25 feet high. Anyway the Balloons had glowsticks in them and it was quite a sight to see them rising in the ballroom. Then as the event approached midnight the balloons began to slowly drift down. What a sight. I'll never forget it. I'm not sure who was responsible for this effect, but have a feeling that it involved Rocky Toomey, Jamie Jeffreis, Don Cheeseman, Marie Mandoli, Chuck and Joyce Guberman, who were all instructors at this event. I always wondered if the falling balloons was planned or just a surprise to all involved.
Check out the following company. The sticks are $32.50/Tube of 50... And all are 22" long. They also have super jumbo at 20% thicker size for $42.50/Tube. And for those of you interested in novelties, giftware, electronics and party supplies, this company has over 500 products (similar to Oriental but much much more!) for really great prices. Ask for a catalog. It's free! Rhode Island Novelty (in Johnston, Rhode Island) Tel 1800 528 5599 or 401 274 1818 fax 1 800 448 1775
- At the Euro Jam there was a guy from Belgium that was making some GREAT eye balls! He was using glow sticks. Glow sticks are well known by the Millitary people. They are these plastic sticks that are filled with a chemical and they glow when you bend them. They do not get warm so you can use them in balloons with very few problems. They come in several sizes and colors too and can glow for several hours! You can get these glow sticks at fishing accessories stores.Anyway the eyeballs.... Get one of these small sticks glowing, put inside an uninflated clear 260. Blow up a small bubble, just big enough to hold the small glow stick. Tie off and cut off the rest. Now blow up a white 260. I cut off the end just above the knot so that I have less of a bulge later. Push the clear 260 into the white one, just enough so that it looks like the white of the eye around the clear (or in our case the glowing part). Now let the air out of white by putting a small hole in the tail end of it. The white will now sit tight on the clear 260. Then you can do the same again with a 3rd color that will match the color of your figure, or any color that you would like to use. These eyes are extra cool and look great! The glow sticks can be used in all kinds of ways, not just for eyes. I can't wait for my next night job where I can put them in hats!
- A boy asked me if I could make his sword into a light saber. He had a small glow stick that I inserted into the end of a 260 then twisted closed leaving the glow stick hanging from the end. The entire shaft of the sword lit up. I bet I made 30 more of them before the night was done. The lighter colored balloons worked best and the shaft had to be shorter than normal or it got top heavy.
- You can preload the small glow-sticks inside round balloons you plan to inflate with helium. On site, crack the lights to activate them and inflate the balloons with helium. Be sure to test ahead of time to make sure the:
- If you are looking for Glow product call 1-800-367-4569 Chicago, IL. They are a big outfit and have it all wholesale.
- You might want to check your local fishing store. They have small glow sticks that fit on top of bobbers for night fishing. I have not tried to put them in a balloon but they are definitely small enough
- Go to a fishing shop, normally they sell little fluorescent things that you can put in a 260
- The name of the Glow light company is:CHEMICAL LIGHT,INC.
595 NORTH LAKEVIEW PKWY
VERNON HILLS,IL. 60061
1-800-446-3200I have done business with them for a long time and they are excellent. They carry all sorts of Glow light to stuff balloons, drop in drink glasses, or wear as whatever. They just sent me samples of their newest stuff: tiny lights that can stuff into a balloon and push the button and the thing comes on and blinks. We vend the glow product as well. - Recently I have done many weddings and special events and found a company I thought you all might find useful. Q-Light Inc. is based out of Colorado and has tons of glowsticks which I have found beneficial. They carry lots of colors and even sticks for high intensity effects and industrial ones that last 8-12 hours. I am doing a "Crystal Ball" function this weekend and am using them inside clear over white 3' balloons to look like real crystal balls. Their web address is http://www.glowlight.com
- LightenUps, flashing lights that fit INSIDE balloons, come in red, yellow, green flashing LED's that are individual units - will float with 16" balloons (best with Hi-float) and can be used in smaller balloons for sculptures, arches, walls, balloon drops, etc., float them on water, any type of nighttime use. They flash continuously for 36-60 hours, operated by watch type batteries - and don't have to be used strictly with balloons - use them with centerpieces, etc.LightenUps are about 1" diameter plastic encasements with a flashing LED sticking out - they come in yellow, green and red. You activated them with a little "button" on the back which can actually be used like a paper clip too. They can also be deactivated.The lights flash continuously for 36-60 hours. They float in 16" balloons (at Denver altitude which may mean they will float in smaller balloons at lower elevations). They are for NIGHT use and are quite dim during the day.
When used inside smaller balloons for sculptures, etc, a little hi float in the neck helps to lubricate them to insert them easier. This is great for BALLOON DROPS! The yellow ones were used in final night centerpieces at IBAC, placed in a handful of irridescent shred under a glass block - it was pretty neat! Some clowns are using them for under their shirts! Also, this is a great way to create FLOATING centerpieces!
The price is 95 cents each and are shipped from Longmont Colorado by mail or UPS. There is no minimum to order, but I would prefer to ship a dozen at a time at least, you pick the colors.
I can't take credit cards but for small orders I will ship and invoice, due on receipt.
Leslie Brandt
3633 Sunflower Cir
Longmont CO 80503
(303) 485-0016
[email protected]
Super Balls
- Insert ball. Inflate balloon but don't tie it. Bounce it on the floor. Watch the fun.
- Superballs are high-bounce balls. They are available at most toy stores and come in various sizes and colors. The smaller ones go nicely into balloons.
- Ball-in-balloon toys are super-popular items. I got superballs through Tom Myers, and in the end each one costs the same as a single balloon. So, cost isn't really a factor -- it's just like doing multi-balloon figures. However, these things are more like kinetic toys than figures. Some things I've been making with superballs in them: fill a balloon all the way, put a ball in, and tie the balloon into a big, loose knot. Overhand and figure eights work great. You can twist 1" bubbles in each end then connect those together if you want. A simple but stunning balloon/ball "maze"! Another toy: fill two balloons of different colors; put a ball in each. Make a long double-helix (see below), and you have a spiral ball racetrack.
- The superballs sold by Tom Myers fluoresce under a black light! I discovered this when I used two of them as eyeballs in "googly eyes" (inside of a clear 260Q bubble) while twisting near the bandstand in a bar. Since the bandstand is lit up with "black" lights, the superballs looked like they were ready to jump right out and grab you - like a cat's eyes in your headlights! Very cool!
- My favorite thing I picked up from T. Myers was using two small super balls in a clear heart or clear 260Q to make googley eyes. When you stuff anything inside a balloon with the meatball method, you end up with a layer that surrounds what you put inside. After working at putting things inside balloons, I can now even controllably unwrap the layer of balloon from the object (ball, etc.) I stuff in the balloon before I withdraw my finger. Google eyes with inserted superballs (or balloon balls) look best if you unwrap the clear cocoon from them after insertion. When I put something inside that I want to unwrap, I try not to break the cocooned object off completely. Instead I try to leave a little latex attaching the cocooned object to the rest of the balloon. My finger stays inside the balloon to plug the hole so the air doesn't escape. Then I use that remaining bit of latex as a handle for my inserted finger, in conjunction with my outside hand, to peel the cocoon from the object. It can still be done even if the object is completely broken free, though it is not quite as fast. In either case, don't leave the cocoon floating around inside the balloon with the object. It is distracting. Just remove it when you pull your finger out.
- Use a hi bounce ball to hold an inflated heart through a Geo. I was making swans, hearts and Geo sculptures and wanted a way to make the heart stand in the Geo. Stretch the knot through the Geo, place a ball against the stretched neck of the heart and the interior of the Geo. Let it all go and "Presto!." The ball snuggles up into the Geo and holds the neck of the heart against the interior of the Geo. It also works with frogs on lily pads, dinasaurs on rocks, flowers in vases and, and, and. I twisted swans, poodles, dinasaurs etc. around the heart/Geo to make lots of fun stuff.
- For the bouncing balloon use a 1" ball in a 350 or a 340. The floor needs to be hard and dropping works better than tossing. I think that that bit is from an old balloon book called Blow By Blow.
- I put two racquet balls inside a 350. The resulting balloon was only about 20 or 24 inches long. It was a lot of fun for tossing up in the air and it bounced kind of strange. A friend picked it up and threw it across the room. The balloon went sailing straight through the air! It flew like a missile, you've got to be careful how hard you throw it!
- I took an orange balloon and made two balls inside of it, then I shot them out and stuffed them into a clear Geo blossom. I put the Geo onto a flower hat and the balls jump around like popcorn every time you move your head. Even little boys want a flower hat like this one.
- Use the ball to hold an inflated heart through a Geo. I was making swans, hearts and Geo sculptures and wanted a way to make the heart stand in the Geo. Stretch the knot through the Geo, place a ball against the stretched neck of the heart and the interior of the Geo. Let it all go and "Walla!". The ball snuggles up into the Geo and holds the neck of the heart against the interior of the Geo. A heavy heart! It also works with frogs on lily pads, dinasaurs on rocks, flowers in vases and, and, and. I twisted swans, poodles, dinasaurs etc. around the heart/Geo to make lots of fun stuff. Used a BB twist to connect some bug food to the Geo for the frog sitting on the flower. Fun.
Things NOT To Put Inside Balloons
- You can put Hershey Kisses or other candy inside balloons, but there are a few things to consider:
- Having to break the balloon to get the candy out means little kids may put the balloon (or the broken pieces) into their mouths. I doubt this is a problem for us big kids though 🙂
- You probably only want to put food in balloons you pump up, not balloons filled with warm moist air from your lungs (those pesky germs again.)
- The talc on the inside of the balloon will get all over the candy.
- When giving children candy, I follow the Halloween rule: If it's not wrapped, would I want my child to take that piece of candy from a stranger?
- I bought some gumballs (Machine refills) and have been putting them inside balloons. Just like making a bubble in a balloon, I push the gumball inside. Be careful to remove the rubber coating on the gumball. Kids seem to like the idea of a gumball inside the balloon.
- I personally would be very cautious of doing this for a couple of reasons. First when they pop the balloon to get the gumball it can still leave balloon on the gumball. Also, the inside of the balloons have powder on them. This powder may get on the gumball. I would hate to see any reaction from that for any of the kids. A child you are giving the gumball to in a balloon more than likely will not be aware that they may be ingesting powder along with their gumball.
- I would be horrified to see a child decide to try to eat the balls I have put into the balloons (the ones from TMeyers) as they had previously seen another put gumballs inside of them instead of bouncy balls.
- A gum ball is a perfect size but we try to educate kids NOT to put balloons near/in their mouths and this might send a mixed message. You're putting something that could be edible inside a NON edible balloon.
- As for mouth blowers, your breath combined with a gumball they are going to stick in their mouth would not be the smartest thing.
- Candy inside a balloon is a nice idea indeed, and most kids like it. The powder inside a balloon is talc. It's harmless unless you're allergic. Personally, I always use wrapped candy. It's cleaner and safer, and lots of candies have colourful wrappers. I remember doing balloons for football fan friends of mine (all you Brits and Yanks out there would call it "soccer"). I made balloon persons in the team colors and put in wrapped gumballs that looked like soccer balls. Everybody loved it.
- I can quote no studies or statistics, but from my general experience as a balloon twister and worrier, and for the balloon coating around the gumball, I consider putting a gumball in a balloon to be an accident waiting to happen. From a child's perspective, if you show him something made to be put in the mouth, most won't know or care there's a balloon coating on it. I've had children break twisted balloons to get at the small rubber ball inside. The idea of doing that with a gumball scares the life out of me.
- The impetus for putting a gumball in a balloon is simple: it fits. It's a fun, colorful thing that fits in there, by golly.But in order to get to it, the sculpture has to be ruined, or the child has to wait a week, at which point the white gunk in the balloon will be a permanent attachment to its sweet, sticky exterior.Other fun, colorful things to put in there might include Tetracycline, Tylenol, and a host of illegal products. But we don't just put things in there because they fit, we put things in there because it enhances the sculpture or makes it more fun.
That's why balls in the balloon make perfect sense. They make a fun boingy thing while the balloon is alive, then they can be removed and played with afterward (by children over three). T's ball putter is a cool gizmo, the balls are cheap (no more than the cost of gum, I don't think) and nobody eats talc or gets a latex allergy in their throat.
If you must put candy inside the sculpture, then use wrapped candy.
Better still, give the sculpture hands and let it _hold_ the candy. Use a model that incorporates the candy and its wrapper into the design so they won't be too quick to take it off. I haven't tried it, but there's probably an opportunity to put a wrapped hard candy in the feet of an acrobat, for example, or anything that you want to stand up by weighting the bottom.
- When I was in first grade (during the Pleistocene, as I recall), I was given a Christmas stocking in the shape of a gingerbread man with a cookie for a face. He was my buddy for the rest of the day, going everywhere I went, down to the dirt hill, through the Bluebonnets, under my bed, etc. That cookie wasn't good eats by the end of the day, and it wasn't a good face, either. I was a kid, and I didn't really understand the rules for how I was supposed to play with things; but then, I was a kid, and there aren't supposed to be rules for how I played with things.
- Gumballs are interesting. If they are lighter then bouncy balls they would be great for googly eyes for figures for display. They wouldn't make figures so top-heavy. And the color selection is interesting. But I would definitely not use them for handouts. Just wrapped candy.
- I do like the idea of using colored gumballs for eyeballs. Since they are less heavy, the figures would become less topheavy. I mostly use balloon meatballs for eyes just because of this topheaviness.
- I would strongly discourage the use of ANYTHING edible combined with balloons. We stress to the children and the parents to keep balloons away from their mouths. It would be confusing to a toddler when you give them a balloon; tell them to keep it out of their mouth and let them see a gum ball inside.
- The very notion of putting anything edible into a balloon strikes me as an incredibly bad idea. There are health concerns (sanitation, latex reactions, choking on a fragment of balloon). There's the fact that the child will have to pop the balloon to chew the gum, or wait until the item is deflated, exposing the gum to more of whatever is in there. If you're using a ball putter, you'll have to puncture the wrapper around the gum to insert it, so that doesn't sound like a solution to me.
- If you must give away gum, you could make figures holding a wrapped piece of gum, or use gum as the weights in the feet of acrobats.
- Putting a ball into a sculpture is great, because it adds an element of fun, and gives the kid something to play with long after the sculpture's gone. Giving a gumball introduces a number of negative possibilities when at best it just gives a kid something to chew on for fifteen minutes and spit out. I really wouldn't recommend doing anything the associates balloons with putting something stretchy and rubbery into one's mouth.
Where To Get Stuff To Put In Balloons
- Accent Annex, 1-800-322-2368.
- Loftus Novelty, 1-800-453-4879 has a whole novelty catalog.
- Oriental Merchandise Co., 1-800-535-7335. Order their wholesale catalog
- Oriental Trading is either 1-800-828-9898 (a Dallas number) or 1-800-228-2269 (a Omaha number)
- Slam Bam in Brooklyn, NY, 800-451-7481.
- Source Book, published by Paper and Party Retailer Magazine, (203)845-8020. A good all around source for many items.
- I get my glow sticks at Martin Industries in Ontario, CA. You can call directory assistance for the 909 area code for their number. The owner is Gary Martin. They supply Disneyland and Knott's, and their stuff is always fresh, which is important.
- There's a place called Oriental Trading Company in Omaha, Nebraska, that has all sort of teensy toys, superballs, et al. for WAY CHEAP. Their number is 1-800-228-0475. Their prices are good but the shipping will kill you unless you order a large quantity. Call and have them send you a catalog.
Tools for Putting and Object Inside a Balloon
- The ball putter was invented because putting a ball into a 260 is something that takes a knack. The balls 'n balloons toys can require you to put a ball in every 2nd or 3rd balloon. After a day of this my finger hurts. The ball putter makes it fast and easy, but you are carrying around another tool. If you can get the ball into a 260 quick and easy and it doesn't hurt your finger, you don't need a ball putter. T. Myer's "Ball Putter" is one of the greatest things I've ever seen. I was not really sure about it when I ordered it. Now, I wouldn't give it up!
- I've been using the T. Myer's Ball Putter to put superballs in balloons, and I love it. I say my sharp wit pops the bubbles. It's so fast I can usually do it before the recipient (child or adult) sees what I'm doing, and they go gonzo (that's a technical term) when they see the ball bouncing around inside the figure. T Myers ball putter is great for super balls but won't work with bubbles.
- At IBAC, Marvin recommended that for stuffing you first go to your local Farm Supply store and buy a "Banding Pliers" - a pliers used for stretching rubber bands when castrating animals. With a simple squeeze you can stretch and hold open a balloon nozzle while you fill it with confetti or whatever.
- Marvin invented the Jiffy Tube system specifically for inserting items into the 260's. It works great. There are 3 tubes which will allow you to insert things into 260's, 5", and 9" balloons. We use the "banding pliers" to easily fit the neck of the 260 over the end of the tube.
- To put a business card into a balloon you need to start with a jewel tone color (yellow, orange, etc.) You will need to inflate the balloon leaving enough to do the insert, pop and the twists for a small animal. Roll the card around a pencil or pen and insert, pop and tie off. Then strip the rubber off of the card. I don't bother to get this piece out as it shortens the balloon but you can if you want to be mysterious about how the card got in there. Twist the nose, ears and neck and gently unroll the card (it will have to stay somewhat curled) then finish the animal. Practice, practice.
- The ball putter has saved my life. I am not very coordinated, and I keep my fingernails very short for twisting. The ball putter rescued me. In fact, one day I forgot it, and someone knew I put balls in balloons. I tried it without it, and couldn't do it. I will sometime spend the time to be able to do it without the putter, but for now, I rely on it. For older kids (especially boys) who think they are "too cool" for balloons, I put the ball in a clear, blow up another darker color (I like blue or purple) and twist the two together, all the way up the balloons. It makes a toy-like balloon. The kids love turning it one way and then the other to watch the ball swirl around.
- When putting objects in balloons you can use an Elastrator from your local farm supply store. It is normally used to remove tails from lambs or castrate calves. It stretches a very small, very strong elastic which is then placed over the offending part and released. (Gentlemen, wince here!) Anyway the point is that the elastic is similar to the ring of the nozzle of a balloon and some objects can be placed in regular balloons.
- The ball putter impales the ball. If you can already put a car in a balloon you probably won't need a ball putter.
- The ball putter is a tool to help you learn how to put your first ball inside a balloon. In rough terms the ball putter is a 1" diameter, 4" long wooden dowel with a pointed metal spike sticking out one end. You impale the ball on the spike, then stick the ball into the end of the balloon. Here comes the nearly impossible part. You slip the ball off the spike, then stretch the balloon a bit to give you some working room, then you pop the inside of the balloon, the part next to the ball. (If you are real real real lucky, the ball will be in the balloon and you won't pop the outside balloon too, and you won't release too much air in the balloon.
- When the ball on the putter is pushed into the balloon, the ball should lean against one side of the balloon before you hold the ball and pull the putter out of the ball. This leaves plenty of space for the putter to break the latex around the ball without touching the outer skin. If the ball is grabbed in the center of the balloon you have a good chance of breaking the balloon. It's a small thing but it makes all the difference.
- My daughter could not put anything inside a balloon before the ball putter. She used it for one week and has never used it since. Now she can put nearly anything into a balloon. (FOR SALE: barely used ball putter for cheap)
- I put a small screw-eye on the end of my ballputter and have it hanging from my keychain.
- If you want a quick and easy way to put balls in balloons then the ball putter is recommended. I got it along with T's book on this topic. It has ideas for various balloon sculptures and how balls and balloons can make neat toys for kids. It takes a bit getting used to but is worth it.
Pop twist
- It is often desirable to get more limbs on an animal than there are ends on the balloon. The basic dog works out OK, but legs need to be grouped in twos. The pop twist will allow two legs or arms to be separated. When you are at a point where you want to make a Pop Twist, twist two medium bubbles, three small bubbles, then another medium bubble. Lock twist the medium bubbles so nothing untwists. Ear twist the first one.
in out \ \ / / \ V / \|/ _( )_ <--- 1 medium bubble (ear twist and tuck between "in" and "out") ( )^( ) <--- 2 medium bubbles (become separate legs) (a)_(b) (c) <--- 3 small bubbles (a, b, c) - Ear twist bubbles a and b. Twist them about 5 times each (completely around). Now pop c. The air should not come out of any of the other bubbles which now represent paws or hands..
ET ET ______()________ @ O______)(________) side view with end view _(_)_ ((_) perspective attempted (_) (_) oo o o - A balloon only has two ends. A pop twist is used if you need an extra end of balloon while using the same balloon. Here is an example. Partly inflate a 260. Make a two inch bubble, now make another one, followed by three 1 inch bubbles and another two inch bubble. lock twist this 2 inch bubble to the second one. Now ear twist the first and third ear twist, and twist at least five or six times. While holding these two twists, pop the center bubble. You now have a 2 inch "head" with two "horns" sticking up. Position them differently and you have a cross etc.
- Pop twists - good for pop-apart arms and legs on beasts, but the twists can easily come undone. Usually I try to put animals and other creations with this kind of pre-popped balloon twist on hats or leashes so they're more likely to "live" longer.
- A "pinch and pop series" is a 5 bubble series. Bubbles 1 and 5 are the same size and bubbles 2 and 4 are the same size. The series is twist locked to form and loop (almost diamond shaped). To pinch bubbles 2 and 4 you take one bubble and bring its own ends together by pulling on it's middle and pinching the ends together. Twist it at least 5 times if you're going to pop bubble number 3. Do this to both bubbles. This is exactly how you would make the outer part of a Teddy Bear head. I believe some books call this a bean or ear twist. Be sure to support the pinched bubbles while popping bubble no. 3 so they do not untwist. Hint - if you twist the pinch in 2 it makes good claws for your T-Rex or Eagle.
- Pop twists -- I find that by pulling the two ear twists apart really hard (sometimes hard enough to burst the middle bubble without manually popping it) the bases of the ear twists become really knotted and are less likely to come undone.
- If I make something that will not use up most of the balloon, instead of a three bubble pop-twist series, I make five bubbles. I ear twist the two staying bubbles a few times, leaving three in the middle untwisted. Out of those three, the middle one is the popping bubble - I usually make it only about a 1/2 inch bubble. The bubbles on either side of the popping bubble are usually about an inch. I make sure the staying bubble ear twists are secure, or split, then twisted in opposite directions. When I pop the popping bubble, the two longer bubbles deflate leaving small, uninflated ends. I wrap the ends into the staying ear twists several times, or if there's enough scrap, I pull and tie it.
- Someone else wraps a tiny balloon scrap from a pocket around the staying ear twists before popping the middle bubble to keep the ends from deflating. It seemed like more work, but when I saw it, it was done so quickly, I hardly noticed.
- Although it may pose some problems, I still think the pop twist is one of the best techniques I ever learned, and many of my balloon creations would not exist if I hadn't.I practice pop twists by inflating a 260 about halfway and seeing how many times I can do the technique, making as many smaller balloons as possible. If you do it with pinch pop twists you end up with a bunch of fat dog bones. If you do a 1 1/2 ' bubble, then a pinch pop, then a bubble. then a tearoff. Then a bubble, pinch pop... you end up with a bunch of fat minnows.

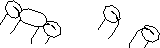
Pop Twists: The Alternate Method!
- I'm not sure what anyone else calls this one so for now I'll call it a toe twist since that's what I like using it for. Make an ear twist, with only a little air in it. The softer the better. Twist the bubble in half now to form two toes.
twist along this line | v ___ (_v_) existing ear twist / ^ \ / / \ \ in out ^ | - The Dewey method for pop-twists requires toe-twisting each ear-twist in the pop twist series.
- Mike Decker a has new technique. After you make the 2 ear twists, and before you try splitting them in half with your fingers, try moving the ear from on top to under, then pushing the ear up, causing the ear to be split by the balloon (2 chambers next to it) creating 2 little bubbles from the ear. Now twist these little bubbles around a time or 2 and your ear-twist is set. Repeat w/ other ear and pop. I lose almost no pops this way and can't remember the last time a kid came back for repairs.
- There is definitely a difference in the two methods of pop twisting. In the Dewey method, you twist the existing ear twist in half. In the Mike Decker method, you squeeze the two bubbles on either side of the ear twist towards each other, then push the ear twist up through the bubbles, using the bottom half of the bubble to split it into two halves. then you twist the two halves around. When I was first starting out, I had a terrible time twisting the bubble in half and broke a lot of bubbles learning the technique. I saw Mike Decker's Video, and his technique is easier for a beginner. I could use his method immediately with little or no poppage. There is less control of the size bubbles with Mike's method. Now, I can do either, and really don't know which is better. Hope this helps
- pop twist - the easiest way I found comes from one of John Holmes videos. First you do an ear twist, that is where after you make a bubble, you fold the bubble over and twist the two ends together so the are joined at the same spot. Next hold your hands on both sides of the ear twist so your thumbs are on the rounded side of the ear twist. Now push the rounded end through the point where the original twist was joined. This will split the ear in half. Once you have pushed this all the way through then twist the whole unit in a circle. Next make a small bubble (the one to be popped) then make another split ear bubble unit (sounds professional). After you finish the rest of the sculpture, pop the balloon in the middle. If you are making an extremely difficult sculpture, you might want to pop the bubble earlier so you don't do a lot of work only to have the pop fail.
- Here is the most valuable piece of advice I can give you about the teddy bear problem. When I was a novice, Joe St. Marie (Sweet Pea the Clown) taught me this one.When you do a pop twist series for the arms and hands many people are taught to do the ear twist and twist it about 8 or nine times, then the middle bubble that gets popped, then the next ear twist twisted 8 or 9 times. This is where you get into trouble! I used to do it this way and I too would lose an arm 1/2 of the time.Instead try it this way. When you do the first ear twist, split it in half with a split twist. After the split twist, you do not have to twist it 8-9 times. 2 or 3 will suffice. Then do your middle bubble (to be popped) and proceed to the next ear twist and split that one.
I promise if you use this method you will never again lose another arm. Besides, the split twists make the bubbles look more like hands or mittens.
- I'm having a problem with the pop twist going bad and the feet going pifffttt and letting all the air out. What am I doing wrong here? There are two possible solutions:
- Twist the pinch twists at least about 7 or 8 times, and hold them as you pop the middle bubble. Then let go of the pinch twists.
- Twist the pinch twists in half. This takes a bit of practice, and a bit of time.
- When I have enough time, and the figure allows it , I use method 2 because it gives the sturdiest results.
- My recommendation to you is that you contact Bruce Kalver at [email protected]. He has a fantastic video that deals with that problem. I do a lot of the popping the middle bubble too and I had never seen it done the way Bruce does it. Before I saw his method I did the ear twist and then divided the ear twist and twisted them again.
- When I first learned this, it was called the CLAW TWIST. Keep the word claw in mind when you do it. You have 3 bubbles in a row that have been twisted at least 4 times around. Do an ear twist with the left bubble. Now thinking of the bubble as a claw, push it against the twist. The twist divides the claw in two and now twist the two bubbles. Do the same thing to the right bubble. Now you can pop the middle bubble safely.
- At a clown convention in Williamsburg, VA, one time, someone showed me how to roll the bubbles on either side of the one to be popped so they would actually tie themselves. It was not another twist of the bubbles that are originally ear twisted, but somehow rolling those bubbles into the balloon again. The gentleman told me it actually tied them off somehow, and they would not lose their air. This is all done before popping the middle one.
- I have one problem - when I first do them my pop twists are ok, but in a few minutes they will start poping or the air will start to leak out. What am I doing wrong?
- Sometimes it's really hard to get those pop twists to stay. It's a practice thing. I have a couple of suggestions, and one that someone else (wish I could remember who so to credit) showed me works well. What I usually do is make my pop twist series. I ear twist the two bubbles that I want to stay (the "staying" bubbles), leaving the one to pop between them. Before I pop the middle one, though, I twist the staying bubble ear twists in half, twisting the half-bubbles in opposite directions about 3-4 times. This works really well for me. Then I pop the middle, "popping" bubble.
- in a pinch pop series I split the pinch twist into a toe twist... it holds much better.
- The pop twists need to be twisted more times... first of all, twist the basic bubble at least four times before doing the ear-twists, then each ear-twist several times. Some twisters find it helpful to also split each ear-twist in half, and then twist each of the halves separately a couple of times.
- Bruce Kalver's "Airnimations 2" describes a technique for the pop twist that is much more durable than the method most often described in books. The video also has a bunch of good character animals on it. Buy one and fear the pop twist no more.
- There is a way: make an extra bubble to each end of the pop twist, deflate this, and use the deflated end to tie off eartwists at the ends. Then twist the eartwist in half. This will use up more balloon, but even when the eartwists at the end untwist, the balloon will not deflate. Another way is to forego the pop twist altogether, and use an bit of separate balloon twisted in to make the extra ends. This may not have the almost magical effect a poptwist sometimes has, but provides for sturdier creations.
- There are two techniques that I use to make the pop-twist more child resistant: First of all, I use a technique that I learned from several John Holmes videos, which John usually credits to Mike Decker. First make the two ear twists on either side of the "pop" bubble. Then, in order to split this twist, press the "ear" bubble into the twist itself. Let the twisted part do the splitting. With practice, this will also help you make the split bubbles more even. Once you have split the ear, twist the new pair of bubbles several times. I've had this particular twist hold up for at least two weeks, if the sculpture is not "played with" too roughly.
- The second technique is part of the patter. I use the pinch-n-pop for making Mermaids, Gorillas, 'Zillas,... *Many* of my more popular designs. Before I hand the child the balloon, I warn them that this critter is very ticklish! Don't play around with the claws/toes/fingers... or the balloon critter will laugh so hard that it will fall to pieces. I *rarely* need to repair a deflated critter due to a failed pop twist.
- Here are 2 simple remedies depending on the creation.
- Airplane: make sure you twist the pinch twists AT LEAST 5-7 times. After you pop the middle bubble, untwist each pinch twist and tie a knot like you did after blowing up the balloon. Voila! No more lost wings.
- For arms, etc. (I got this idea from Bananas "Carol Fields" in Kansas City) BEFORE popping the middle bubble, twist each pinch twist in half, twisting one of the new tiny bubbles several times, then twist the pair several more times to secure. Do this to each original pinch twist, THEN pop the middle bubble. I have yet to have one of these come undone. When you split each pop-twist you can make one larger than the other so that you have a hand and wrist, so to speak, on each arm.
Popping the center bubble
- The easiest way to pop an inflated unwanted balloon is to pinch the balloon between your thumb and middle finger and simply snap your fingers. If you can snap your fingers normally you should be able to do this easily. I've even used this technique to make the fully inflated 260 "disappear" instantly. The kids like it and always ask how I did it, I tell them it was "magic." That's the way I do it too (though I'd mention that my thumb NAIL and middle finger NAIL pop the balloon with a scissor-like action when I snap. I never tried just snapping the fleshy parts of my fingers to pop a balloon though I expect that would work if you pushed hard enough and your hands were clean and dry). Makes pop-twists extra impressive.
- When I twist I prefer to exude effortless ease and smoothness. I use my fingernails to pop the center bubble of pop twists, pop extra lengths of balloon, put old, sick and unclaimed balloon animals to sleep, strike round balloon sculptures, etc. However when I do so it appears to the uninitiated that all I do is touch the balloon or bubble and it disappears with a bang.I use a modified "finger snap" action to dispatch rogue bubbles "first time, every time." In preparation to snap normally, the palm-side skin of my thumb would be pressed against the palm-side skin of my middle finger. However, here I curl my thumb and finger a bit more and press the end (edge) of my thumbnail against the end (edge) of my middle finger's nail. The nails cross each other at approximately a right angle (90 degrees). Keeping them pressed together, I "snap" my fingers, flicking my thumb away from my palm and middle finger toward my palm, while minimizing their overshoot. (As you get better at it, all you need do is rub the ends of the fingernails together.)Now with a pencil or spaghetti balloon, I do as follows. First I reach for the unwanted bubble and begin to put my fingers around it they way I would normally hold it for twisting. However, as I start to close my hand around it I instead pinch the bubble between my nails as described above and snap. If it is a soft bubble I pinch it in the middle to develop the most pressure possible in the bubble. If it is a hard bubble or a large balloon (heart, round, 350, etc - not a 1xx or 2xx balloon) I pinch it off-center or close to an edge. As I deftly snap, the scissoring action of the fingernails makes a tiny tear in the balloon. In response the vanquished bubble gives out a mortal yell and vanishes in a cloud of talcum powder. Cough-cough.
This can be hammed-up by completing a sculpture then holding it up by only the hard middle bubble of a pop twist. Snap your fingers and have the sculpture fall into the waiting hands of a child.
How does this work? Well, think of cracking a raw egg. First you create a crack by hitting the egg against an edge, then you grow the crack by prying the two halves apart. When the crack growing CW meets the crack growing CCW, you have two eggshell halves. With a balloon what you are really doing is creating a tiny tear and then getting the stress in the balloon to help you crack the bubble in two using fracture mechanics.
- Though elastic, latex has low fracture toughness (cracks easily).
- When a flaw/tear/hole in a balloon is larger than a certain "critical" size, a crack will propagate in the balloon wall. This critical size depends on the stress in the balloon wall.
- The greater the pressure in the bubble (the harder it is), the more stress there is in the balloon wall.
- The greater the stress is in the balloon wall, the smaller the critical size becomes (the smaller the hole need be to grow a crack)
So, the pinching action increases the pressure in the bubble, thus raising the stress in the balloon wall which in turn decreases the critical crack size. The small flaws/tears/holes introduced are now larger than the critical size needed to propagate a crack around the bubble, so it happens.
When popping large or soft balloons which don't respond to the pinching by firming up, the critical crack size will be larger. Scraping the fingernails together a little harder during the snap creates a larger flaw/tear/hole and still allows the method to work.
If the balloon is old and very soft, the critical crack size will be so large that this modified snap method can only puncture the balloon and let the air slowly leak out.
- I realize everyone does whatever he's comfortable with. I snap/tear the balloon with my fingers. I've done it for so long I don't even think about it anymore. The reason I started doing it was because I watched others "bite the balloon bullit" and thought it looked very tacky and unprofessional... Not necessarily unsanitary. There just doesn't seem to be a graceful way to do it... faces contort, eyes squint, whatever. Many times when I am twisting, I'm doing it in a clown costume, and don't want to run the risk of messing up makeup, either.
- Practice with an untwisted balloon blown up all the way. Take the balloon in both hands with thumbs close together. Press both thumbs into the balloon (-><-). If you are right handed your right thumb will press much further into the balloon and if you are left handed your left thumb will press much further into the balloon. Then push this thumb with a quick motion. Sometimes projecting in your mind that your hands will be about 3 feet away diagonally, will help. Of course, your hands will break the balloon within inches.
- I've found that the best way to pop a balloon is to try twisting it into an animal shape right after telling a friend, "Let me show you this new design I've come up with."
- Poppin' pop twists - Here's a couple more ideas:
- Make the middle bubble a bit larger. More rubber to be grabbed by the pinch twists.
- Make the pinched bubbles softer (before pinching). Will actually create more friction.
- Hold the two pinch twists as you do the pop.
- When you pop the middle balloon hold onto the two bubbles that will separate. Sometimes the action of separating them causes them to untwist. If you hold onto them, they will not deflate.
- Hold on to the eartwists when popping the center bubbles. I used to have a lot of pop twists deflate, but I discovered holding on to the bubbles while popping made all the difference.
- Maybe a final piece of advice I have not read yet: wait until your balloon is finished before popping the center bubbles in all pop twisted parts. This may provide the surprise effect described above, and you can give all your attention to the careful popping and positioning process.
- I construct lots of multiple designs using 160s and am always trimming the balloons. I do cut them apart and trim off the excess with a child size pair of scissors that is attached to my balloon bucket with a 160. People are amazed when you take scissors to a balloon - but of course only in the uninflated section or the knot.
- I have found that by keeping the sacrifice bubble tight (the one in the middle) I can pop it easily with the capped end of my marker. Mike Decker uses his thumbnail in a sort of pinch motion.
Implements of Destruction
Pocket Knife
- I have a pocket knife with a 7 cm blade. I take it out and sometimes say things about a sacrifice. Usually I talk to the balloon and say "We have ways to make you talk." The people will notice the knife and some will cover their ears. One kid said "Don't pop it, it's for me." Then I say: "Say pop!" and pop the middle bubble. It works nicely.
- I have one of those mini-Swiss Army knives that my wife gave me as a gift once, that has several blades, including a little pair of scissors. I carry this knife with me always (in clown or out-of-clown) and find it very handy for popping or cutting off excess pieces of balloon. It's not as quick as Marvin Hardy's belt cutter, but it is always handy never gets in the way.
Letter Openers
- Marvin Hardy's Magic Cutter. You can see a drawing of Marvin's cutter at http://www.balloonmagic.com/magicutter.html It is convenient but others, such as Bruce Kalver, use the cutter separately. You can also keep it on a string (elastic or balloon, too) or retractable line. It is an alternative to using scissors.
- If you are having trouble with tearing apart a pencil balloon, Balloon Magic (Marvin Hardy) sells a neat little belt-hook-mounted razor-blade holder that protects the blade but allows you to slide a balloon twist down into the holder to slice it in half, cut nozzles off, etc. It's called a Magic Cutter. When you get comfortable using this tool, it is incredibly slick, and you don't even have to look down at it to use it. One note: You do need to be careful when using it though - the plastic razor blade holder (actually one of those plastic letter openers with a tiny, protected razor blade set in at an angle) has a pointed end which sticks up. Though it's to be used for popping bubbles, the point is easy to forget about and easy to scrape your arm against (which I promptly did - Ouch!). I think I am going to shorten the pointy part on mine, and wear it closer to my belt buckle than to my right side so I don't injure myself again. The Magic Cutter costs $15 and has a lifetime guarantee.
- Marvin uses it so smoothly that it definitely adds to his professional appearance on stage. But I'm a concerned about the pointy part. It scares me to think about wearing it in the middle of a crowd of kids. Has anyone worked with one of these when kids were pressing in?
- Yes, I too was impressed with how smoothly Marvin uses it, so I bought one several years ago. I wore it a few times but stopped wearing it because of all the blood... No matter where on my belt I wore the thing, I scratched my arm or cut my arm open on it. So I turned the cutter pointy-side down, only to find that I now stuck my arm into it on the upswing instead of on the downswing. I believe that I would have eventually gotten used to it, but I decided that it simply wasn't worth the pain. I firmly believe the things are downright dangerous to the wearer. In my opinion, the Magic Cutter is a product liability lawsuit waiting to happen. It is the duty of a manufacturer to make a safe product, give adequate warning of any danger and publish instructions as to its use. As far as I know, the thing doesn't even come in a box. Its design is clearly deficient from a safety standpoint... it is "unreasonably dangerous." It straps a non-retractable sharp point to one's beltline, and comes without a customary safety holster to protect the wearer from injury when not in use.
- I tried using it in a restaurant on two different occasions, but one of the servers got too close and was scratched pretty good. I took it off, and decided right then that I wouldn't use it unless I have plenty of room. I think it will work great when not in a crowded restaurant. "Remember what was said about liability." I have been trying to think of how to put a cover over it which could be moved aside easily.
- BE CAREFUL around the cutter's pointy part. I have ripped a shirt and I have cut my wrist on it! Then the pointy tip of my cutter broke off one day just above the blade part. Since then, I have not had any more problems. Though I don't have the pointy part to pop the balloons, it is still rough enough to pop them. When I need to replace it I might break the tip off the new one.
- Royal once tried Marvin's balloon cutter years ago and yes, the pointy end did injure his arm. He had a lovely gash about 5 inches long down his forearm. His remedy was to file down the pointy tip and give it a rounded edge. Although Marvin uses that point to pop unneeded bits of balloons, Royal thought the risk outweighed the need because he could easily break off the balloon with his hands.
- I cut the sharp point off of mine and filed it round. Since it is just a letter opener, you can have a rounded one for close quarters and a sharp one for when you need to pop some balloons or parts. Also remember that in the holder you can have it pointed up (toward the sky) or down (toward the ground). If you try the other direction, you may have fewer problems.
- I use my balloon cutter by applying some velcro. It sticks perfectly on my pogo pump along the top edge with the point hanging down. I've just made it a habit to leave it there and pull it off, use it, and stick it back on. Doesn't get in the way and avoids stabbing someone.
- I think the convenience of using one of those letter openers is slicker than, slick but that sharp point on Marvin's has scared me and the price of the holder turned me off. I found the same type of letter opener but it has the shape of a ruler and is about seven inches long and the point is set back just a little bit from the end. Also, what makes it safer I believe is that the point and the main body are less than 3/16ths of an inch apart. Only enough room for a letter or a, well, 260 balloon to fit in. Your finger couldn't get cut on the blade if you tried and because they are so close together it would be extremely difficult to poke yourself or another by hitting the point seperately. With a hole drilled through the other end and an uninflated 260 tied through the hole it can safely and loosely dangle from your waist and you can pull it up when you need it. It's not quite as quick and smooth as Marvin's holder though it still is much easier than plucking one of those kid-ka-bobs off of the tip of your cutter while trying to keep your patter going. Mine is one of those cheap office supply advertising pieces that have some company logo imprinted on it and is given away. Those companies that print your name on ball point pens would be my first source to check out and next I would be knocking on the door of STAPLES OFFICE SUPPLY.
- Warning: Do not place any body parts that you hope to use in the future near the sharp blades. If a child should become impaled on your letter opener try and work it into your patter.
- T Myers writes: watching Marvin use his cutter is wonderful. He uses it with a minimum of motion that gives him an air of efficiency and grace in performance. If you have ever seen Marvin work he appears to be in complete control of every motion he makes or is about to make. He came up with the perfect tool for his style. Most of the people I've talked to who use the tool have modified it to fit their style, but not until after they have poked themselves.It was mentioned that I have Marvin's Cutters for sale. Well, that's true but I don't list it anywhere. The reason I don't list it is that I think it is dangerous. I don't want to sell it to someone who thinks they can just clip it on and forget about it. If you forget about it, chances are that you will be using your hands to talk, get excited, gesture wildly, stab yourself and need stitches in your clothes or your skin. So, if you want one of these cutters, you have to ask and you have to listen to me tell you it is dangerous and you need to write me a note saying you understand it is dangerous and you will not hold me responsible for any damage caused by the cutter.
- I like this cutter and use it all the time. It's much quicker and easier than scissors. I did poke myself with it and even ripped a shirt once, but nothing really bad. I solved the problem by mounting it on my suitcase instead of on myself. Now, I can still use the cutter, but the the harm is a bit further away.
- I cut off the sharp point since I don't need it really. I glued the cutter to my electric pump which is in a small camera bag (I have the pump and battery in seperate bags), and because the "pump is in the way" I never hit it anymore by accident. Whenever I need something really sharp, I have a safety pin hanging on the side of my pump.
- At T"Jam I bought Marvin's cutter. I thought it was the greatest thing to come along since flippers changed to legs. I only used it a couple times. The last time I used it I got excited, while having a stimulating conversation with a customer, and there went my shirt (and a 3 inch gash on my forearm.) I could have cut the end off, like everyone said to do, but I just went back to breaking them off with my fingers.
- I used to use a letter opener. (the ones with the razor blade) It worked great until I cut my finger when the blade came lose. People weren't thrilled getting balloons from a man with a bloody hand. I now carry band-aids with me.
- I've been using a letter opener to cut balloons (just like Marvin) for a long time now. The only difference is that I bought one with a recessed point. That means that I don't accidently gash my arm and bleed all over my audience. I don't know why anyone would use a cutter with a point jutting out. It would fit in Marvin's holster without the element of danger, however I drilled a little hole in the plastic end of the letter opener and attached a key ring to it. I hooked the ring onto a little spiral keychain, just as Royal and Jimmy Leo did.
- My friend Howie Marmer took one of those envelope openers (the same device found in Marvin's cutter) and cut away most of the plastic, leaving only the functional parts and enough room to make a slot for wearing on belt or waistband. It's very small, then, so it's both visually inconspicuous, less dangerous, and has more options for exact placement.
Scissors
- I have a small pair of scissors in a little pocket on my apron. It beats "gnawing" at a balloon.
- I took a pair of baby fingernail scissors and attached them to my belt with a "badge reel." These are little round things with a cord coming out - you pull, and the cord pulls out; let it go, and it sucks the cord back in - so the scissors are hanging against your belt again. Kind of like the big reels they have for keys but only about an inch across. The nice thing about the baby nail scissors is that they have round, blunt tips. They aren't very sharp but still fine for going through balloons. And they are only about a buck a pair!
- Inspired by Royal Sorell after seeing his cuting contraption two years back, I came up with what best suited me. Like his, mine was on a retractable chain that clipped directly onto my pants. On this I attached a pair of safety scissors.
- I attach a spiral keychain to my standup pvc pump. Attached to it is a small pair of fingernail clippers which I use to break bubbles when necessary or to trim stray hangnails. I've also put a small screweye on the end of my ballputter and have that hanging from my keychain as well.
- I use my scissors a lot and having them on a brightly colored balloon "string" makes them esier to find.
- I also use scissors. I carry them in my fanny pack for easy access.
- I have a little pair of sharp pointed Fiskar scissors that I use. My balloon apron has a little pocket made just the right size to allow the handles to stick out enough to grab them.
- I use small children's scissors (good quality ones) which have brightly colored handles. I slip one of these in my shirt pocket and have it close at hand all the time. Works great. I use a toenail clipper for popping and trimming.
- I use the small Fiskars brand scissors that are sold as kids' scissors. The tips are not needle-sharp and they are small and light. I use a coiled key chain cord and have had zero trouble with them.
- Unlike my friend Ken Stilman "Flash", I don't like wearing gloves when twisting balloons. (They drive me nuts!) So when I need to remove or shorten a piece of balloon I use scissors. The drawbacks to scissors are:
- Size-weight-bulk, more to lug around
- Where to put them for quick access
- Not losing them. (I lost one pair leaving it behind at a table I worked in a restaurant, and another I must have just dropped somewhere.)
- Not getting poked by the sharp end when you're moving fast, reaching for other things.
- Some solutions I've found useful:
- To cut down on weight and bulk I switched to a small pair of folding scissors. The first brand I bought (commonly sold at fabric stores) worked, but after a while the "chrome" started wearing through (looked bad) and peeling (cut fingers). My sister Barbara (who performs as "Miss Bubba") had a set she got from Fuller Brush Co. back east. They were great, but not available here in CA. There is a brand sold with camping supplies at sporting goods stores, stamped "made in USA" that are excellent.
- For easy balloon access I work wearing a multi-pocket/pouch belt, but the little scissors tended to get lost in the pockets. So, I use a key chain leash (a plastic coil like a phone cord with a key ring at one end and a clip at the other) with the scissors on the keyring and the clip attached to a "D" ring on my belt. Normally I drop the scissors into a side pocket, but if I'm moving fast I can just drop them and let them dangle from the belt. (And I don't loose them anymore)
- These scissors come with needle sharp points that can easily damage fingers & balloons (especially dangling from a leash!) What I did was open the scissors and round off the point on one side with a grinder, (you could use file if no grinder available) and then ground the point on the other leg(?) shorter, at an angle(NOT tapering the whole leg). So that it still has a point, but when the scissors are closed, the leg with the point is hidden behind the longer, rounded (safe) leg. The tension of the scissors should hold them closed. This way, the scissors are handy, you don't loose them, they are safe (rounded tip only, exposed), and you can still open them to use the point if you need to pop a bubble. This works well for me, and when I demonstrated it at a COAI convention workshop it went over well. P.S. I've made a few before, for friends, and they make great, inexpensive, gifts for any other balloon twisters in your life.
Olfa "Touch-Knife"
- Someone suggested, and I bought, a couple of the OLFA "Touch-Knife" model TK-1 cutters from a JoAnn Fabric store. These are great tools... variety of colors, small, spring-loaded/locking blade, and cheap ($1.69ea.).
- I use something called the: "Olfa Touch-Knife" What is it? It is a small, spring-loaded razor knife in a brightly colored plastic case/handle. (many colors available!) It is roughly a half-circle about 1.5" across, with a sliding button to extend the blade. If you push this slide out all the way, it will lock (o.k. click gently...) into place leaving about 3/8" of blade exposed. If you stop pushing before the click, you will have less than 1/4" of exposed blade. Release the button, and the entire blade retracts into the plastic handle. It has a small hole opposite the blade that is *designed* for a lanyard of some kind. (I use a 12" piece of elastic cord.)With the blade retracted, you can juggle the things with *NO* possibility of cutting yourself. (I have juggled them!) The spring is strong enough that the blade won't extend accidently, but it is easy enough to do tricks with. With minimal practice (say, 5 minutes or so...) you can use the tip of the blade to pop the pop-twist at no risk to anything but your eardrums. Cutting an uninflated balloon *is*, I must admit, a bit trickier. You will need to stretch the uninflated balloon to get a clean cut.The best part is that they are cheap enough and easy enough to find that if I should loose one, I can ignore the loss. The last time I checked, they were available at three different fabric Chain Stores in the Ft. Collins area (Joann's, Hobby Lobby, and Hancock Fabrics) for an average price of $.74 each. (That's right! 4 for 3 dollars!)
All that I can say as a final word is to check them out. They will cost you less than a buck to test, and unless you are a total klutz (or a *roaring* drunk!) you should not be able to hurt yourself. Go to your local fabric store, and give one a try.
- I also use these and think they are great. I have also seen them at the super market in the checkout line and at hardware stores.
- I get the Ardell touch knife at the super market for $1.19. It is small, a little smaller than a silver dollar. The blade is on a spring. It stays stored inside the case until you push up on the lever to raise the blade. When you release the lever the blade goes back in. The blade is also small enough that it is hard to cut your self! It hangs from a string on my apron.
Other Solutions
- I have used a hat pin that I had pinned on my shirt.
- I also carry a seam ripper for pop twists. Very handy!
- I was trying to decide what would be best to use, when I found a coupon clipper in the food section at Pic-n-Save. It's off-white, uses a razor blade to cut, BUT the passage is too small for even the smallest fingers, though a balloon twist will fit nicely. It's handle is a closed circle, so I'm able to tie ribbon to it and hook it to my apron, or costume easily. The blade is also replaceable. For only 69 cents it's a bargain and parents think it's a riot that I use it. I'm trying to work out a coupon clipping routine to go with it. There's GOT to be something funny there, I just KNOW IT.
- I use my hands and/or teeth.
- Besides the obvious discomfort you must feel at having to explain the biting of the balloon, may I ask why you bite a balloon bubble at ALL? As easilly as that fragment could go into a childs windpipe, biting a bubble could cause a fragment to go into yours.
- I never bite the pop twist. I find it very easy to use the fingernail on the thumb and pointer finger, squeeze, then give a light jerk, and that is all it takes.
- I used to use my teeth, but I thought better of it when I saw a child doing the exact same thing to a balloon after seeing me do it. That's when I went to the small knife. I don't think we should set an example of putting an inflated balloon in our mouth to do anything to it.
- I have seen many others use the teeny scissors and it works well and quickly. I did look at the wonderful tool that Marvin uses and knew immediately that in my hands it would become a suicide weapon... or worse yet, someone else would end up poked. If I didn't/couldn't snap them, I would opt for the scissors. Whenever I see someone bite, it makes me cringe and wish they were more professional about it.
Fear of Popping
- If your business is inflating balloons, you have to get past the fear.
- I'd suggest you take a bag of balloons and inflate each balloon until it pops. You'd get a realistic feel for when they are going to pop.
- Maybe your mind and body will get tired of being afraid if you just keep popping balloons until it bores you.
- When I first started ballooning, I was afraid of balloons popping on me. When I was a kid, i was afraid of heights. I cured it by forcing myself to stand on first chairs, then ladders, then high bridges and buildings. For balloons, I used a similar technique. I just inflated a couple and squeezed them in my hands until they popped. After doing this for the umpteenth time, I stopped being startled by the sound, and fearing a popping balloon. Just build on it slowly. If you keep the balloon away from your face so as to protect your eyes, there's actually not a lot that can go wrong. You wont hurt your hands. Your ears might ring a bit if it's a loud pop, but that's about the worst that can happen. It's a matter of mind over fear. Start with your eyes closed. Work up from there. You'll get over it !I am NOT starting a debate over safety again. Yes, a popping balloon can be dangerous. Yes, everybody should be careful. We must all wear protective goggles and warn everybody about balloons. I'm just telling you how I conquered my initial fear of balloons popping on me, which is not a practical trait if you're a balloonist, but which can be conquered. 'Nuff said, I shall now jump into a tank filled with Tarantulas to conquer my arachnaphobia.
Noisy Pop Twists
- I suffer from a rare form of balloon disease called "I-Dont-Like-The-Pop-Twist-itis" and was wondering if anyone else here suffered from it also. It is not that I can not do it, but i found that if I do it for children at a party, or a show, I always get the same child coming back with a parapalegic man, or an airplain with no wings just a few minutes later. I know that there are alot of creatures out there to be made with the Pop-twist, but I need a way to make it more durable vs. children.
- I never do pinch and pop series. I always add another balloon or scrap of balloon to create the necessary section. I hate the popping noise and do everything possible not to pop balloons in front of my customers. I really do dislike the popping noise. So many people of all sizes are sure you are going to make the balloon go "pop" that they don't want to be anywhere near the balloon person.
- I too, strongly dislike the pop twist. I hate the noise and the fact that the recipients love to untwist the bubbles and bring you back something to fix. I never do pop twists. I would rather add another balloon and create the part - hands and arms, feet and legs, airplane landing gear, etc.
- Of course, there are occassions where a loud pop is no option (a hospital, e.g.), or when you need a really a childproof balloon. In that case, I mostly go for the extra-bit-of-balloon-option (quicker than tying off the pinch twists). It also has the advantage of offering the possibility to bring some extra color to the balloon figure.
- On my new video I show a claw twist which is a variation of the pinch pop. My suggestion is to make 4 bubbles instead of 3 and cut on the twist in the middle
oOxOo <----cut on the x
This avoids the bang sound.
- I have a rather quiet series. What I do is:Make a pinch and pop series and then I twist my ear twists in half. Usually by forcing the center of the ear twist onto and around the twist that holds it together. The center bubble is not loose, it is rather taut. I touch the center bubble with as much of one finger or so that I can to help muffle the noise and then I push a free index finger into the bubble and if necessary give a good quick twisting motion. This usually helps to muffle the noise. That and NOT letting my center bubble get TOO large and/or too tight.
- A soft center bubble in a pop twist would certainly pop more quietly, but I don't know that you'd get a consistent break. You might frequently end up with a stringy piece of latex holding the two outer bubbles together (which I suppose isn't a problem if you don't mind having to pull out the scissors).
- While it is true that a pop-twist is a weak point in a balloon creation, I find it to be a invaluable technique for me. I use it often. The loud pop-sound it makes for me is an asset rather than a default. When I pop the bubble, I get often get this reaction like "heehee...he popped the bubble...heeheeheee..." and then, as I position the bubbles of the poptwists, they see these ends of balloon appearing were first there were none. The heehee-ers then realize I meant to pop it. It gets very good reactions. When I make a balloon crocodile or lizard, I wait until the very end to pop the legs. It is only at this point the crocodile-slash-lizard shape is clear, and I often get these great wow-it-really-looks-like-one-and-how-the-hell-did-he-do-that-??? responses. Plus, the loud pop attracts attention from passers-by and such. The same for the handlebars on a one-balloon motorcycle.
- Does anybody know of a way to make the pop less noisy?
- Instead of doing a pop twist (ear twist, 1" bubble, ear twist) you could also do 2 small .5 inch bubbles between the ear twists and then cut the twisted part between the 2 small bubbles. You don't pop any bubbles that way, and you still separate the balloon.
- Try making the bubble that you plan to pop very soft by squeezing a lot of the air out of it before going on the next bubble. Less air, less pressure therefore, less noise.
- You could make the area to be broken a twisted string of balloon instead of a bubble. Then use some sort of cutter for a silent pop twist.
- You get a twisted string of balloon after a bubble if you squeeze the air down the balloon an inch or so and twist the now uninflated section.
- Try making one arm, then the pinch twist, then split the pinch twist. Then instead of a bubble, squeeze the air down and make a string of twisted balloon an inch long. Now make a split pinch twist and the arm. Then you can cut the string without making a pop.
- Maybe you could learn to be quick at this, but I don't think it can be as quick as popping a bubble.
Banana Twist
- The banana twist is from my (Bruce Kalver) first video AIRNIMATIONS. Blow up a balloon all the way and tie the ends together. Find the middle and twist. Now find the middle again and twist in half. Tie together. You now have what resembles a bunch of 4 bananas.
- Simple banana fold. It's when you make a bunch of four bananas out of one 260 balloon. Inflate 5/6ths of the way. Connect the ends of the 260 to make a circle. Make two smaller circles. Intersect the circles and there you go; one bunch of bananas.
Attaching balloons with adhesive
Rubber Cement
- I'm not sure that any one brand is better or worse for balloons. The kind that I use is Elmers. Before I brush any of the cement on the balloons I take off the cap and let it sit for about 10-15 minutes. Letting rubber cement sit for 15 minutes helps to prevent the balloon popping; the "rubber" in rubber cement is in a solvent. The drying process allows the solvent to evaporate, leaving the rubber. This solvent can dissolve balloons. Vaseline will dissolve a condom. Gasoline will dissolve a Styrofoam cup. In short, petroleum based substances (gasoline, paint thinner, kerosene, etc.) will often dissolve polymers (rubber, balloons, Styrofoam, plastics).
- When applying the cement to the balloon, make sure you keep it away from your fingers. It's difficult to handle the balloon when it keeps sticking to your fingers. Use the brush that comes with the bottle to apply the adhesive, but be careful not to POKE the balloon. Also, only use a minimal amount to get the job done. Too much makes the sculpture look messy, other things (dust, particles etc.) can get stuck to it, and people can see where the glue has been applied.
- Wait a few seconds until the glue loses its clear look and becomes white-ish. Now just connect the two balloons together. Make sure the balloons to be connected touch in the right place, because it's hard to take the balloons apart without breaking them.
- Oasis floral glue is the best balloon-glue made! Oasis floral glue works unbelievably well on balloons. A small amount holds well, a large amount will not pop the balloon (as rubber cement will) and it stretches enough to take a lot of abuse. This is one of my favorite tools when building large sculptures for event decor. It doesn't need to be plugged in, you can't burn yourself on it and it drys quickly.
- Now, what can we do with the use of rubber cement?? Instructions for making a rabbit, a three layered cake and a gumball machine can be found in Steve Hattan's Mon, 25 Apr 94 email entitled "Sculptures."
Cold Glue Guns
- For balloon sculptures, cold-glue guns are used. These are similar to hot-glue guns, but they operate at a much lower temperature and use an adhesive that does not dissolve latex as rubber cement does.
Twisting Balloons 102
The second half of this chapter is called Twisting Balloons 102.
MB 12/21/95
LM 7/31/96
SKB 12/01/96
SKB 01/06/97
SKB 02/11/98
LM 02/17/99
SMB 09/14/00