
How to design and create Precision Balloon Walls
Sue Marston-Weston
Conwin, Inc.
Personally, I think that there is nothing quite like seeing a wonderful balloon wall that has a design or logo built within it! I have seen many great examples designed by very talented balloon artists around the world and the one thing that always stands out is the precision of the balloons, how all the balloons are inflated to the exact same size! Working with Conwin’s precision equipment, such as the Precision Air Inflator we can easily create a professional wall, and with a little extra know-how, we can add in a design or company logo.
There are a number of different techniques to create balloon walls the most commonly used are:
- Traditional 4-Balloon Cluster Pack
- Alternate-Size Garland Pack for “Square” Garlands
- 2-Balloon Duplet Square Pack
Each different style of wall has a different finished appearance; some are easier than others to design a pattern or logo within the wall.
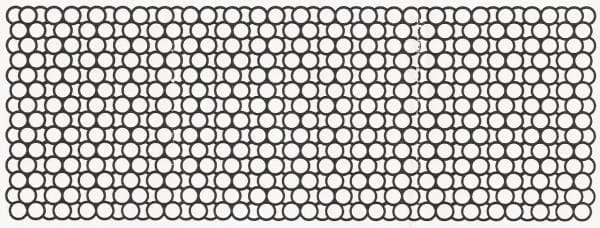
Traditional 4-Balloon Cluster Pack
This method uses one size of balloon which is packed in the same way you would pack a 4-balloon ‘garland’ or ‘column’. This type of wall gives us a flat base and top, but the sides and surface are bumpy.
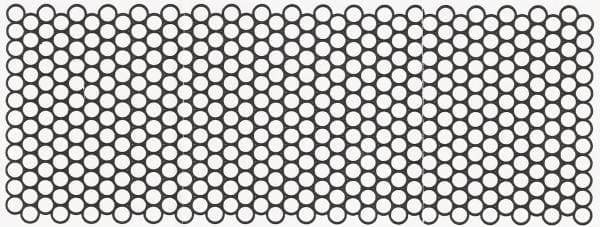
2-Balloon Duplet Square Pack
This method uses one size of balloon and is packed working with duplets (2 balloons) rather than with clusters (4 balloons). This method gives us a wall with flat sides, flat surface but the base and top are uneven.
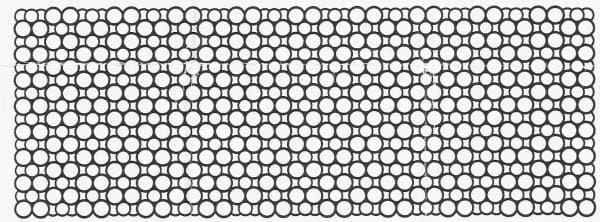
Alternate Size Garland Pack for ‘Square Garlands’
This method of packing uses 2 different sizes of balloons. I prefer to use a 1″ / 2.5cm difference when working with smaller balloon sizes and a 2″ /5cm difference when working with bigger balloons, a greater difference in size means that the columns will pack together a little more tightly. A greater difference in size will also give a different texture and look; you will need to experiment to determine your own preference. This style of packing gives us a flat base, flat sides and also a flat surface, which I think gives a very professional appearance.
Creating a design within a wall
Working with ‘Balloon Wall’ graph paper, makes designing a balloon wall pretty simple; Bruce Walden created the graph paper that I have used for many years, without it, I think I would find it very difficult to know which type of wall to work with as each one has strength’s and weakness for certain patterns and lines.
So the first job is to work with each paper, and plot your design to see which one show’s off your design the best.
Once you have decided which wall type you are working with you also need to consider that the graph paper is only showing you the front of the wall, so what is happening behind?
The Traditional and Alternate Size Garland Pack is easy; with both these methods you can see either 2 balloons or 3 balloons facing the front in each of the columns.
 |
3 balloons facing, the fourth balloon should be a repeat of whatever colour the central balloon is, in this instance the central balloon has a chequered pattern |
 |
2 balloons facing, the other 2 balloons should repeat exactly the same as the front, see example below |
 |
 |
The 2-balloon duplet ‘Square Pack’ method is a little more difficult, with each duplet you pack only one of the balloons is for the front and the other is for the back, I find it easier to make the back balloons all one colour as you will not see any of these balloons from the front and it makes a very clean back to the wall.
Example of how to create a design using the Alternate-Size Garland Pack method
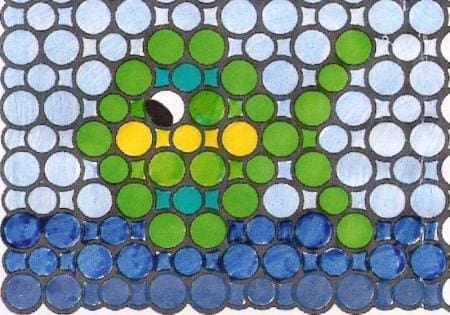
I have used this method because I personally feel that it gives a really Professional ‘finished’ look. I have used a simple image of a fish to illustrate how to make this wall.
This wall is made up of 6 columns, in each column there are 10 clusters of balloons, therefore we will use in total 240 balloons.
4 (number of balloons per cluster) x 10 (number of balloons in the column = 40 x 6 (number of column) = 240
Now it is easier to break this wall down into its individual columns, so that we can start to build the wall.
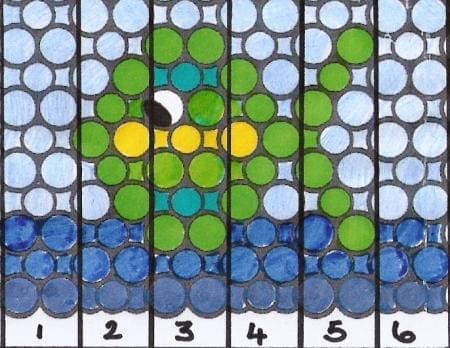
| Dark Blue | L Blue | Green | Teal | Yellow | White | Total Balloons per column |
|
|---|---|---|---|---|---|---|---|
| Column 1 | 12 | 28 | 0 | 0 | 0 | 0 | 40 |
| Column 2 | 12 | 13 | 13 | 0 | 2 | 0 | 40 |
| Column 3 | 8 | 4 | 14 | 8 | 4 | 2 | 40 |
| Column 4 | 12 | 14 | 12 | 0 | 2 | 0 | 40 |
| Column 5 | 10 | 17 | 13 | 0 | 0 | 0 | 40 |
| Column 6 | 12 | 28 | 0 | 0 | 0 | 0 | 40 |
| Total Balloons per colour |
66 | 104 | 52 | 8 | 8 | 2 | 240 |
I now know exactly how many balloons I will be using and how many balloons I need in each colour.
You now need to determine how big you want the overall balloon wall to be when completed, and therefore what size the balloons need to be inflated to.
It is easier to work with the width of the wall; we can adjust the height by adding or removing balloon clusters.
So we will work with an 8′ or 2.43m wall.
An 8′ wall = 96″
A 2.43m wall = 243cm
96 ÷ 6 (number of columns) = 16″ (total width per column)
243 ÷ 6 (number of columns) = 40.5cms (total width per column)
16 ÷ 2 (number of balloons) = 8″
40.5 ÷ 2 (number of balloons) = 20.25cms
I know that the largest of my balloons need to be inflated to 8″ or 20.25cm, however, if you look back to earlier in these notes you will see that I suggest;
“This method of packing uses 2 different sizes of balloons. I prefer to use a 1″ / 2.5cm difference when working with smaller balloon sizes and a 2″ /5cm difference when working with bigger balloons, a greater difference in size means that the columns will pack together a little more tightly. A greater difference in size will also give a different texture and look; you will need to experiment to determine your own preference.”
So taking this into consideration I will make my larger balloons 8″ (20.25cm) and my smaller balloons 6″ (15.25cm), allowing a 2″ or a 5cm difference between the large and small clusters.
If you look at each of the columns you will see that columns 1, 3, 5 starts with a large cluster and ends with a small cluster, columns 2, 4, 6 starts with a small cluster and end with a large cluster.
I would recommend always starting your columns from the same point, i.e. from the top or bottom so that you never get confused.
I recommend using Dacron Arch line rather than Monofilament Arch line when building your garlands, Dacron is a softer, woven line that is easier to pack balloons onto, and it will also not stretch when put under pressure unlike monofilament line that stretches particularly when used outside. Conwin sells 50lb and 150lb breaking strength Dacron line.
I also always recommend that only one person ‘packs’ the balloons to create the columns, each person packs at a different tension and therefore this can create a difference with the overall finished result.
Assembling the balloon Wall
Once you have made all the columns lay them down in order on the floor (ideally on to a clean surface), make sure that the wall is correct and that you have not made any errors. You can push all the columns together; you will see how they ‘LOCK’ together very neatly. The reason for this is the 2 different size balloons that you have used. To actually attach them together, there are a number of different techniques, some people just use a 260 and run it through from one side of the wall to the other, securing it to the first and last columns on the Dacron lines. I prefer a method that I was taught by Ian Herd (UK); he likes to use the ‘paperclip & rubber band’ method. Ian secures 2 paperclips to one rubber band, the rubber bands should all be the same size.not too small and not too big. I connect the first paperclip to column 1, I connect after I count the first 3 clusters, and I then stretch the band across to the next column and connect the second paper clip onto the Dacron line also after the first 3 clusters, keeping a straight line as we work across the wall. I then take another paperclip and rubber band set, this time I connect the paper clip not to the line on the second column but to the second paperclip! This way we do not get any tension from the rubber bands pulling in each direction, see examples below. Repeat this method until you reach the 6 column and then repeat a 3 cluster intervals until the whole wall is secured together.
| Example 1 | Example 2 |
 |
 |
Once you have locked the wall together, you can now easily lift the wall and stand it upright. To support the wall, I suggest using 2 poles and bases, one at each end, you can push the first and last columns onto the poles. Balloon Walls can be used for many different purposes, a backdrop behind a wedding table or at the entrance to a room, as a photograph background, on a trade stand at an exhibition.the list is endless, all it needs now is your imagination!
Materials List
In addition to the 240 balloons required to make this wall, you will also need:
- 2 x Base Plates
- 2 x 6′ or 1.80m poles
- 18 Rubber bands
- 36 Paperclips
- Dacron Arch line
- Conwin Precision Air Inflator-highly recommended for precision air work and time efficiency, including walls, garlands, columns and sculptures… just ask an expert!
Visit www.ConwinOnline.com for information on Conwin’s full range of equipment, step-by-step designs and much more!