|
|
|
TIPS AND DESIGNS USING HI-FLOAT AND SUPER HI-FLOAT BALLOON TREATMENT
|

|
The technical data contained herein are guides to the use of
 Dear HI-FLOAT User, In 1982 Marjorie Burchette opened a small balloon delivery shop in I went to work on the problem at night in my basement shop, and HI-FLOAT and SUPER HI-FLOAT are water soluble plastics specially In addition, for the more advanced user we have included several fun HI-FLOAT can also be used to coat the outside of balloons to keep We sincerely hope you find this booklet helpful. If after reading We wish you every possible success!
ANSWERS TO FREQUENTLY ASKED QUESTIONS
HI-FLOAT and SUPER HI-FLOAT are aqueous solutions containing a
A simple rule of thumb is that you may use either HI-FLOAT or SUPER If you are coating the outside of the balloon to prevent Yes. HI-FLOAT and SUPER HI-FLOAT are non-toxic, non-irritating, non- Although it is non-toxic, it is a good idea to keep bottles away When used properly, HI-FLOAT increases the floating life of latex |
|||||||||||||||||||||||||||||||||||||

| Latex Balloon Size |
Latex Balloon Type |
Number of Balloons per 242 Helium Tank |
Average Flying Time Helium Only* |
Average Flying Time Helium and Hl-FLOAT* |
Average Flying Time Helium and SUPER Hl-FLOAT* |
|
|---|---|---|---|---|---|---|
| 9″11″
11″ 14″ 16″ 18″ 11″ 17″ 16″ 16″ 24″ 3′ |
ROUNDSTANDARD COLORS
METALLIC & PEARLIZED ROUND ROUND ROUND HEART HEART GEO DONUT® GEO BLOSSOM® ROUND GIANT |
900485
485 240 180 130 843 268 340 400 50 15 |
12-16 hrs.18-24 hrs.
16-18 hrs. 26-30 hrs. 30+ hrs. 36+ hrs. 8 hrs. 14 hrs. 22-26 hrs. 18-24 hrs. 2-4 days 3-5 days |
**2-5 days
2-3 days 4-7 days 7-10 days 8-12 days ** ** ** ** 10-18 days 2-4 weeks |
**4-10 days
4-7 days*** 8-14 days 14-20 days 16-24 days ** 2-3 days*** 3-5 days*** 2-4 days*** 18-30 days**** 4-8 weeks |
|
****** ****
|
Please remember that these are estimates for typical indoor conditions. Flying time will be less outdoors.Flying time varies greatly due to factors such as latex quality, humidity, temperature, altitude, etc.Balloons typically float half as long in hot, humid weather. For maximum floating life, hand-tie balloons. SUPER HI-FLOAT not recommended for this size and shape balloon. Prestretch these balloons with air before treating with SUPER HI-FLOAT. Use white pump clip for Geo Donuts® and Blossoms®. Use blue clip for metallic, pearlized and 17″ hearts. Use two strokes with the yellow pump clip to treat 24″ balloons.
|
|||||
2
|
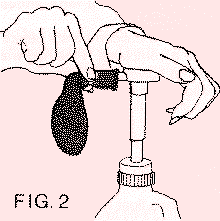
Slide the balloon onto the pump outlet as far as it will go in order to inject the HI-FLOAT deep inside the balloon as shown in Figure 2. Depress the pump plunger as far as it will go. Remove the balloon from the pump. Wipe the pump nozzle with the balloon as you remove it in order to keep the nozzle dry. |
 |
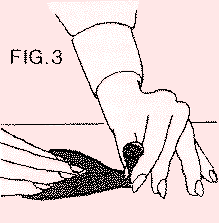 |
Place the balloon on a flat surface while holding the opening upwards to prevent dripping. Gently rub the balloon a couple of times as shown in Figure 3 to spread the liquid over the inside surface. Mash down any lumps of liquid to make the coating as uniform as possible. Make sure the entire inside surface of the balloon is wetted except for the stem which contains the opening. |
|
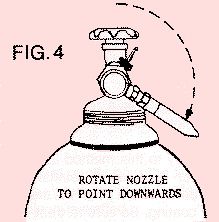
Inflate the balloon in the usual manner and hand tie. We recommend rotating your helium nozzle downwards as shown in Figure 4 to reduce splatter and help keep the liquid out of the balloon stem. A key to minimizing mess when using HI-FLOAT is to keep it out of the balloon stem where it can leak onto the hands when tying. |
 |
When the balloon is first inflated it should float up straight but
it will not be very buoyant until the HI-FLOAT dries which takes a
couple of hours. After drying the balloon will have nearly as much
upward pull as an untreated balloon. If the balloon does not float,
or leans to one side when first inflated, see instructions on page 10.
With a little practice you should be able to treat balloons neatly
and quickly.
3
If a treated balloon bursts before the coating dries it can be messy
and cause a complaint. A method was developed by a number of
HI-FLOAT users to solve this problem called the “dry” method
because the coating is allowed to dry overnight before the balloon
is given to a customer.
Some of the advantages are:
- If a balloon pops there is no mess.
- Balloons float well initially since the dried coating weighs very little.
- Gives the maximum floating life possible.
- Balloons are less likely to burst.
- Eliminates uneven spots of liquid sometimes visible in clear balloons before drying.
-
-
-
-
This method consists of the following steps:
Step 1. At the end of the day treat enough balloons on the
inside with HI-FLOAT to cover the next day’s orders. Inflate the
balloons with helium and seal with plastic clips or discs.Step 2. Allow the balloons to dry overnight. In the morning
remove the clips and give the balloons an extra shot of helium to
regain their full size. Hand-tie the balloons.
This results in a fully inflated balloon coated with HI-FLOAT which
is completely dry. If a balloon accidentally pops there is no
mess!
The key to this method is to keep the HI-FLOAT out of the stem of
the balloon so it can be reinflated the next day. Inject the liquid
deep inside the balloon then pinch the stem closed when rubbing the
balloon to spread the coating. Be sure to treat extra balloons for
those unexpected orders.
Giving the balloons a shot of helium the next day is quick and easy
with a little practice.
Many balloon shops use this method to treat every balloon they sell.
4
Coating the Outside of Air Filled Balloons After Inflation
A dilute HI-FLOAT coating may be applied to the outside of a latex
balloon after it is inflated to keep it from oxidizing (turning
chalky). This is especially useful for those arrangments where items
such as stuffed animals are put inside of clear balloons and it is
important that the balloon remain clear for a long time. Treating
the outside of an air-filled clear balloon will keep it bright and
clear for several weeks if it is cared for properly. Fig. 5 shows a
bear in a balloon where one-half of the balloon has been coated with
HI-FLOAT. The treated half remains clear even after several weeks!
The uncoated half started turning chalky in a few days.
Warning: Air-filled balloons having an external coating of HI-FLOAT
must be kept in an air-conditioned location in hot weather. Exposure
to heat and/or high humidity can cause the balloon to burst or
deflate prematurely. SUPER HI-FLOAT is worse in this regard.
Therefore we recommend using regular HI-FLOAT for all
coatings on the outside of balloons.
This dilute coating method does not work well on helium filled
balloons since it can cause streaking.
Step 1. Before inflation dip the balloon into a glass
containing a liquid dish washing detergent and water. Swish it
around to wash the bal loon.Step 2. Inflate the balloon and stuff it as usual.
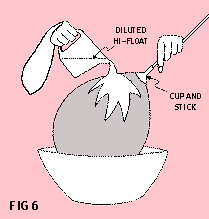
Step 3. Attach the stuffed balloon to a cup and stick to
provide a handle.Step 4. Mix one cup of HI-FLOAT with two cups of warm water.
Stir gently to avoid making foam.Step 5. Place the balloon in a large pan and gently pour the
liquid over it while slowly rotating the balloon as shown in Figure 6.
Make sure the entire outside surface of the balloon is wetted.Step 6. Hang the coated balloon up by the handle so that it
can drip and dry. Under normal conditions drying takes about 30 minutes.
5
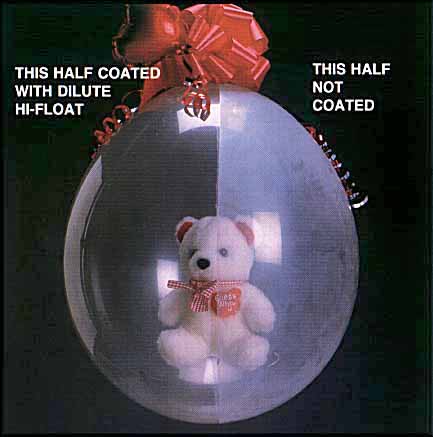
FIG. 5 BEAR IN A CLEAR BALLOON THREE WEEKS AFTER INFLATION
Left half coated on the outside with dilute HI-FLOAT remains clear
and shiny. Uncoated right half is heavily oxidized.
6
 |
Drying can be quickened by using a hand held
hair dryer. Do not aim the blower at one spot too long since this
could burst the balloon.
The liquid which drains into the pan may be placed in a capped
bottle and saved for reuse. Refrigerate during storage to keep
mold from forming.
Any bubbles in the coating will collect at the lowest point. Wipe
this spot gently with a damp sponge after drying about 15 minutes.
After drying, touch up any missed spots with a small brush.
Do not dilute the HI-FLOAT more than two parts water to one part HI-FLOAT.
A more dilute solution will not wet the balloon surface
properly and the final coating will be spotty.
Never dilute HI-FLOAT for coating uninflated balloons since
this will drastically reduce floating life! Use the diluted material
only for coating balloons which are already inflated.
This outside coating will remove oxidation which has already occurred.
This technique will keep balloon animals made from twisted 260
balloons looking big and shiny for several days. Simply place the
animal in a pan, pour the diluted mixture over it, and hang it by
the knot until dry.
7
Coating the outside of balloons before inflation
This method is a quick way to apply a HI-FLOAT coating to the
outside of balloons before they are inflated. It can be used
for helium-filled balloons. This method gives the usual increase in
floating life but has the added advantage of keeping balloons from
oxidizing for an extended period. The coating usually dries in a few
minutes. A disadvantage of this technique is that it is somewhat
messy.
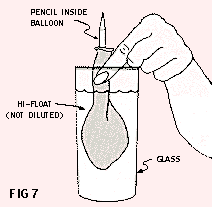
Step 1. Place an uninflated balloon over a pencil and dip the
balloon into a glass of HI-FLOAT to the stem as shown in Figure 7.
Keep the liquid out of the inside of the balloon. Make sure the
entire outside of the balloon is wetted except for the stem. If
folds form in the balloon withdraw it from the liquid and then redip
it to wet the entire outside.Step 2. Remove the balloon from the liquid and let it drain
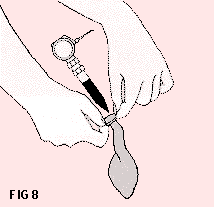
for two to three minutes.Step 3. With the helium nozzle pointed downward as shown in
Figure 8, slip the balloon onto the nozzle and inflate it while the
balloon is still wet. The balloon will stop dripping as soon as
inflation begins. It will dry within a few mintues.Step 4. Seal the balloon and attach a ribbon. Try not to
touch the balloon except near the stem until it is dry.
 |
 |
8
TROUBLESHOOTING GUIDE
Under normal conditions you should see at least a five-fold increase
in the floating life of your balloons when using HI-FLOAT and a
ten-fold increase using SUPER HI-FLOAT. In low humidity weather,
such as win ter, the increase in floating life will be at a maximum.
It is normal for treat ed balloons to float only half as long in
summer as they do in winter because of higher heat and humidity.
To get the maximum floating life possible do these seven things:
| 1 |
Use SUPER HI-FLOAT.
It gives twice the floating life as regular HI-FLOAT under all weather conditions. |
| 2 |
Add the full recommended
amount of HI-FLOAT. Use the blue pump restrictor clip for 11-inch balloons. Adding less HI-FLOAT will shorten floating life. |
| 3 |
Inflate the balloons fully.
The balloon should float straight up when first inflated. If it leans to one side or doesn’t float at all, you probably have not inflated the balloon large enough. It is normal for the balloon to not have much upward lift when first inflated. However the upward pull will increase as the balloon dries over a couple of hours. |
| 4 |
In hot weather
keep balloons in an air conditioned location for at least the first few hours after inflation so they may dry quick ly. The lower humidity speeds drying. HI-FLOAT does not begin to hold in helium until it dries. Ideal drying temperature is 72 to 8O°F. Never put balloons inside a plastic bag since this will interfere with drying. Do not place balloons in a hot car or van. Run the air conditioner first to cool things down. |
| 5 |
In cold weather
keep balloons in a heated location for the first few hours after inflation. If it is too cold the balloons will not dry fast enough. Typical room temperature is adequate. |
| 6 |
Pearlized and
metallic colors float about a third less than regular colored balloons. If you need the maximum floating life possible, don’t use pearlized or metallic colors. Also, heart shaped, Geo Blossom® and Geo Donut® balloons float much less time than regular balloons. See additional instructions for treating these balloons on page 11. |
| 7 |
Hand tie the balloons. |
9
Clear or transparent balloons float about 25 percent longer than
solid colored balloons. Metallic and pearlized colors float about a
day less than other treated latex balloons. Heart shaped and
doughnut shaped balloons float less than half as long due to their
shape.
One final caution on floating life. Balloons inflated when the
helium cylinder is almost empty (less than 300 pounds pressure) may
not float as long as balloons inflated from a full cylinder.
Balloons don’t float when first inflated
Treated balloons should float straight up when first inflated.
If your balloon does not float straight up or leans to one side,
then you either have too much HI-FLOAT in the balloon or not enough
helium.
Check to make sure you are using the correct restriction clip on the
pump and that you are not using a helium/air mixture to fill the
balloon.
Make sure the balloon is fully inflated. The balloon should
be inflated until it begins to become pear shaped. Some people first
inflate their balloons with air to stretch them. They then inflate
them with helium. This allows the balloon to be inflated to a larger
size.
If the balloons still do not float well initially, then either don’t
push the pump down all the way or switch to the next longer size
restriction clip. This will reduce the amount of HI-FLOAT injected
into the balloon. However, it will also give less floating life.
Your balloons will get more buoyant as the HI-FLOAT dries. When
completely dry, the balloon will float with nearly the same upward
force as an untreated balloon.
Reducing splatter inside balloons
When using HI-FLOAT or SUPER HI-FLOAT in clear or transparent
balloons, some uneven runs of liquid may be visible initially. These
will gradually disappear as the coating dries.
This splatter can be minimized in a number of ways. Try inflating
the balloon more slowly with the helium nozzle pointed in a downward
direc tion. Also, when rubbing the balloon to spread the coating,
rub gently to avoid working bubbles into the liquid.
If the HI-FLOAT or SUPER HI-FLOAT is very old and has begun to get
very thick and stringy (gel) it will be more visible inside the
balloon. This gel can be redissolved by heating as described on page 13.
Special tips for using HI-FLOAT on decorating jobs
When treating balloons to decorate large areas such as reception
halls, shop ping centers, etc. it is always a good idea to test a
few balloons beforehand in the actual location where the
decorations will be in order to determine the actual floating life
under these conditions of humidity, temperature, etc.
10
In hot, humid weather many problems can be avoided if the air
conditioning system can be left on while the decorations are up. If this
is not possible, at least make sure the air-conditioning is on for
the first few hours after the decorations are finished. This will
speed drying and will give a much longer floating life.
Spiral arches filled with helium are difficult to do using HI-FLOAT
or SUPER HI-FLOAT since the balloons are bundled together and do not
dry quickly enough for a long float life. We recommend simple
balloon arches instead. Or, use an air-filled spiral arch supported
on PVC pipe.
Treating heart shaped, Geo Blossom® and Geo Donut® balloons
Heart shaped, Geo Blossom® and Geo Donut® balloons normally
float for a much shorter time than round balloons. To get the
maximum floating life with these balloons use the following
method:
Step 1. Inflate the balloon fully with air to stretch it, then
deflate it entirely.Step 2. Inject SUPER HI-FLOAT using the white clip for Geo
Blossom® and Geo Donut® balloons, or using the blue clip for
17-inch heart shaped balloons. (SUPER HI-FLOAT not recommended with
11-inch heart shaped balloons.)Step 3. Rub the balloon to spread the SUPER HI-FLOAT around.
Step 4. Inflate the balloon as large as possible with helium
and hand-tie.
Treating pearlized and metallic balloons
Pearlized and metallic balloons float about a third less time than
regular colored balloons. To get the maximum floating life possible
use one of the following methods:
Method 1. Inject the SUPER HI-FLOAT into the balloon the day
before it is to be inflated, using the correct pump clip. Rub
the balloon in the nor mal manner to spread the SUPER HI-FLOAT
around when it is injected into the balloon. Treat several balloons
in this manner and then gather them together by placing a rubber
band around their necks to keep the SUPER HI-FLOAT from drying out.
The next day briefly rub the balloon a second time and then inflate
with helium.Method 2. (will give about the same increase in floating time
as above.) Inflate the balloon with air to stretch it. Then deflate
the balloon, treat it with SUPER HI-FLOAT in the normal manner, and
inflate with helium.
11
HI-FLOAT and SUPER HI-FLOAT “beads up” inside balloon
HI-FLOAT and SUPER HI-FLOAT work well on all major brands of
latex balloons. However, occasionally we find a balloon which has an
oil coating which interferes with the HI-FLOAT wetting the inside
of the balloon. When this happens the HI-FLOAT or SUPER HI-FLOAT
“beads up” similar to water on a freshly waxed car. In this
case treatment gives very little increase in floating life. The
only solution is to use a different brand of balloon when using
HI-FLOAT or SUPER HI-FLOAT.
Shortly after inflating a balloon you may notice a haze or
cloudiness on the inside of the balloon. (Oxidation occurs on the
outside of the balloon.) This may be caused by adding less than the
full recommended amount of HI-FLOAT or SUPER HI-FLOAT. Make sure you
are using the correct colored clip for that size balloon.
Cleaning HI-FLOAT or SUPER HI-FLOAT
Allow adequate drying time for balloons to avoid clean-up jobs. We
recommend drying a couple of hours before giving to customers.
HI-FLOAT and SUPER HI-FLOAT are completely soluble in water, even
after they have dried. They dissolve much quicker in hot water.
On nonporous surfaces such as counter tops, allow spilled liquid to
dry then simply peel it up and discard.
On machine washable fabrics wash in warm or hot water if possible.
Presoak a few hours if the HI-FLOAT has completely dried.
For dry cleaning, you must inform the cleaner that the spot is
soluble in water and/or steam.
On upholstered fabrics the HI-FLOAT and SUPER HI-FLOAT can be
removed by dipping a toothbrush into a cup of hot water and rubbing
the spot to soften it. Then blot with a dry towel. Repeat wetting
and blotting several times as necessary. After drying, if any trace
remains, repeat the procedure. Brush felted fabrics to restore nap.
Product discolors in the bottle (mold)
A dark green mold can grow on the surface of HI-FLOAT or SUPER HI-
FLOAT in a bottle which has been opened for several months. This is
very similar to the mold which grows on bread. If this happens scoop
off and discard the discolored material. Quickly use the remainder
of the bottle.
Do not pour the small amount left in an old bottle into a new bottle
since this can seed the new bottle with mold. Wash off the pump when
transferring to a new bottle.
If mold is a recurring problem in your area, purchase HI-FLOAT or
SUPER HI-FLOAT in the quart size since this will be used more quickly.
12
A pump dispenser should last through several gallons of HI-FLOAT or
SUPER HI-FLOAT. The pump may be cleaned as follows:
- Unscrew the top of the pump and place both sections in a pan of
hot tap water. Let stand overnight.
- Rinse the pump parts with warm water. Make sure the air holes
under the threaded cap are clean. Reassemble.
Product gets too thick to pump (gel)
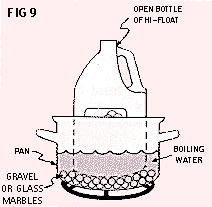 |
Normally HI-FLOAT and SUPER HI-FLOAT have the consistency of honey.
However, with excessive age it can begin to gel and will get very
thick and lumpy. If your product becomes too thick to pump, it can
be redissolved by heating as follows. Remove the pump or cap and
place the bottle in a pan of water as shown in Figure 9. Boil the
water in the pan for about two hours. This will heat the liquid
sufficiently to dissolve any gel. After cooling, the HI-FLOAT
should remain flowable for years.
WARNING! IMPORTANT SAFETY NOTES: |
Place a one-inch layer of gravel or glass marbles in the bottom of
the pan as shown in Fig. 9 to keep the plastic bottle from touching
the pan during heating.
Do not allow the water in the pan to boil dry since this will melt the
plastic bottle.
Do not heat the bottle without first removing the pump or bottle cap
since this could build up pressure and rupture the bottle resulting in
burns or serious injury. Heat only an open bottle.
Do not heat HI-FLOAT directly with gas or electrical heat since this
will scorch the HI-FLOAT and ruin it. The HI-FLOAT must be heated
by placing the bottle in a pan of heated water as shown in Figure 9.
Never heat HI-FLOAT in a microwave oven.
Allow the HI-FLOAT or SUPER HI-FLOAT to cool to room temperature
before handling to avoid the possibility of burns or injury.
13
ANSWERS TO FREQUENTLY ASKED QUESTIONS
HI-FLOAT and SUPER HI-FLOAT are not toxic. They are very similar to
the adhesive found on the back of postage stamps. Although
non-toxic, keep out of the reach of children. If splashed into the
eyes flush with water for several minutes.
The shelf life of HI-FLOAT or SUPER HI-FLOAT is at least a year
after purchasing for unopened bottles and at least three months
after the bottle is opened. Use your oldest material first to avoid
accumulating product with excessive age.
How many balloons will a gallon treat?
One gallon of HI-FLOAT or SUPER HI-FLOAT will treat the following
number of balloons.
| Balloon Size | Number |
|---|---|
| 9 inches |
11 inches
14 inches
16 inches1055
540
290
160
How much does it cost to treat a balloon?
The cost per balloon is shown below. This is based on a purchase
price of $29.00 per gallon.
| Balloon Size | Cost |
|---|---|
| 9 inches |
11 inches
14 inches
16 inches3 cents
5 cents
12 cents
18 cents
Most people charge extra for treated balloons. By charging just
25 cents extra to treat a balloon, you will earn over $100.00
extra profit for each gallon of HI-FLOAT you use!
14
How much to use in giant balloons?
| Balloon Size | Amount |
|---|---|
| 24 inches |
30 inches
36 inches
40 inches
48 inches
60 inches2 strokes with yellow clip
3 strokes with green clip
4 strokes with green clip
5 strokes with green clip
1 cup (add through funnel)
2 cups (add through funnel)
For maximum floating life keep balloons in a place of low humidity
the first several hours after inflation.
Does altitude affect floating life?
Yes. At high elevation less HI-FLOAT or SUPER HI-FLOAT should be
used in order for the balloons to float well initially. Use the next
size larger pump restriction clip than recommended in the
instructions. Or, use the technique for heart shaped balloons
explained on page 11.
Does HI-FLOAT work on Mylar balloons?
No. Mylar balloons are not buoyant enough and will not float when
treated. For very long floating life we recommend a 16-inch latex
balloon treated with SUPER HI-FLOAT.
Freezing does not affect the performance of HI-FLOAT or SUPER
HI-FLOAT liquid. Allow it to thaw for about a day at room
temperature before using. If balloons are to be taken outdoors in
extremely cold weather (below 0°F or -18°C) use
regular HI-FLOAT instead of SUPER HI-FLOAT.
What causes a large percentage of balloons to sometimes burst?
Sometimes, for no apparent reason several balloons begin bursting.
This may be caused by static electricity brought about by changing
weather conditions. This happens with or without HI-FLOAT. Try
spraying “Static Guard” around your work area to reduce balloon
loss.
Further questions can be answered by your distributor or by phoning
or writing the HI-FLOAT Co., 13025 Middletown Industrial Blvd.,
Louisville, Ky. 40223. Phone toll free (800) 57-FLOAT. You may also
purchase the HI-FLOAT Tips and Designs Video from your
distributor or by calling the HI-FLOAT Co. directly.
15
SPECIAL DESIGN TRICKS USING HI-FLOAT and SUPER HI-FLOAT
Try this technique to make some beautiful marbleized balloons that
resemble dyed Easter eggs as shown in Fig. 10.
Use the white clip on the pump to add HI-FLOAT or SUPER HI-FLOAT to
the inside of some 11-inch white latex balloons. Next add 2 or 3
drops of food coloring to the balloon such as red, yellow, or blue.
At first try just one color per balloon. Rub the outside of the
balloon to mix the food coloring and HI-FLOAT and spread it around.
Next inflate the balloon with air or helium in the usual manner.
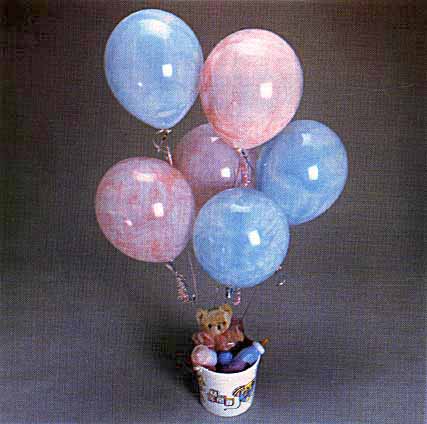
FIG. 10. FOOD COLORING BALLOON ARRANGEMENT
16
If you don’t like the color pattern, deflate the balloon, rub it
some more, and then reinflate it to get a different pattern. No two
are alike!
For a more elegant look use pearlized white balloons instead of
plain white. Use a little less HI-FLOAT since these balloons will
not inflate as large as plain white.
You will be surprised at the beauty of these custom colored
balloons. By blending you can make any color you want. The colors
will darken slight ly on drying. If “runs” form use slightly
less HI-FLOAT. For a variation, use clear balloons instead of white
ones and add a little glitter for added sparkle. Or, use with pastel
colored balloons to achieve many beautiful colors.
Confetti on inside of clear balloons
The very festive and eye-catching arrangement shown in Fig.11 can be
made by putting colored Mylar confetti in balloons as follows. Add
HI-FLOAT or SUPER HI-FLOAT to 16-inch clear balloon using the blue
pump restriction clip. Rub the outside of the balloon in the usual
manner to spread the coating over the inside surface. Then blow a
puff or air into the balloon so the sides are not touching.
Next add about one-third of a cup of chopped mylar or other soft
confetti into the balloon through a canning funnel. You can make
this confetti by cutting up some old Mylar balloons which have
popped, or you may buy it already chopped from several distributors.
Then inflate the balloon with helium to about the size of a
grapefruit. Shake it vigorously to spread the confetti uniformly
around inside the balloon.
Finally, inflate the balloon the rest of the way with helium and tie
it with rainbow curling ribbon. Attach several of these balloons to
a bottle of jelly- beans for a really colorful arrangement.
The key to getting the confetti uniformly spread over the inside of
the balloon without forming “clumps” is to avoid rubbing
the balloon after the confetti is added. Instead, inflate the
balloon slightly and shake it.
This same technique can be used to put sparkling “glitter”
inside the balloon.
Note: It is always a good idea to wear protective eyewear when
working with confetti.
17

FIG. 11 CONFETTI ON INSIDE OF CLEAR BALLOON
18
Confetti on outside of balloons
To make balloons with confetti on the outside as shown in Fig. 12
place the balloon to be coated on a pencil as shown in Fig.7 and dip
it into a glass of pure HI-FLOAT. Withdraw the balloon and let it
drain a couple of minutes.
As you inflate the balloon it will stop dripping. The outside
coating of HI- FLOAT will remain wet and sticky for about twenty
minutes. You can sprinkle confetti or glitter on the outside of the
balloon during this time. Be careful not to use too much or the
balloon will get heavy and will not float.
Since the balloon is still wet you will need to be careful to tie it
without touching the sides and you will want to keep it from
touching other bal loons for about a half an hour.
Warning: Air-filled balloons having an external coating of HI-FLOAT
must be kept in an air-conditioned location in hot weather. Exposure
to heat and/or high humidity can cause the balloon to burst or
deflate prematurely.
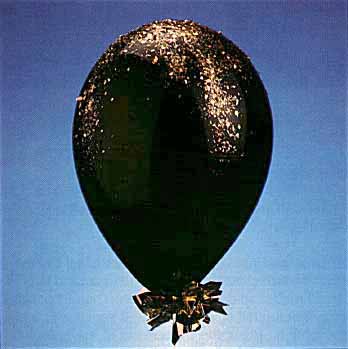
FIG. 12. CONFETTI ON OUTSIDE OF BALLOON
19
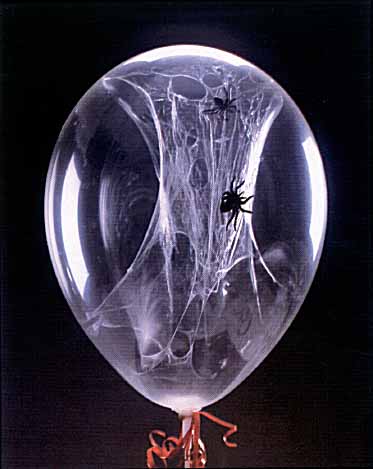
For a really great item at Halloween make some clear balloons with
spiders and webs inside as shown in Fig. 13.
First inject a little less than the usual amount of HI-FLOAT or
SUPER HI-FLOAT in an 11-inch clear balloon, and rub it around to
coat the inside. Next put a small rubber spider in the balloon. Then
inflate the balloon to about 75 percent of the full size with air,
and seal it with a plastic disc or clip. Let dry overnight. Place
the balloon out in the open where there is good air circulation. It
must be very dry in order to form the spider web.
20
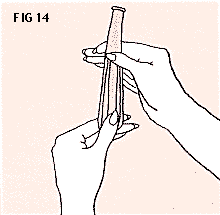
The next day remove the clip and deflate the balloon. Hold it by the
stem and the top as shown in Fig. 14 and stretch it a few times to
separate the dry film from the wall of the balloon. Then slowly
inflate it with helium. When it gets to about full size the HI-FLOAT
film will separate from the wall in several places and hang inside
the balloon to form a spider web. If the coating does not separate,
deflate the balloon, stretch it a couple of more times and reinflate
it.
This takes a little practice, but once you’ve mastered it almost
every balloon turns out beautifully.
Since the HI-FLOAT coating inside the balloon is no longer intact,
the balloon will not have an extended floating life. A long lasting
product can be made by inflating the balloon with air instead of
helium and putting it on a cup and stick. Use the dilute coating
technique on the outside to keep it from oxidizing. It should last
for weeks.
Double-stuffed and gumball balloons
To increase the floating time of a double stuffed balloon (an
11-inch col ored balloon inside a 16-inch clear balloon) or a
gumball balloon (sever al 5-inch colored balloons inside a 16-inch
clear balloon) use the follow ing method:
Step 1. Treat the inside of the 16-inch clear balloon with
SUPER HI-FLOAT using the green clip. Inflate the balloon with
helium and seal with a plastic clip or disc.Step 2. Allow the balloon to dry for at least twenty-four
hours. Then remove the clip, letting only a little helium escape.
Insert the smaller 5-inch balloons or the 11-inch balloon. Replace
any lost helium and hand-tie the 16-inch balloon. Note: the
SUPER HI-FLOAT should be completely dry inside the 16-inch balloon
before inserting smaller balloons.
21
| arches | 11 |
| altitude, effect of | 15 |
| balloons won’t float | 10 |
| basic direction | 2 |
| bursting balloons | 15 |
| cleaning HI-FLOAT | 12 |
| cost to use | 14 |
| confetti balloons | |
| -confetti on inside | 17 |
| -confetti on outside | 19 |
| decorating job tips | 10 |
| double-stuffed balloons | 21 |
| “dry” method | 4 |
| float life, maximum | 9 |
| floating life table | 1 |
| food coloring balloon | 16 |
| freezing HI-FLOAT and SUPER HI-FLOAT | 15 |
| further help | 15 |
| Geo Blossoms® and Geo Donuts® | 11 |
| giant balloons | 15 |
| gumball balloons | 21 |
| haze on inside of balloon | 12 |
| heart shaped balloons | 11 |
| HI-FLOAT beads up inside balloon | 12 |
| how many balloons per gallon | 14 |
| metallic balloons | 11 |
| mold | 12 |
| Mylar balloons | 15 |
| outside coating | |
| -after inflation | 5 |
| -before inflation | 8 |
| pearlized balloons | 11 |
| pump | 13 |
| -cleaning | 13 |
| -restriction clips | 2 |
| safety | 1,14 |
| shelf life | 14 |
| spider web balloon | 20 |
| spiral arches | 11 |
| splatter, reducing | 10 |
| static electricity | 15 |
| SUPER HI-FLOAT, when to use | 1 |
| toxicity | 1,14 |
| wetting | 11 |
Acknowledgements: We thank the following creative artists for
their designs and tips shown in this book:
Shirley Diagre
Sherri Hankins
Debra Paulk
Bob Smith
Carol Smith
Charles Story
LIMITED WARRANTY |
HI-FLOAT and SUPER HI-FLOAT are effective if used as instructed.
With the exception of this warranty, there are no other warranties,
express or implied, including warranties of merchantability or
fitness for a particular purpose. The HI-FLOAT Com pany cannot be
responsible for use of the product after purchase. Purchaser’s
remedies shall be limited to refund of purchase price and, in no
event shall the HI-FLOAT Company be liable for any amount in excess
of the original purchase price of the product or for any incidental
or consequential damages.
HI-FLOAT and SUPER HI-FLOAT are registered trademarks of the HI-FLOAT Co., Inc.
Revised Dec. 1999 ©1987 HI-FLOAT
 |
Bulk Rate |
PAID
Permit #78
Louisville, KY
13025 MIDDLETOWN INDUSTRIAL BLVD.
LOUISVILLE, KENTUCKY 40223

Web Version by Mark Balzer, 6/11/2000